> ## Documentation Index
> Fetch the complete documentation index at: https://support.pexcard.com/llms.txt
> Use this file to discover all available pages before exploring further.
# Connector for CMiC
> Auto-sync purchases and receipt images from PEX into CMiC. Map Job/Dept/Eqp., Cost Code/Account/Category, Cost Type/Tran Code, and other CMiC fields to PEX tags.
To configure this integration, you don't even need to wait for your account manager. You can get started right away with just your CMiC and PEX credentials.
## Prerequisites
To sync PEX transactions to CMiC, you need the Job Costing Module and Document Management Module enabled in CMiC. With the Enterprise plan, you need a license for CMiC ECN Application and setup config.
## Connect PEX and CMiC
To connect your PEX and your CMiC accounts from the PEX Marketplace follow these steps:
Log in to [http://dashboard.pexcard.com/](http://dashboard.pexcard.com/?utm_source=support)
Navigate to [Apps > Available](https://dashboard.pexcard.com/apps/available?utm_source=support)
Locate **Connector for CMiC**.
Click **More info > Install > Launch**.
* You'll be re-directed you to a **Connect** tab.
Click **Manage credentials**.
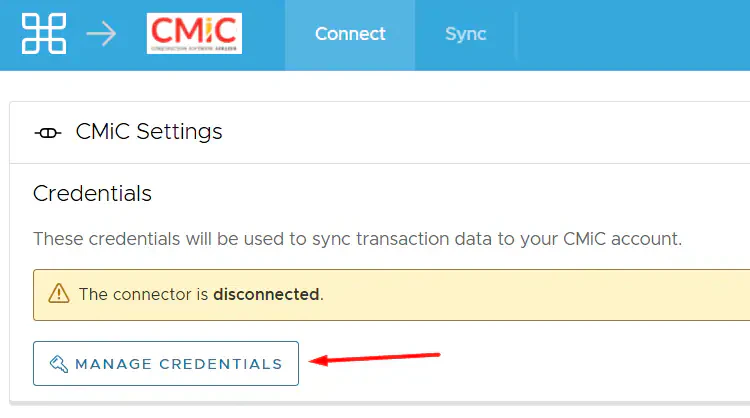 Enter your CMiC username and CMiC password in the popup window.
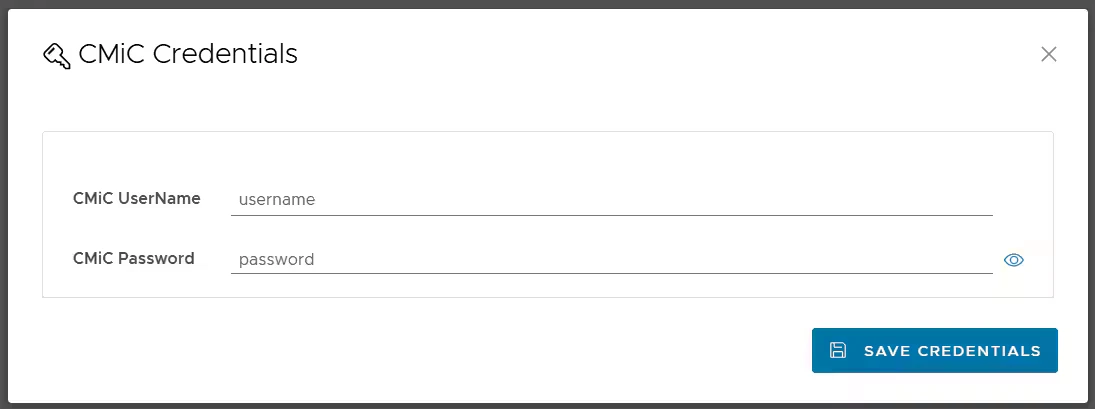 Click **Save credentials**.
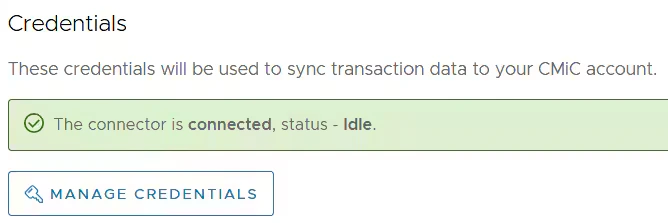
You will see the success message.
Click **Save credentials**.
You will see the success message.
 ## Configure Transaction Settings
On the Transaction Settings card, you can configure the **Start Date** and **End Date**.
Start date:
* Must be less than 1 year ago (if today is Nov 30, 2024 then you can not go further back than Nov 30, 2023).
* Leave empty to default 2 months back.
* Auto-sync will always process 2 months back.
End Date:
* Leave empty to default to the time of sync.
* Temporarily pick a small date range for testing and reconciliation purposes.
For PEX to know which company to sync transactions to, select a **CMiC company** if it is not already prepopulated. Also, select an **AP Invoice Location** if it is not already prepopulated.
Now decide if you want to:
* Sync all purchases or only approved purchases
* "Only approved" means that purchases must be approved in PEX before syncing to CMiC.
* Only sync purchases with attachments
* Purchases must have an attachment before syncing to CMiC. If this box is unchecked, a default attachment will be used if a purchase does not have an attachment.
Choose a **vendor** for purchases. Every purchase will sync with the same vendor you select in this field. Consider creating a new vendor named "PEX" in CMiC if you would like to book all of your PEX purchases against a single vendor.
**Purchase Field Mappings**
In this table, you need to map CMiC fields so the connector knows which values to use when syncing purchases to CMiC:
* The "Group Code", "Valid Flag", and "Type Code" fields can be mapped only to static values.
* The "Job/Dept/Eqp.", "Cost Code/Account/Category", and "Cost Type/Tran Code" fields can be mapped to static values or PEX Tags.
If you choose to use PEX tags, you must create them in advance, following the logic described in the ["Create PEX tags for CMiC"](/administrator-guide/create-pex-tags-for-cmic) article.
For example, the "Job/Dept/Eqp." is one of the fields on your Purchase:
* Mapping the "Job/Dept/Eqp." to a static value means that you can select one Job/Department/Equipment out of the many presented in CMiC, and that value ("NYC Office Renovation" in our example below) will be applied to all PEX purchases.
## Configure Transaction Settings
On the Transaction Settings card, you can configure the **Start Date** and **End Date**.
Start date:
* Must be less than 1 year ago (if today is Nov 30, 2024 then you can not go further back than Nov 30, 2023).
* Leave empty to default 2 months back.
* Auto-sync will always process 2 months back.
End Date:
* Leave empty to default to the time of sync.
* Temporarily pick a small date range for testing and reconciliation purposes.
For PEX to know which company to sync transactions to, select a **CMiC company** if it is not already prepopulated. Also, select an **AP Invoice Location** if it is not already prepopulated.
Now decide if you want to:
* Sync all purchases or only approved purchases
* "Only approved" means that purchases must be approved in PEX before syncing to CMiC.
* Only sync purchases with attachments
* Purchases must have an attachment before syncing to CMiC. If this box is unchecked, a default attachment will be used if a purchase does not have an attachment.
Choose a **vendor** for purchases. Every purchase will sync with the same vendor you select in this field. Consider creating a new vendor named "PEX" in CMiC if you would like to book all of your PEX purchases against a single vendor.
**Purchase Field Mappings**
In this table, you need to map CMiC fields so the connector knows which values to use when syncing purchases to CMiC:
* The "Group Code", "Valid Flag", and "Type Code" fields can be mapped only to static values.
* The "Job/Dept/Eqp.", "Cost Code/Account/Category", and "Cost Type/Tran Code" fields can be mapped to static values or PEX Tags.
If you choose to use PEX tags, you must create them in advance, following the logic described in the ["Create PEX tags for CMiC"](/administrator-guide/create-pex-tags-for-cmic) article.
For example, the "Job/Dept/Eqp." is one of the fields on your Purchase:
* Mapping the "Job/Dept/Eqp." to a static value means that you can select one Job/Department/Equipment out of the many presented in CMiC, and that value ("NYC Office Renovation" in our example below) will be applied to all PEX purchases.
 **Note:**
Note that a purchase will not be tagged with this static value. You will not see this static value on the purchase details. The static value will be used only when syncing a purchase to CMiC.
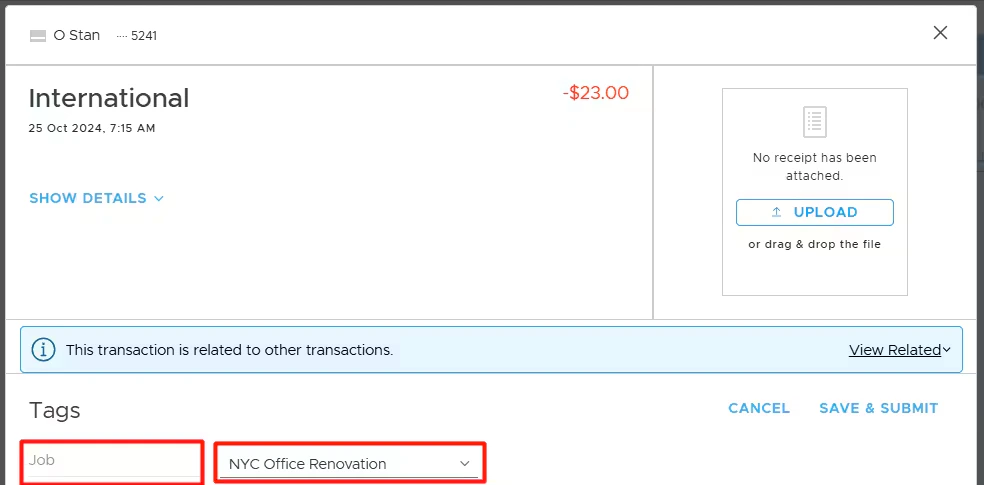
* Mapping the "Job/Dept/Eqp." to a PEX tag ("Job" in our example below) means that you and your cardholders can select one of the tag values for each purchase.
**Note:**
Note that a purchase will not be tagged with this static value. You will not see this static value on the purchase details. The static value will be used only when syncing a purchase to CMiC.
* Mapping the "Job/Dept/Eqp." to a PEX tag ("Job" in our example below) means that you and your cardholders can select one of the tag values for each purchase.
 For that go to the "Transactions" menu -> locate a purchase -> click on it -> select a tag value ("NYC Office Renovation" in our example below) of the "Job" tag -> click "Save". Note that you and your cardholders can select one of the tag values for each purchase once you finish the CMiC connector setup and sync tag options from CMiC to PEX.
 When mapping to a tag, you can also specify a default "Job/Dept/Eqp." value: for example, Downtown Hospital Expansion Phase 2, as highlighted below.
 **Note:**
Note that a purchase will not be tagged with this default value ("Downtown Hospital Expansion Phase 2" in our example) on the purchase details. It means that if you or your cardholders forget to tag a purchase before it is synced to CMiC, the default value ("Downtown Hospital Expansion Phase 2" in our example) will be applied to this purchase during the sync.
If you or your cardholders do tag a purchase with the tag option from the tag chosen in the highlighted field below,
**Note:**
Note that a purchase will not be tagged with this default value ("Downtown Hospital Expansion Phase 2" in our example) on the purchase details. It means that if you or your cardholders forget to tag a purchase before it is synced to CMiC, the default value ("Downtown Hospital Expansion Phase 2" in our example) will be applied to this purchase during the sync.
If you or your cardholders do tag a purchase with the tag option from the tag chosen in the highlighted field below,
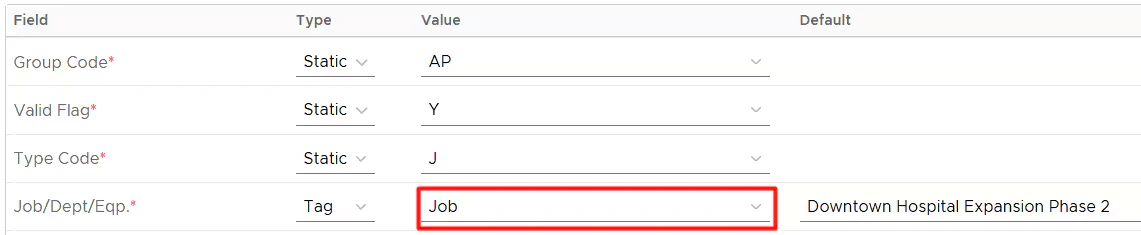 that specific purchase will be recorded against the tag option ("NYC Office Renovation" in our example below) you tagged the purchase with. Tags take precedence over default values.
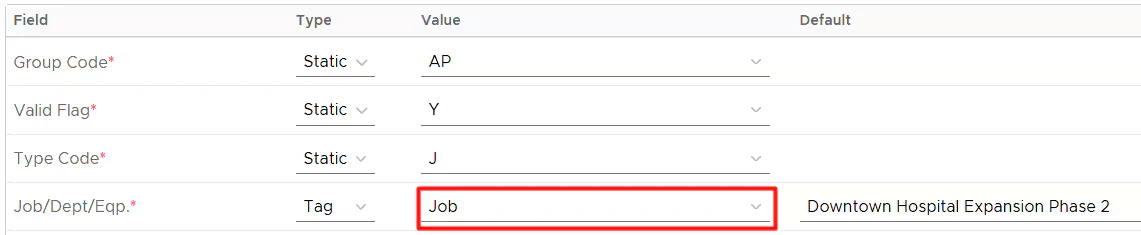 * Enable the sync toggle to sync field values from CMiC into PEX as tag options.
 For example, the values for the PEX tag "Job" (in [Tag Manager](https://dashboard.pexcard.com/business-settings/tag-manager?utm_source=support)) will be populated with the names of your CMiC jobs.
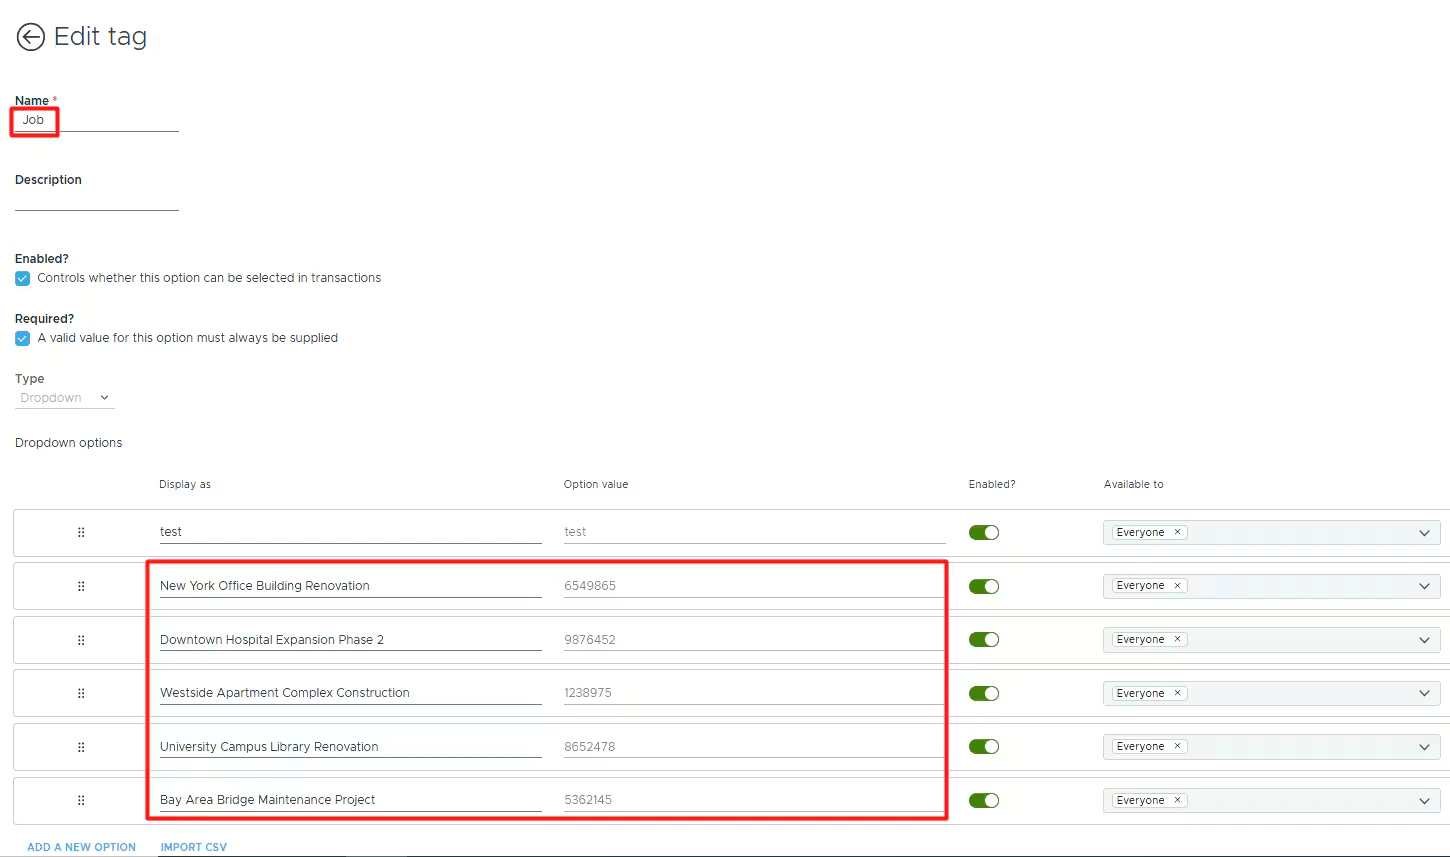 Click **Save**. PEX will redirect you to the **Sync tab**.
## Sync to CMiC
In the Sync tab, you can:
View the last synchronization time.
Manually sync by clicking "**Execute**".
Click **Save**. PEX will redirect you to the **Sync tab**.
## Sync to CMiC
In the Sync tab, you can:
View the last synchronization time.
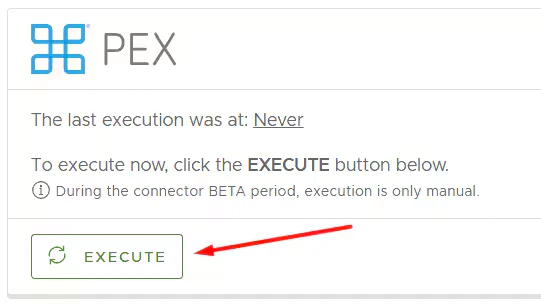
Manually sync by clicking "**Execute**".
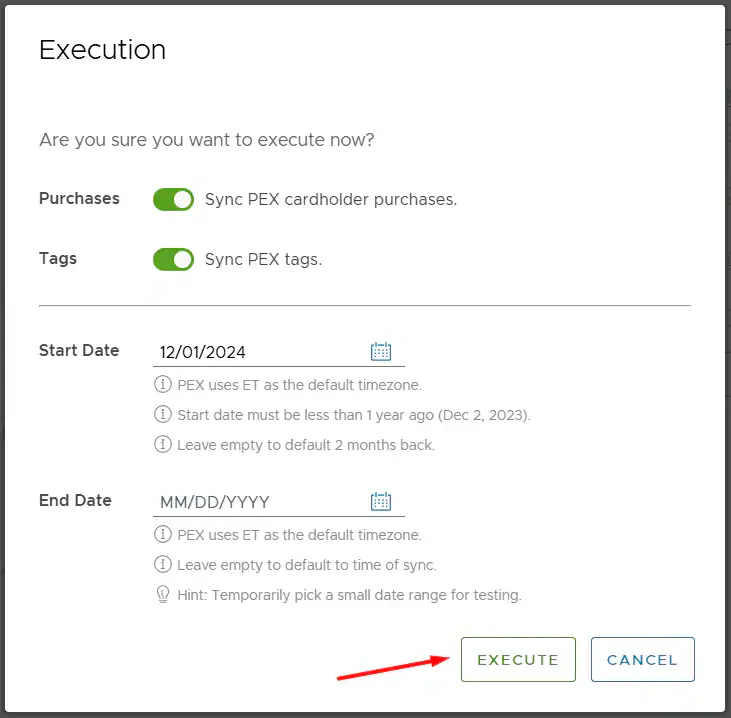 View **Connection** info.
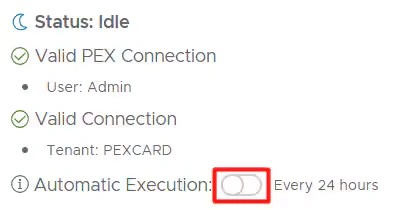
Enable/disable auto-sync.
* Enabled: Transactions sync automatically every 24 hours.
* Disabled: Transactions will not sync automatically.
View **Connection** info.
Enable/disable auto-sync.
* Enabled: Transactions sync automatically every 24 hours.
* Disabled: Transactions will not sync automatically.
 Disconnect.
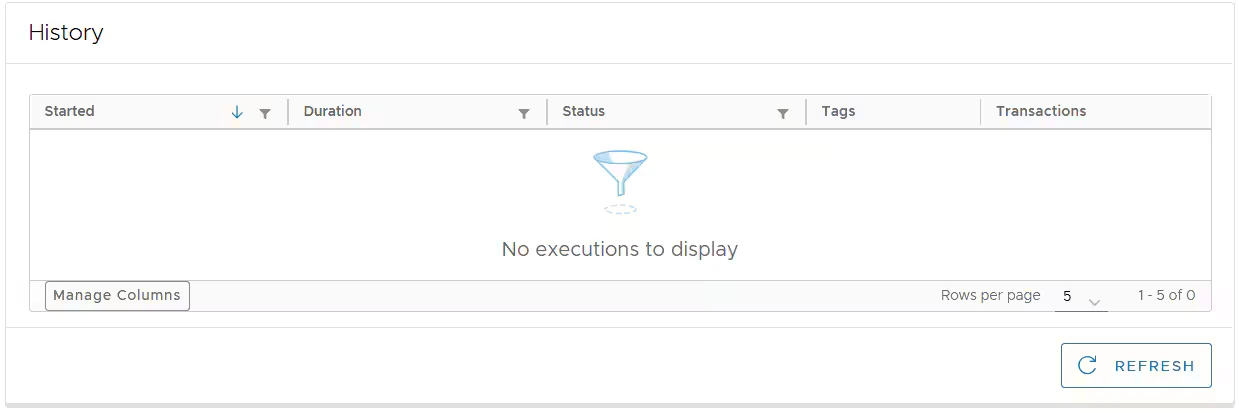
View the **History** of transactions synced to CMiC.
Disconnect.
View the **History** of transactions synced to CMiC.
 View Settings information
Edit settings if necessary.
**Auto-sync**
Auto-sync will always process transactions based on the start date specified on the **Connect tab**, with a maximum limit of 2 months back from today. If there is no start date specified on the **Connect tab** then auto-sync will sync transactions up to 2 months back from today.
**Manual sync**
Manual sync will process transactions based on the start date specified on the **Connect tab**, with a limit of 1 year back from today. If there is no start date specified on the **Connect tab** then manual sync will process transactions only up to 2 months back from today.
## Auto Tagger
The Auto Tagger app is a great complement to CMiC. It allows you to create rules that auto-tag purchases. [Learn more.](/administrator-guide/pex-auto-tagger)
## View Transactions and Receipts in CMiC
Log into CMiC account and navigate to *Enterprise ->* *Enterprise Content Management -> Image Manager ->*
View Settings information
Edit settings if necessary.
**Auto-sync**
Auto-sync will always process transactions based on the start date specified on the **Connect tab**, with a maximum limit of 2 months back from today. If there is no start date specified on the **Connect tab** then auto-sync will sync transactions up to 2 months back from today.
**Manual sync**
Manual sync will process transactions based on the start date specified on the **Connect tab**, with a limit of 1 year back from today. If there is no start date specified on the **Connect tab** then manual sync will process transactions only up to 2 months back from today.
## Auto Tagger
The Auto Tagger app is a great complement to CMiC. It allows you to create rules that auto-tag purchases. [Learn more.](/administrator-guide/pex-auto-tagger)
## View Transactions and Receipts in CMiC
Log into CMiC account and navigate to *Enterprise ->* *Enterprise Content Management -> Image Manager ->*
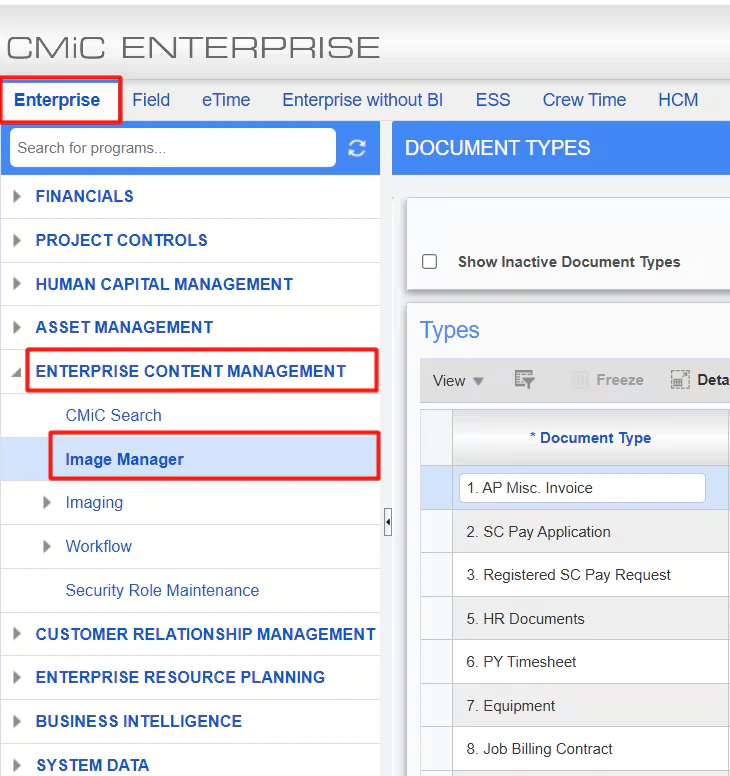 *-> select your folder ->*
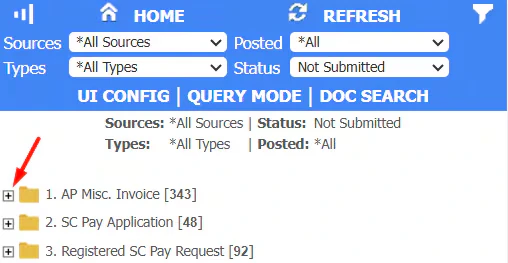 *-> click on a transaction* to view it.
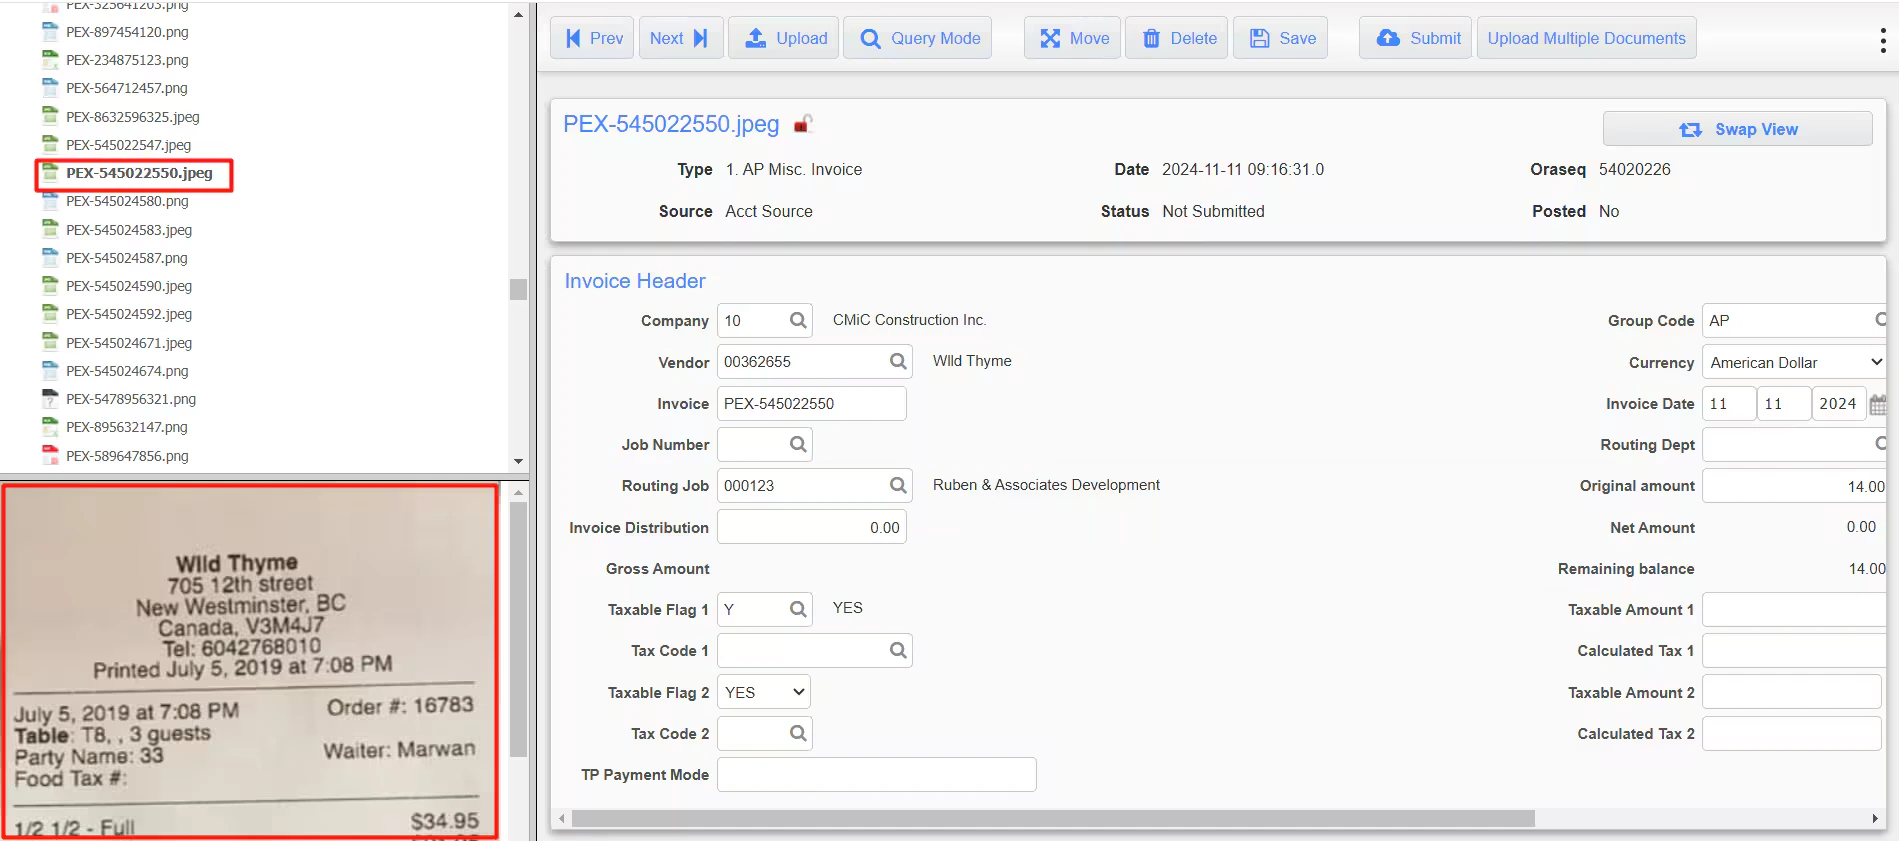
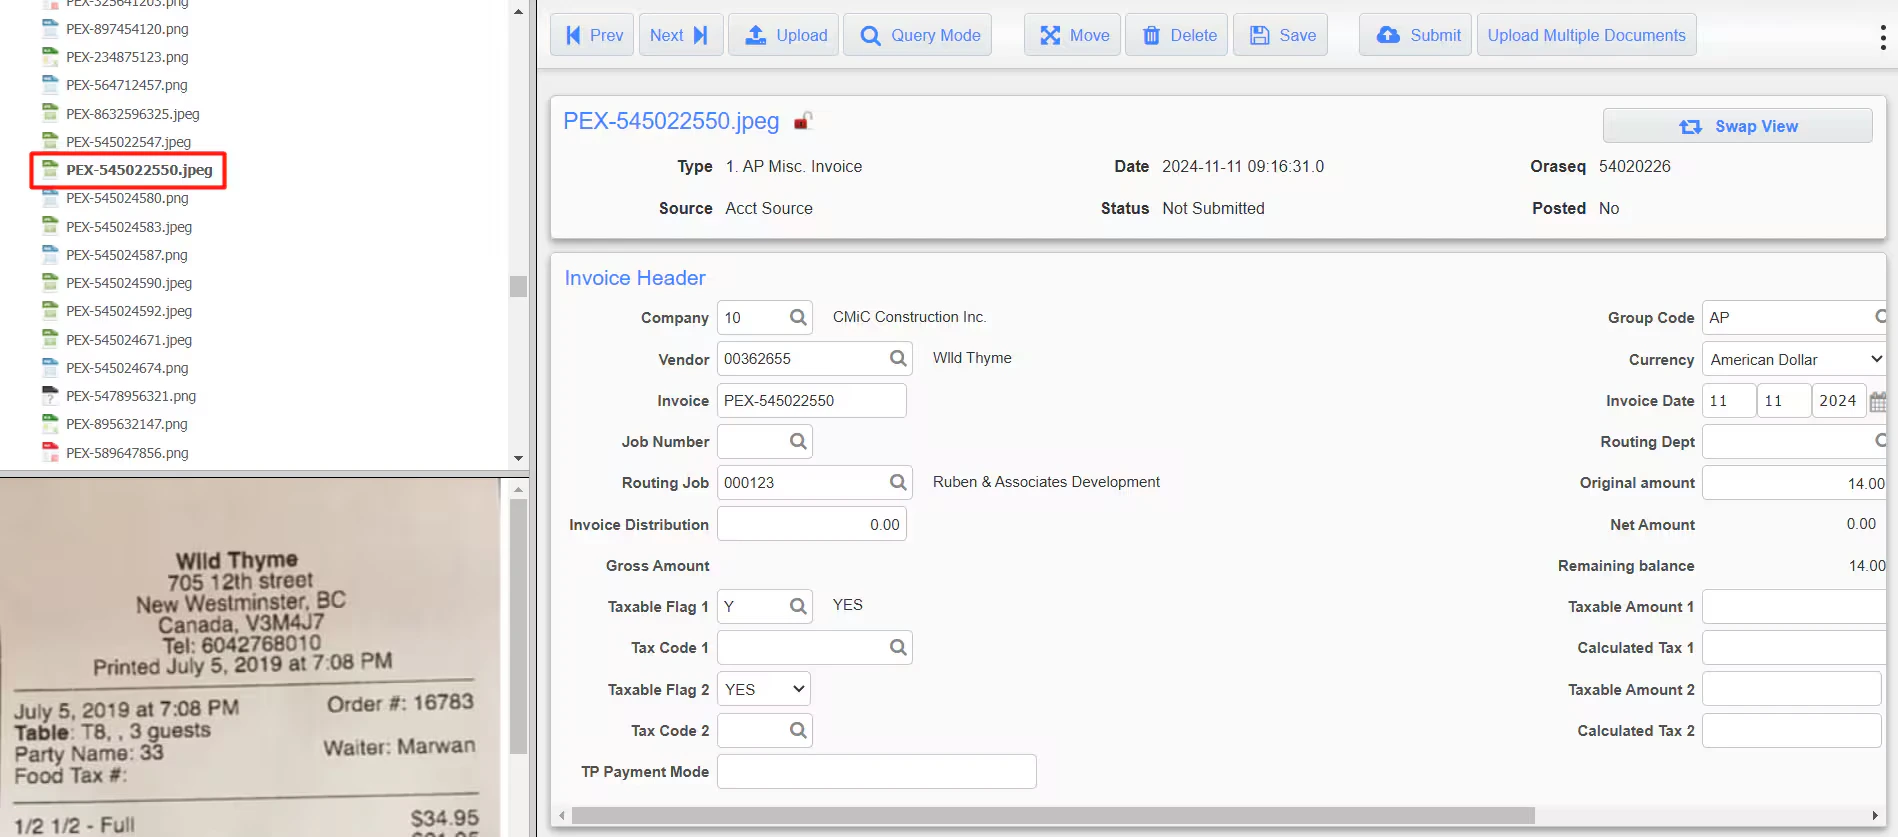 You can find and view the receipt on the left.
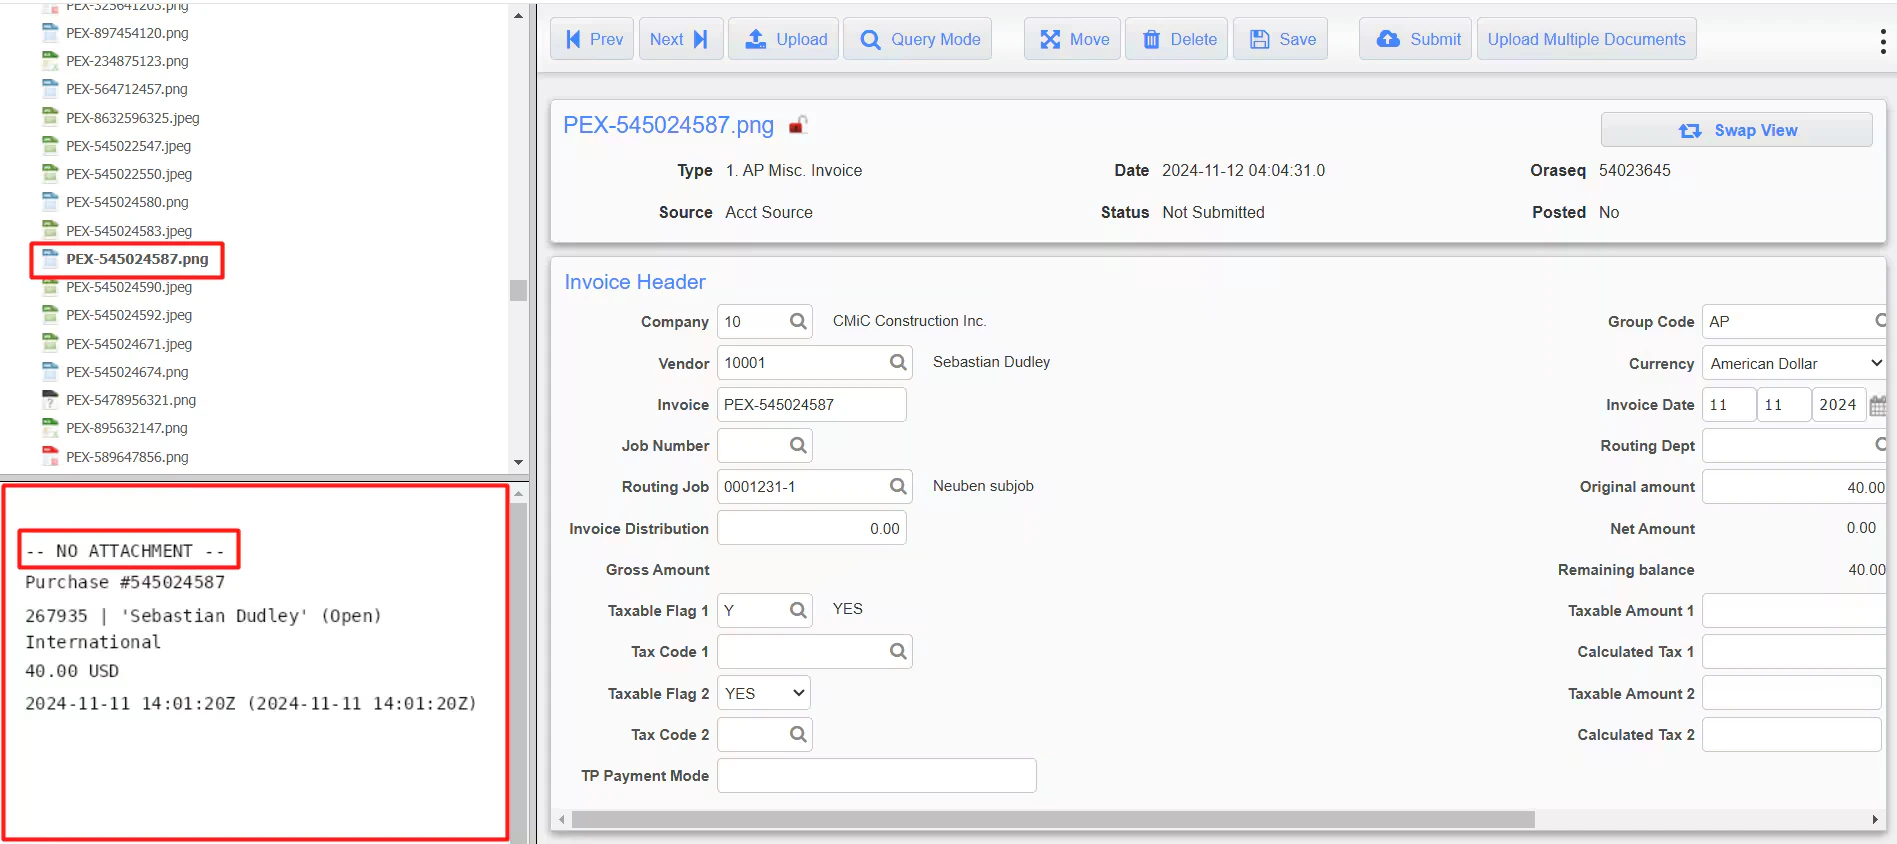
 If a transaction does not have a receipt, you will see **No Attachment** title.
 ## FAQ
Auto-sync is not available during the connector BETA period.
Only purchases in a settled status are synced.
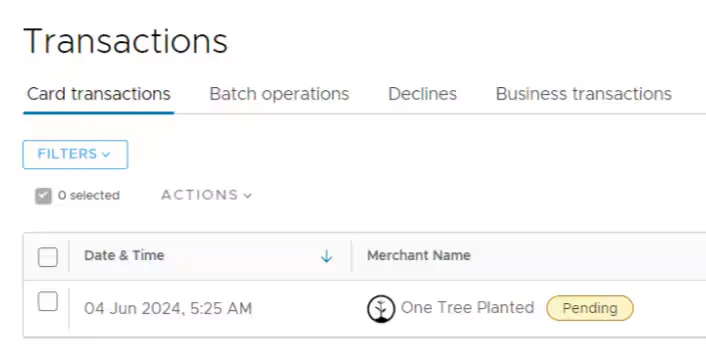
No. Only transactions in settled status get synced to your account. If you see a "Pending" label next to the merchant name as shown on the screen below, then the transaction is still in the pending status.
## FAQ
Auto-sync is not available during the connector BETA period.
Only purchases in a settled status are synced.
No. Only transactions in settled status get synced to your account. If you see a "Pending" label next to the merchant name as shown on the screen below, then the transaction is still in the pending status.
 Yes. If you prefer not to manually tag each transaction, PEX Auto Tagger offers a solution. This app allows you to create dynamic rules that automatically tag transactions. [Learn more](/administrator-guide/pex-auto-tagger).
We strongly recommend using automatic sync of tag options from CMiC to PEX. This will keep your PEX tags and CMiC fields in sync. For more information, check out the support article ["Create PEX tags for CMiC"](/administrator-guide/create-pex-tags-for-cmic) to add tags and test tag options.
Once added, enable "Sync Tag" for fields with the Type set to Tag (as shown in the example below).
Yes. If you prefer not to manually tag each transaction, PEX Auto Tagger offers a solution. This app allows you to create dynamic rules that automatically tag transactions. [Learn more](/administrator-guide/pex-auto-tagger).
We strongly recommend using automatic sync of tag options from CMiC to PEX. This will keep your PEX tags and CMiC fields in sync. For more information, check out the support article ["Create PEX tags for CMiC"](/administrator-guide/create-pex-tags-for-cmic) to add tags and test tag options.
Once added, enable "Sync Tag" for fields with the Type set to Tag (as shown in the example below).
 We strongly recommend using automatic sync of tag options from CMiC to PEX. This will keep your PEX tags and CMiC fields in sync. For more information, check out the support article [.](/administrator-guide/create-pex-tags-for-cmic)
Every synced transaction has a "Synced with CMiC" note. As long as you don't remove the "Synced with CMiC" note on a transaction, it will not re-sync to your CMiC account.
Didn't find the answer you were looking for? Check out our [Accounting Software Connector Troubleshooting](/administrator-guide/accounting-software-connector-troubleshooting) article.
## Support & Inquiries
For any questions or for more information, please email [appsupport+cmic@pexcard.com](mailto:appsupport+cmic@pexcard.com)
We strongly recommend using automatic sync of tag options from CMiC to PEX. This will keep your PEX tags and CMiC fields in sync. For more information, check out the support article [.](/administrator-guide/create-pex-tags-for-cmic)
Every synced transaction has a "Synced with CMiC" note. As long as you don't remove the "Synced with CMiC" note on a transaction, it will not re-sync to your CMiC account.
Didn't find the answer you were looking for? Check out our [Accounting Software Connector Troubleshooting](/administrator-guide/accounting-software-connector-troubleshooting) article.
## Support & Inquiries
For any questions or for more information, please email [appsupport+cmic@pexcard.com](mailto:appsupport+cmic@pexcard.com)