> ## Documentation Index
> Fetch the complete documentation index at: https://support.pexcard.com/llms.txt
> Use this file to discover all available pages before exploring further.
# Connector for Microsoft Dynamics 365
> Auto-sync purchases, transfers, fees, rebates and receipt images from PEX into Microsoft Dynamics 365 Business Central, ensuring your data is clean, accurate and up to date. Map Dynamics 365 fields such as Accounts, Vendors, Classes, Departments and Locations to PEX tags. Custom fields are also supported. Receipt images are stored directly in the Dynamics 365 Journal Entry to serve as your system of record.
No need to contact your account manager—get started immediately with your Dynamics 365 and PEX credentials.
## Create General Journal in Dynamics 365
Before transactions can sync from PEX, you must create a General Journal in Dynamics 365 Business Central for the connector to post entries to.
Go to **Finance →** **General Journals**
On the **General Journals** page, click **+ New** in the toolbar.
Fill in the following fields:
* **Name:** `PEX Card. `
* **Description:** Enter a description (e.g., `PEX Card Journal`).
* **Bal. Account Type:** Select `G/L Account. `
Leave the remaining fields (Bal. Account No., No. Series, Posting No. Series, Reason Code) blank unless your organization requires them.
Close the page. Your new journal is now available for the PEX connector.
**Note:**
The journal name must be `PEX Card` for transactions to sync.
## Connect PEX and Dynamics 365
Log in to [dashboard.pexcard.com](http://dashboard.pexcard.com/?utm_source=support)
Go to [Apps > Available](https://dashboard.pexcard.com/apps/available?utm_source=support)
Find **Connector for Dynamics 365**
Click **More info > Install > Launch** (redirects to the Connect tab)
Click **CONNECT**
**Note:**
You need these permissions: *Edit business settings & apps*, *Manage cardholder*, *View card transactions*. Enable them in [My Profile > Permissions](https://dashboard.pexcard.com/account/permissions?utm_source=support).
PEX connects via secure OAuth:
A popup prompts you to sign in with your Microsoft account. Use an account with admin access to your Business Central environment.
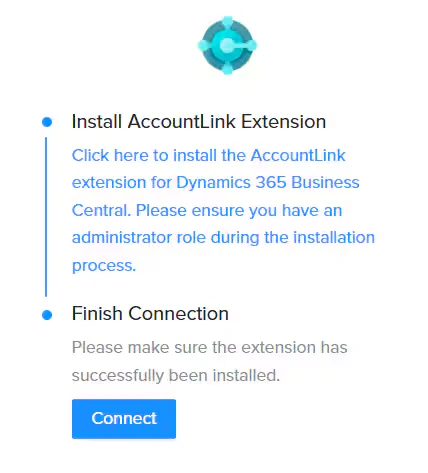
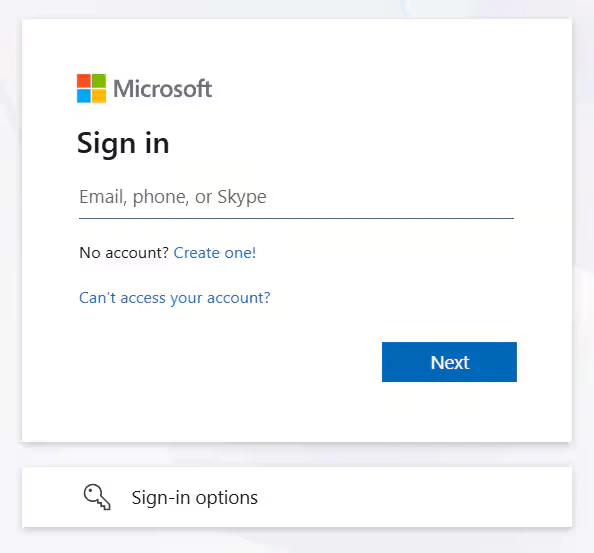 Authorize PEX to access your Dynamics 365 data.
PEX processes the connection. Status shows **Connected: Not Ready** for a few minutes,
Authorize PEX to access your Dynamics 365 data.
PEX processes the connection. Status shows **Connected: Not Ready** for a few minutes,
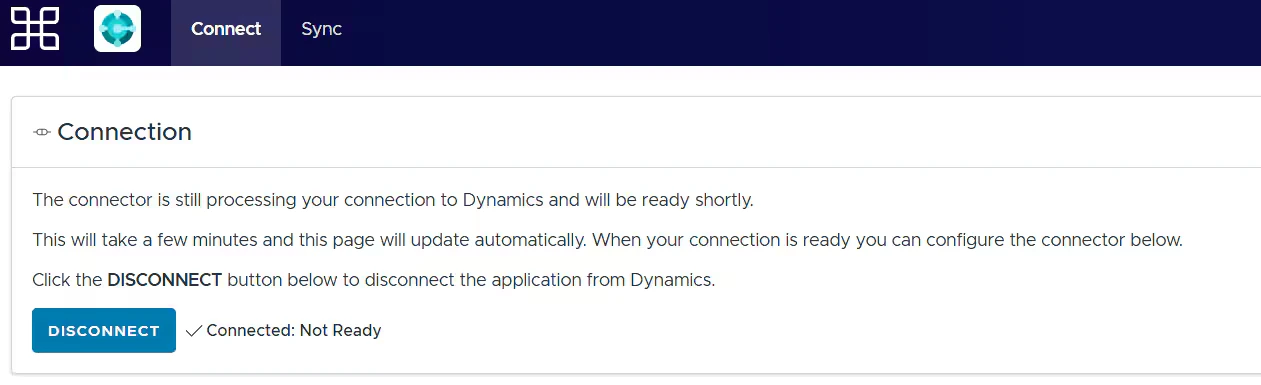 then updates to **Connected: Ready** automatically.
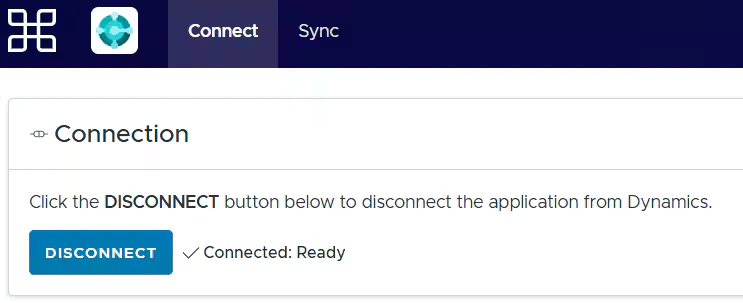 **Note:**
For multiple PEX accounts connecting to the same Dynamics 365 tenant, you can link an existing connection instead of re-authenticating.
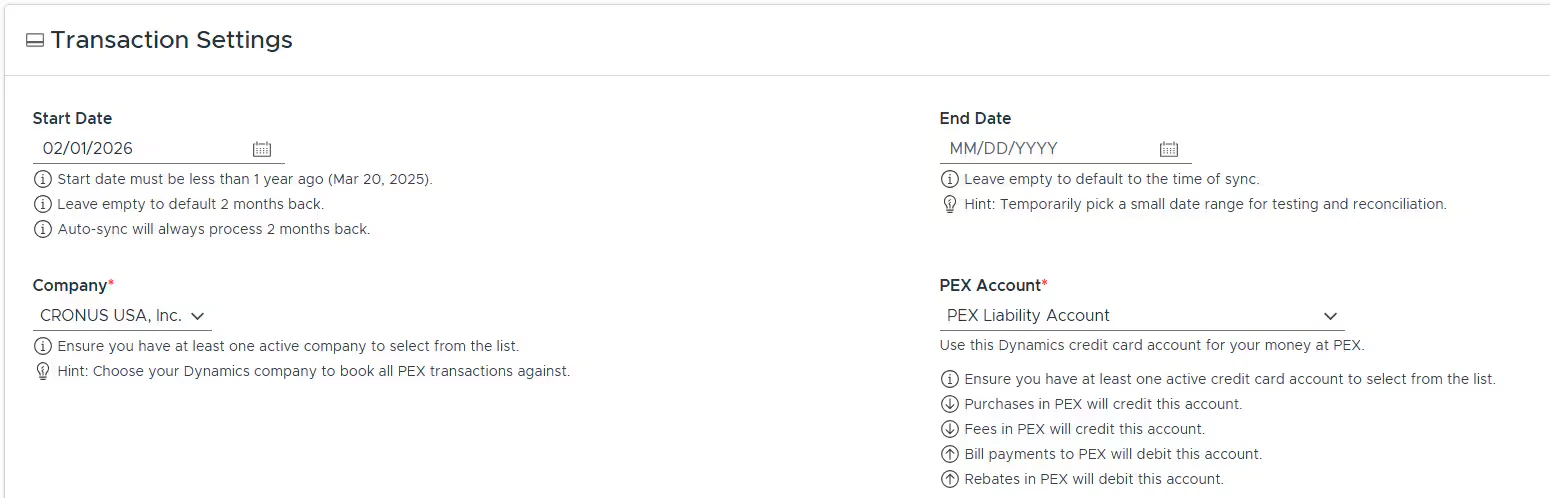
## Configure Transaction Settings
**Start Date:**
* Transactions on/after this date will sync.
* Maximum 1 year back from today.
* Defaults to 2 months back if left empty.
* Auto-sync always processes 2 months back.
**End Date:**
* Transactions on/before this date will sync.
* Defaults to time of sync if left empty.
* Use a narrow range for testing/reconciliation.
**Company:** Select the Dynamics 365 company to book all PEX transactions against.
* Ensure you have at least one active company to select from the list.
**PEX Account:** Select the Dynamics 365 liability account for your PEX funds.
* Ensure you have at least one active liability account to select from the list.
* Bill payments to PEX will reduce the amount owed on this account.
* Purchases in PEX will be charged to this account.
* Fees in PEX will be charged to this account.
* Rebates from PEX will reduce the amount owed on this account.
**Note:**
For multiple PEX accounts connecting to the same Dynamics 365 tenant, you can link an existing connection instead of re-authenticating.
## Configure Transaction Settings
**Start Date:**
* Transactions on/after this date will sync.
* Maximum 1 year back from today.
* Defaults to 2 months back if left empty.
* Auto-sync always processes 2 months back.
**End Date:**
* Transactions on/before this date will sync.
* Defaults to time of sync if left empty.
* Use a narrow range for testing/reconciliation.
**Company:** Select the Dynamics 365 company to book all PEX transactions against.
* Ensure you have at least one active company to select from the list.
**PEX Account:** Select the Dynamics 365 liability account for your PEX funds.
* Ensure you have at least one active liability account to select from the list.
* Bill payments to PEX will reduce the amount owed on this account.
* Purchases in PEX will be charged to this account.
* Fees in PEX will be charged to this account.
* Rebates from PEX will reduce the amount owed on this account.
 ## Purchases
To sync purchases to Dynamics 365, enable *Create journal entries in Dynamics for cardholder purchases*. Configure the following:
* **Sync all purchases or only approved purchases**
* "Only sync approved purchases" (recommended) means that purchases must be approved in PEX before syncing to Dynamics 365.
* **Sync purchase attachments**
* If this box is checked, purchase receipts will sync to Dynamics 365.
* **Use settlement dates or purchase dates**
* Purchases sync only once settled, but you can choose either the settlement or purchase date as the posting date in Dynamics 365.
* Note: A purchase may settle in a period following the time of purchase.
* **Create a Dynamics vendor for each unique merchant**
* *Unchecked:* Map vendor to a static Dynamics 365 vendor or PEX tag (see Mappings).
* *Checked:* PEX will record purchases with existing vendors in your Dynamics 365 account or auto-create a new vendor if one doesn't exist.
* **Update vendors with the chosen company if needed**
* *Checked:* Automatically assigns your chosen company to the vendor in Dynamics 365.
* *Unchecked:* You'll need to manually add your chosen company to the vendor, or the purchase will fail to sync.
* **Use standardized vendor names**
* *Checked:* PEX will record purchases like "Target #0973226" simply as "Target" in Dynamics 365.
* *Unchecked:* PEX will record purchases like "Target #0973226" as "Target #0973226" in Dynamics 365.
## Purchases
To sync purchases to Dynamics 365, enable *Create journal entries in Dynamics for cardholder purchases*. Configure the following:
* **Sync all purchases or only approved purchases**
* "Only sync approved purchases" (recommended) means that purchases must be approved in PEX before syncing to Dynamics 365.
* **Sync purchase attachments**
* If this box is checked, purchase receipts will sync to Dynamics 365.
* **Use settlement dates or purchase dates**
* Purchases sync only once settled, but you can choose either the settlement or purchase date as the posting date in Dynamics 365.
* Note: A purchase may settle in a period following the time of purchase.
* **Create a Dynamics vendor for each unique merchant**
* *Unchecked:* Map vendor to a static Dynamics 365 vendor or PEX tag (see Mappings).
* *Checked:* PEX will record purchases with existing vendors in your Dynamics 365 account or auto-create a new vendor if one doesn't exist.
* **Update vendors with the chosen company if needed**
* *Checked:* Automatically assigns your chosen company to the vendor in Dynamics 365.
* *Unchecked:* You'll need to manually add your chosen company to the vendor, or the purchase will fail to sync.
* **Use standardized vendor names**
* *Checked:* PEX will record purchases like "Target #0973226" simply as "Target" in Dynamics 365.
* *Unchecked:* PEX will record purchases like "Target #0973226" as "Target #0973226" in Dynamics 365.
 **Purchase Field Mappings**
Map Dynamics 365 fields to static values or PEX tags. Fields can be mapped to static values or PEX Tags. If you choose to use PEX tags, you must create them in advance, following the logic described in the ["Create PEX tags for Microsoft Dynamics 365"](/administrator-guide/create-pex-tags-for-microsoft-dynamics-365) article.
For example, the "Expense Account" is one of the fields on your Purchase:
* Mapping the "Expense Account" field to a static value means that you can select one account out of the many presented in Dynamics 365, and that value ("Advertising" in our example below) will be applied to all PEX purchases.
**Purchase Field Mappings**
Map Dynamics 365 fields to static values or PEX tags. Fields can be mapped to static values or PEX Tags. If you choose to use PEX tags, you must create them in advance, following the logic described in the ["Create PEX tags for Microsoft Dynamics 365"](/administrator-guide/create-pex-tags-for-microsoft-dynamics-365) article.
For example, the "Expense Account" is one of the fields on your Purchase:
* Mapping the "Expense Account" field to a static value means that you can select one account out of the many presented in Dynamics 365, and that value ("Advertising" in our example below) will be applied to all PEX purchases.
 Note that a purchase will not be tagged with this static value. You will not see this static value on the purchase details. The static value will be used only when syncing a purchase to Dynamics 365.
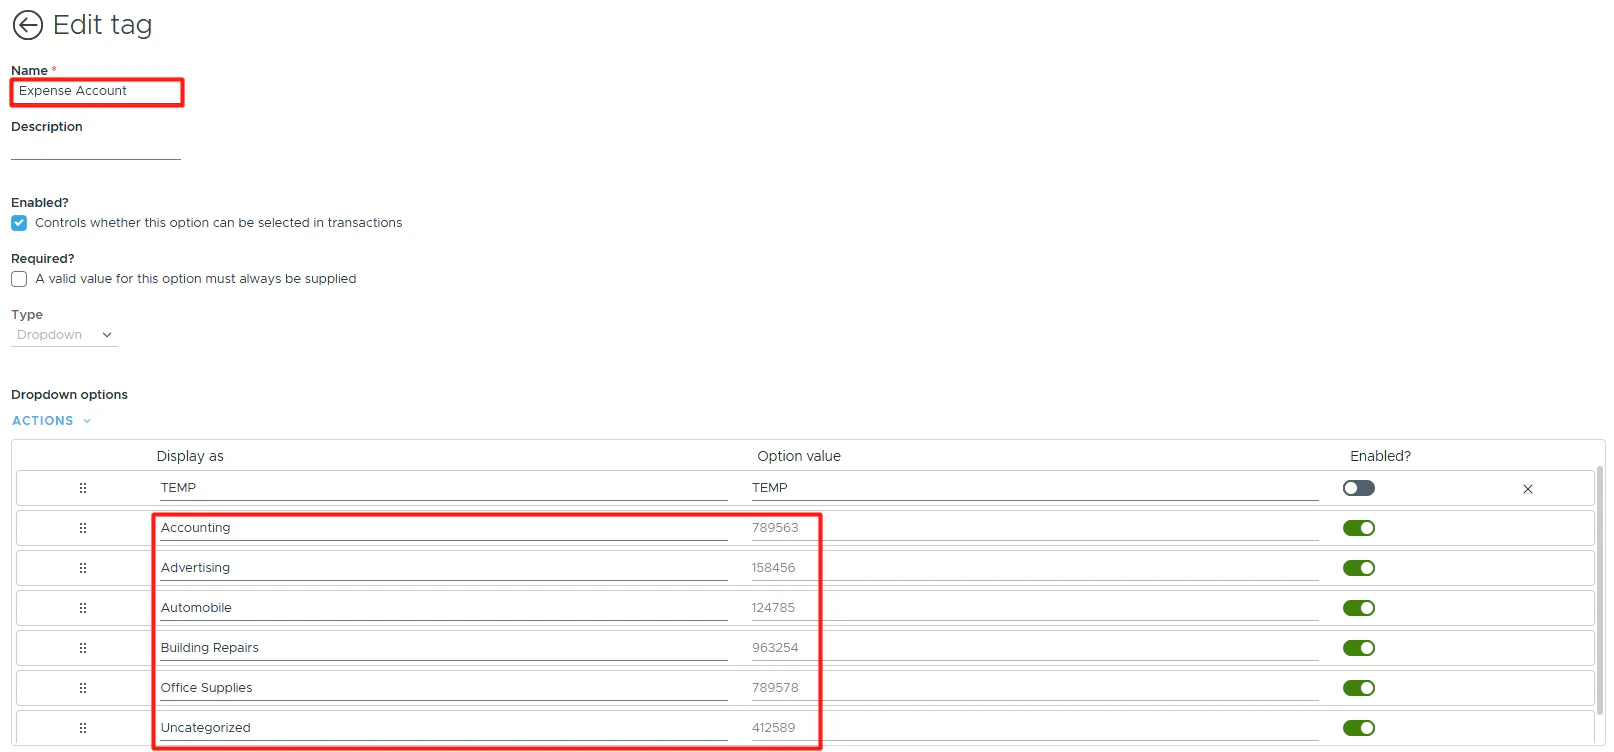
* Mapping the "Expense Account" field to a PEX tag ("Expense Account" in our example below) means that you and your cardholders can select one of the tag values for each purchase.
Note that a purchase will not be tagged with this static value. You will not see this static value on the purchase details. The static value will be used only when syncing a purchase to Dynamics 365.
* Mapping the "Expense Account" field to a PEX tag ("Expense Account" in our example below) means that you and your cardholders can select one of the tag values for each purchase.
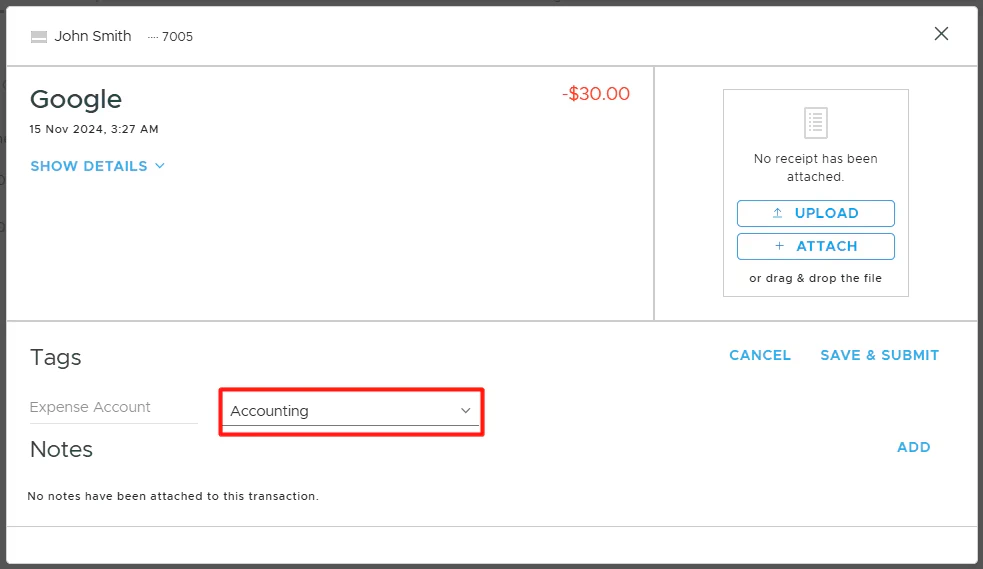
 For that go to the "Transactions" menu -> locate a purchase -> click on it -> select a tag value ("Office Supplies" in our example below) of the "Expense Account" tag -> click "Save". Note that you and your cardholders can select one of the tag values for each purchase once you finish the Dynamics 365 connector setup and sync tag options from Dynamics 365 to PEX.
 When mapping to a tag, you can also specify a default "Expense Account" value: for example, Uncategorized, as highlighted below.
 Note that a purchase will not be tagged with this default value ("Uncategorized" in our example) on the purchase details. It means that if you or your cardholders forget to tag a purchase before it is synced to Dynamics 365, the default value ("Uncategorized" in our example) will be applied to this purchase during the sync.
If you or your cardholders do tag a purchase with the tag option from the tag chosen in the highlighted field below,
Note that a purchase will not be tagged with this default value ("Uncategorized" in our example) on the purchase details. It means that if you or your cardholders forget to tag a purchase before it is synced to Dynamics 365, the default value ("Uncategorized" in our example) will be applied to this purchase during the sync.
If you or your cardholders do tag a purchase with the tag option from the tag chosen in the highlighted field below,
 that specific purchase will be recorded against the expense account ("Accounting" in our example below) you tagged the purchase with. Tags take precedence over default values.
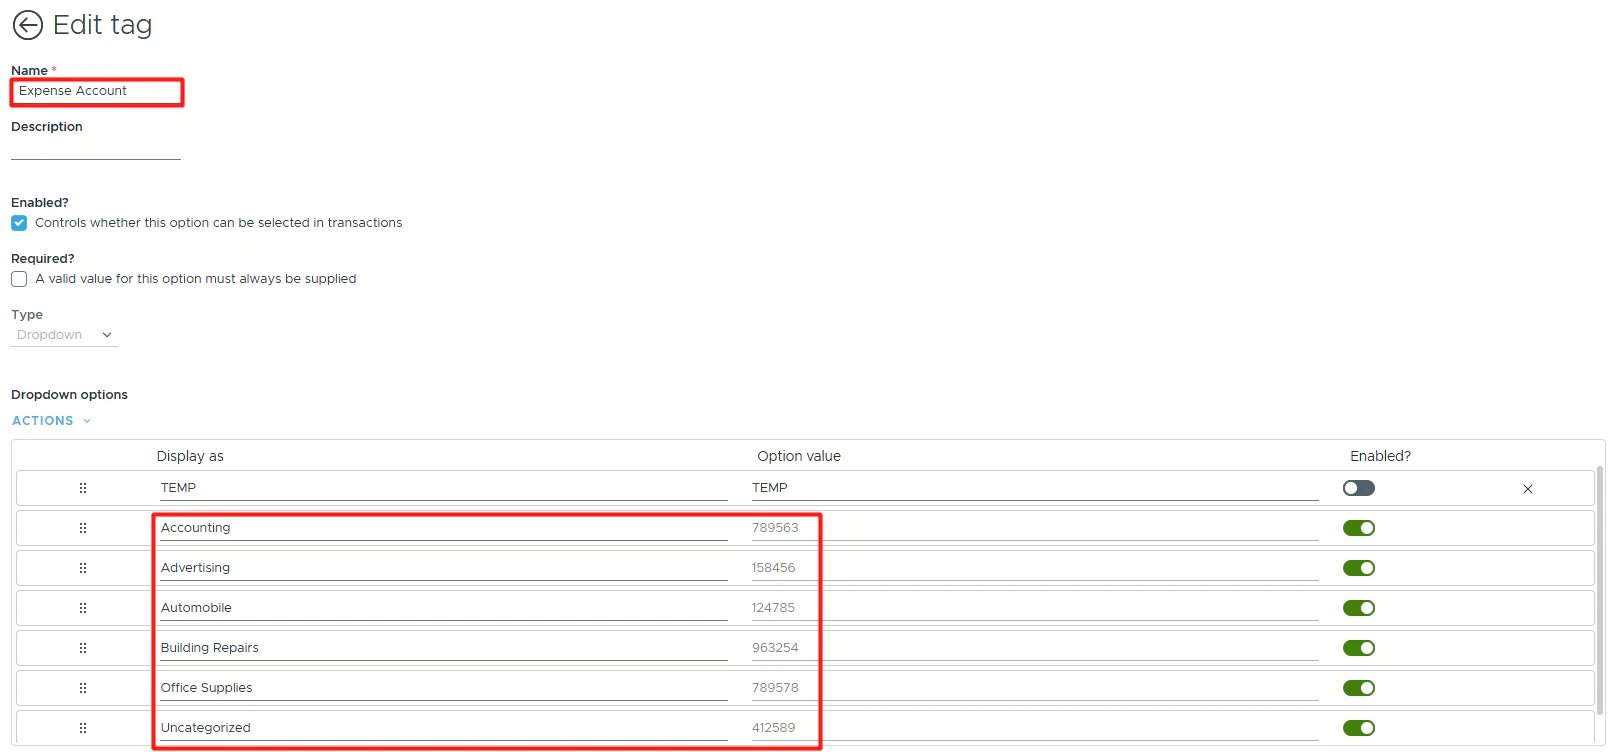
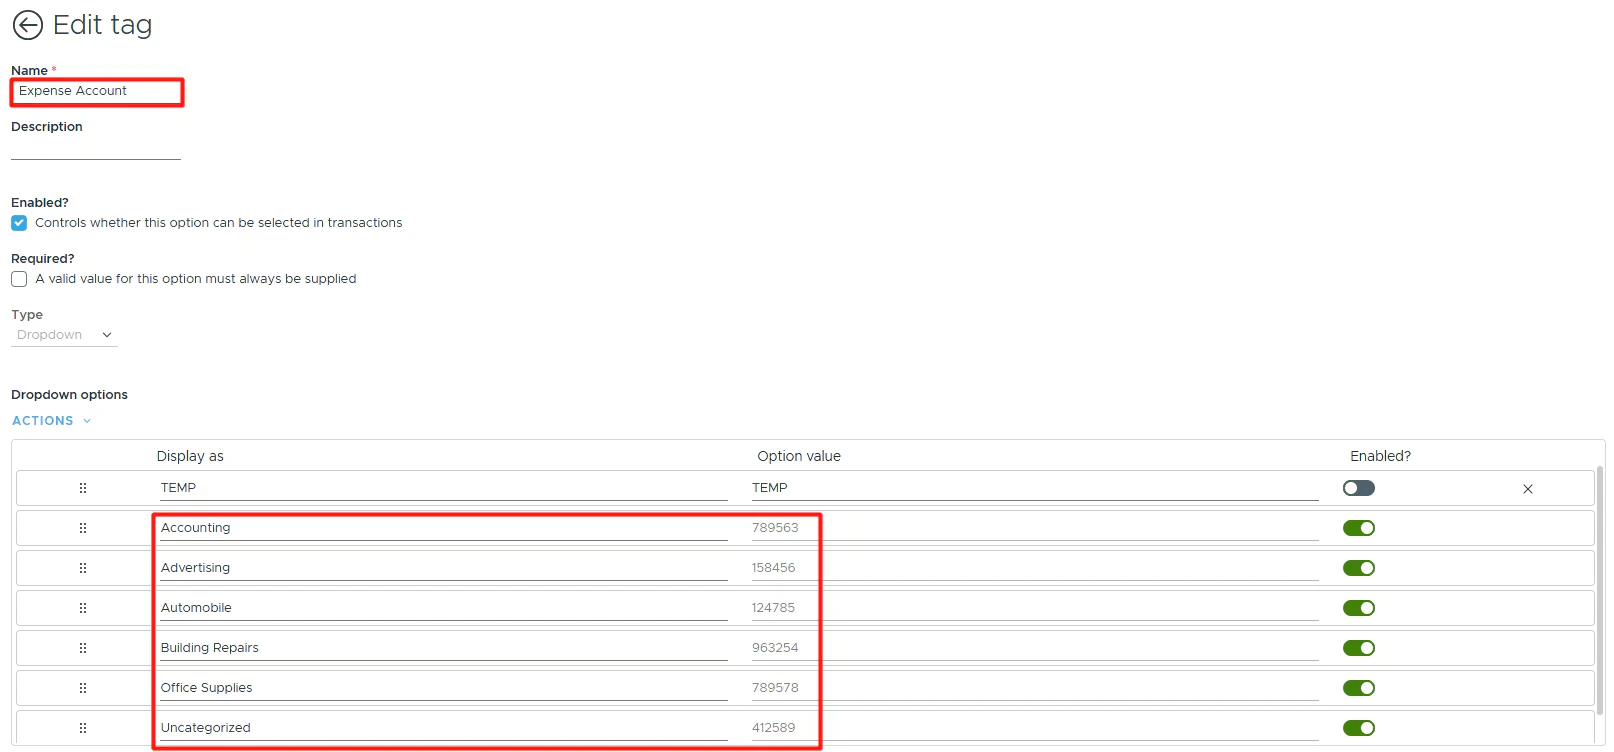
 * Enable the sync toggle to sync field values from Dynamics 365 into PEX as tag options.
 For example, the values for the PEX tag "Expense Account" (in [Tag Manager](https://dashboard.pexcard.com/business-settings/workflows/tags?utm_source=support)) will be populated with the names of your Dynamics 365 accounts.
 If you have left the "Create a Dynamics vendor for each unique merchant" unchecked, you can map the vendor to a single static Dynamics 365 vendor called "PEX".
 Select "Static" for Vendor and "PEX" in the Value column.
 ## Fees
To sync business & cardholder fees to Dynamics 365, enable the toggle *Create journal entries in Dynamics for business & cardholder fees*.
**Fee Field Mappings**
Map Dynamics 365 fields so the connector knows which values to use when syncing fees to Dynamics 365. The fields can only be mapped to static values. PEX fee transactions that sync to Dynamics 365 will debit the account selected in the "Value" column ("Advertising" in our example below). The same account can be used for both purchases and fees.
## Fees
To sync business & cardholder fees to Dynamics 365, enable the toggle *Create journal entries in Dynamics for business & cardholder fees*.
**Fee Field Mappings**
Map Dynamics 365 fields so the connector knows which values to use when syncing fees to Dynamics 365. The fields can only be mapped to static values. PEX fee transactions that sync to Dynamics 365 will debit the account selected in the "Value" column ("Advertising" in our example below). The same account can be used for both purchases and fees.
 ## Bill Payments
To sync bill payments to Dynamics 365, enable the toggle *Create journal entries in Dynamics for bill payments*.
**Bill Payment Field Mappings**
Map Dynamics 365 fields so the connector knows which values to use when syncing bill payments to Dynamics 365. The fields can only be mapped to static values. PEX bill payment transactions that sync to Dynamics 365 will credit the bank account selected in the "Value" column ("Checking " in our example below).
## Bill Payments
To sync bill payments to Dynamics 365, enable the toggle *Create journal entries in Dynamics for bill payments*.
**Bill Payment Field Mappings**
Map Dynamics 365 fields so the connector knows which values to use when syncing bill payments to Dynamics 365. The fields can only be mapped to static values. PEX bill payment transactions that sync to Dynamics 365 will credit the bank account selected in the "Value" column ("Checking " in our example below).
 ## Rebates
To sync business rebates to Dynamics 365, enable the toggle *Create journal entries in Dynamics for business rebates*.
**Rebate Field Mappings**
Map Dynamics 365 fields so the connector knows which values to use when syncing rebates to Dynamics 365. The fields can only be mapped to static values. PEX rebate transactions that sync to Dynamics 365 will credit the income account selected in the "Value" column ("Income" in our example below).
## Rebates
To sync business rebates to Dynamics 365, enable the toggle *Create journal entries in Dynamics for business rebates*.
**Rebate Field Mappings**
Map Dynamics 365 fields so the connector knows which values to use when syncing rebates to Dynamics 365. The fields can only be mapped to static values. PEX rebate transactions that sync to Dynamics 365 will credit the income account selected in the "Value" column ("Income" in our example below).
 Click "Save". PEX will redirect you to the **Sync tab**.
## Sync to Dynamics 365
Click "Save". PEX will redirect you to the **Sync tab**.
## Sync to Dynamics 365
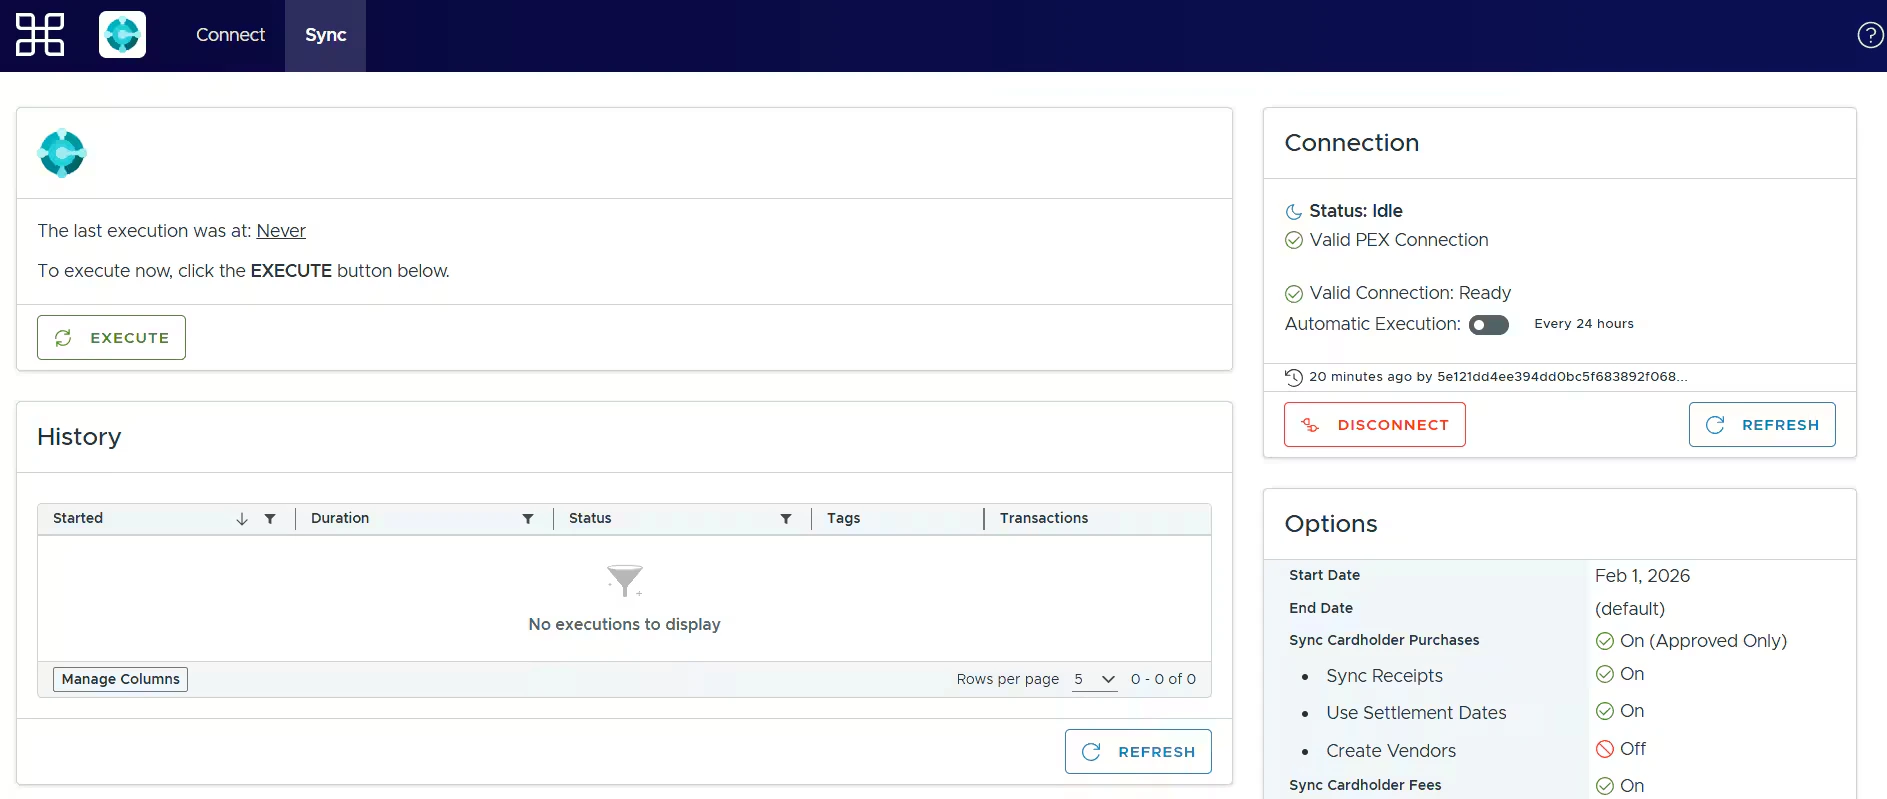
 In the Sync tab, you can:
**View the last synchronization time.**
**Manually sync transactions/tag options** by clicking **EXECUTE**.
* When executing, you can choose which transaction types to sync.
* You can override the start and end dates for a specific execution.
**View Connection** info.
**Enable/disable auto-sync.**
* Enabled: Transactions/tag options sync automatically every 24 hours.
* Disabled: Transactions/tag options will not sync automatically.
In the Sync tab, you can:
**View the last synchronization time.**
**Manually sync transactions/tag options** by clicking **EXECUTE**.
* When executing, you can choose which transaction types to sync.
* You can override the start and end dates for a specific execution.
**View Connection** info.
**Enable/disable auto-sync.**
* Enabled: Transactions/tag options sync automatically every 24 hours.
* Disabled: Transactions/tag options will not sync automatically.
 **Disconnect** from Dynamics 365.
**View the History** of transactions synced to your Dynamics 365 account.
* Each execution shows: Started time, Duration, Status, Tags synced, and Transactions synced.
* Click on Tags or Transactions counts to view detailed sync results.
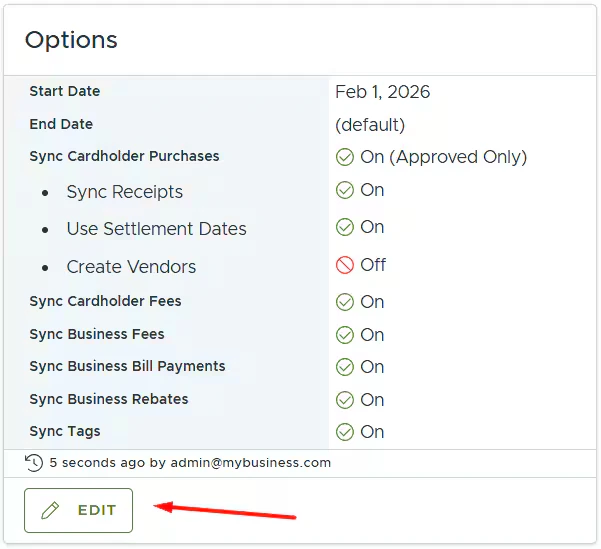
**View Settings** information.
**Edit settings** if necessary.
**Disconnect** from Dynamics 365.
**View the History** of transactions synced to your Dynamics 365 account.
* Each execution shows: Started time, Duration, Status, Tags synced, and Transactions synced.
* Click on Tags or Transactions counts to view detailed sync results.
**View Settings** information.
**Edit settings** if necessary.
 **Auto-sync**
Auto-sync will always process transactions based on the start date specified on the **Connect tab**, with a maximum limit of 2 months back from today. If there is no start date specified on the **Connect tab** then auto-sync will sync transactions up to 2 months back from today.
**Manual sync**
Manual sync will process transactions based on the start date specified on the **Connect tab**, with a limit of 1 year back from today. If there is no start date specified on the **Connect tab** then manual sync will process transactions only up to 2 months back from today.
## Auto Tagger
The Auto Tagger app is a great complement to the Dynamics 365 connector. It allows you to create rules that auto-tag purchases. [Learn more.](/administrator-guide/pex-auto-tagger)
## View Synced Transactions in Dynamics 365
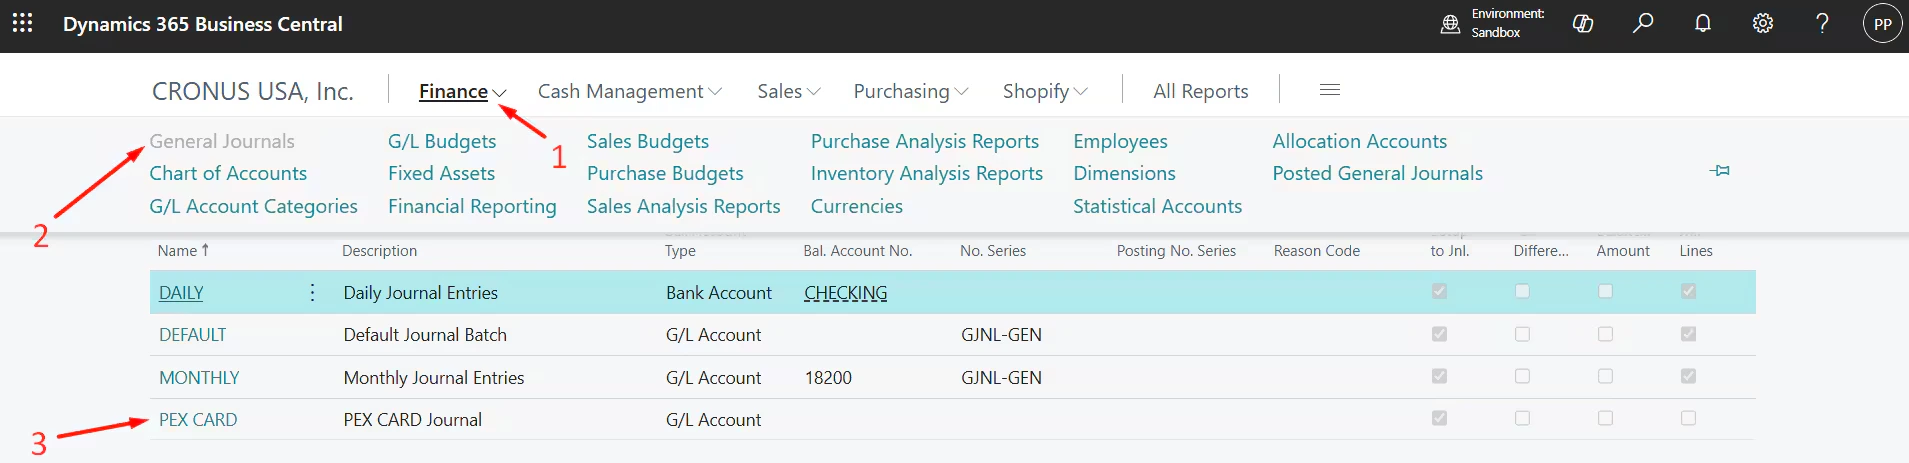
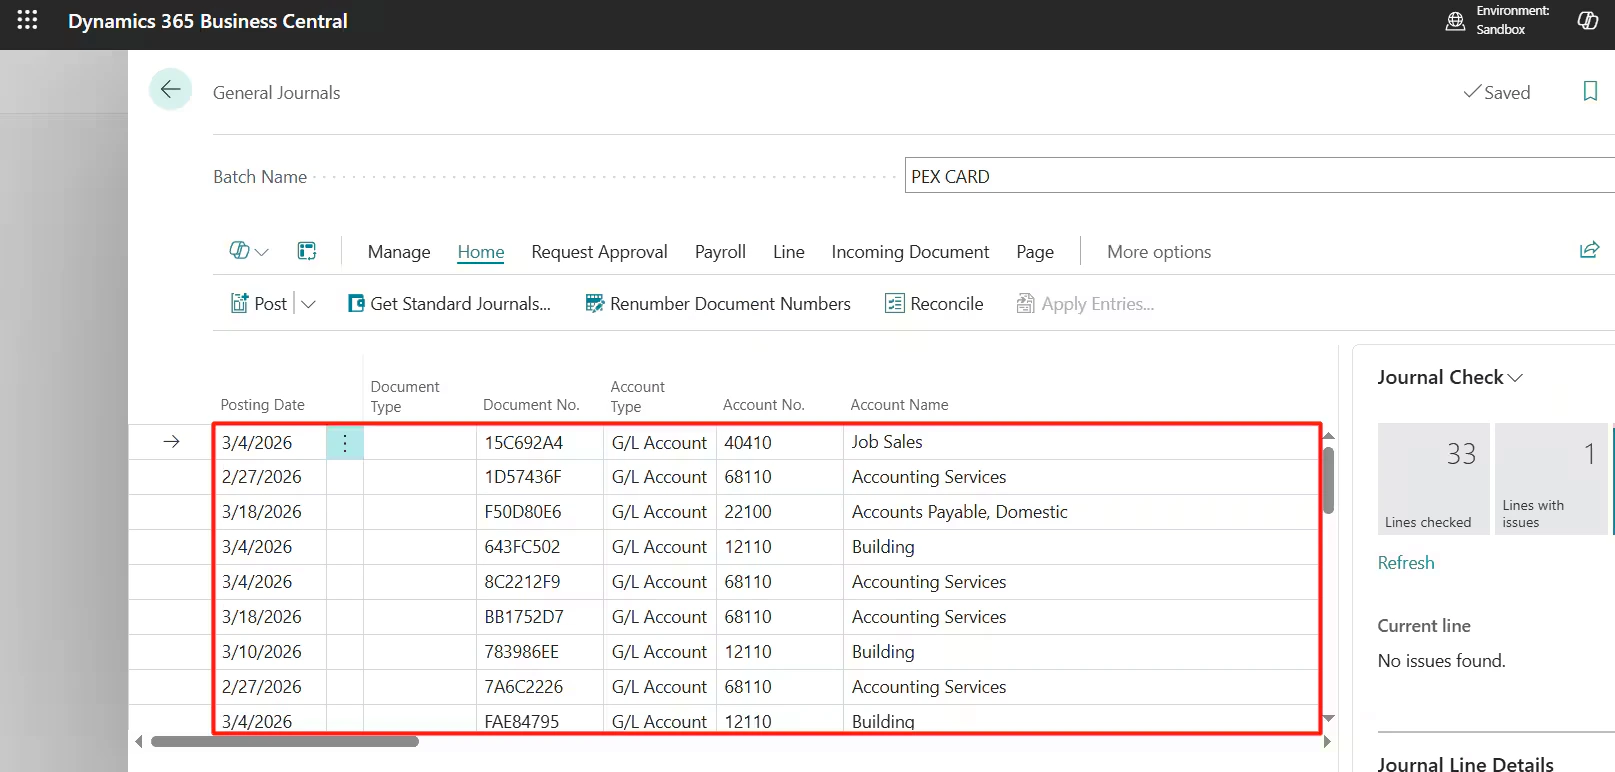
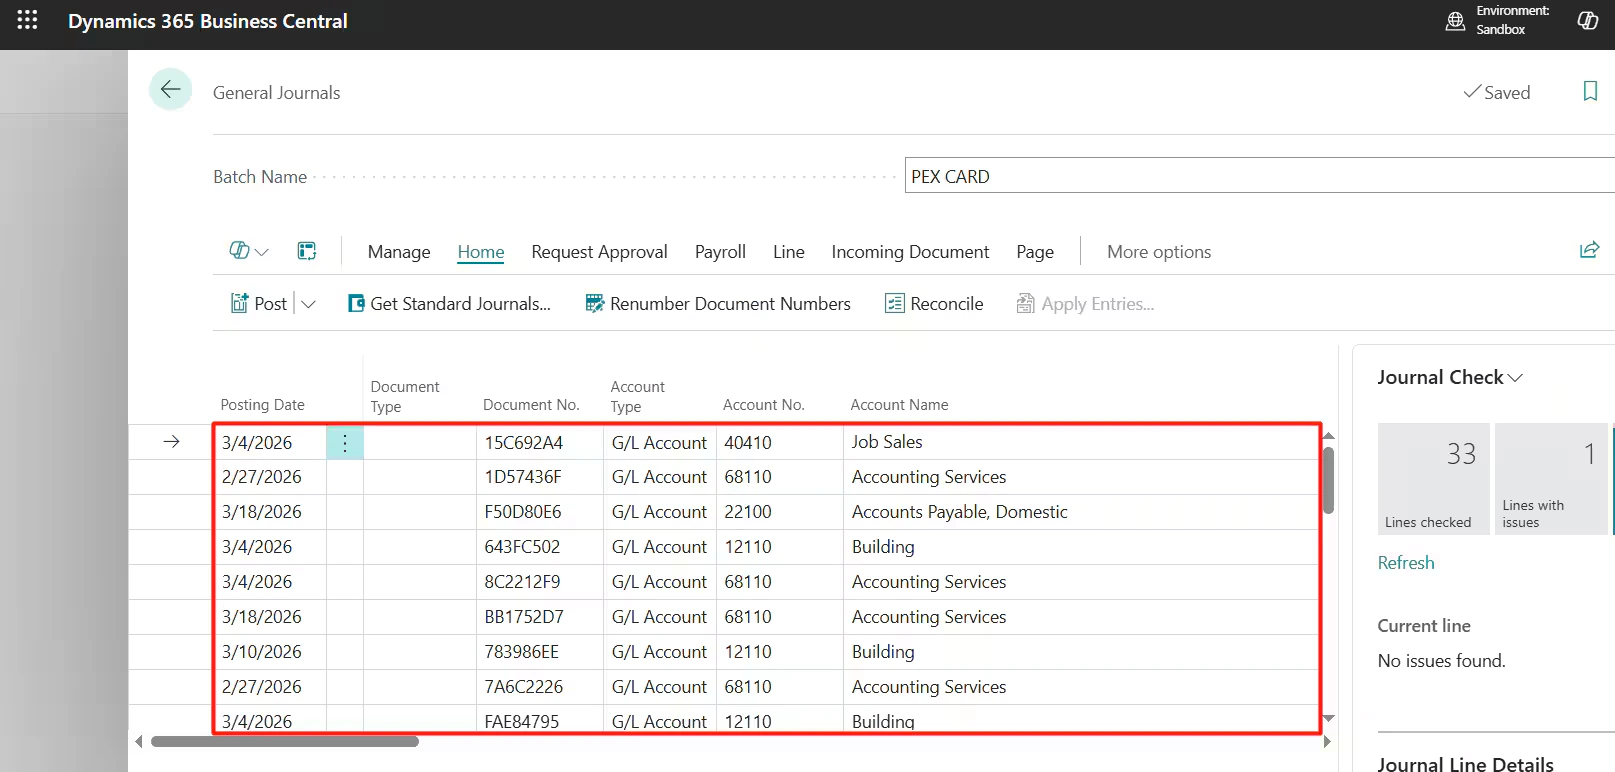
In Dynamics 365 Business Central, go to **Finance →** **General Journals →** click on the **PEX Card** journal →
**Auto-sync**
Auto-sync will always process transactions based on the start date specified on the **Connect tab**, with a maximum limit of 2 months back from today. If there is no start date specified on the **Connect tab** then auto-sync will sync transactions up to 2 months back from today.
**Manual sync**
Manual sync will process transactions based on the start date specified on the **Connect tab**, with a limit of 1 year back from today. If there is no start date specified on the **Connect tab** then manual sync will process transactions only up to 2 months back from today.
## Auto Tagger
The Auto Tagger app is a great complement to the Dynamics 365 connector. It allows you to create rules that auto-tag purchases. [Learn more.](/administrator-guide/pex-auto-tagger)
## View Synced Transactions in Dynamics 365
In Dynamics 365 Business Central, go to **Finance →** **General Journals →** click on the **PEX Card** journal →
 → view journal entries.
 ## View Synced Receipts in Dynamics 365
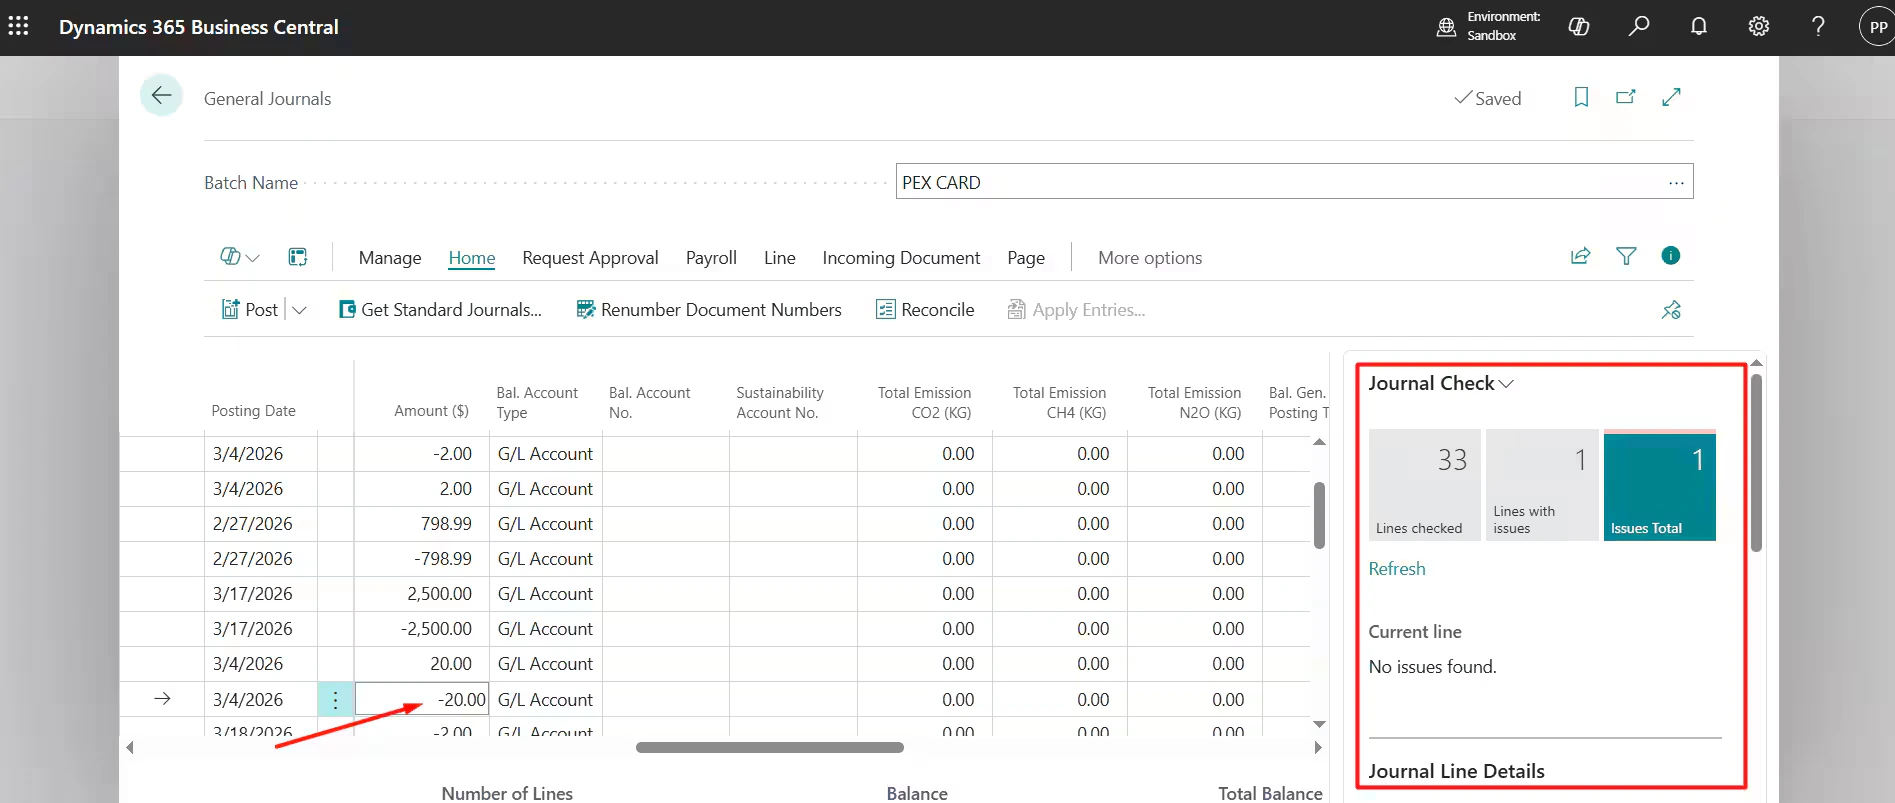
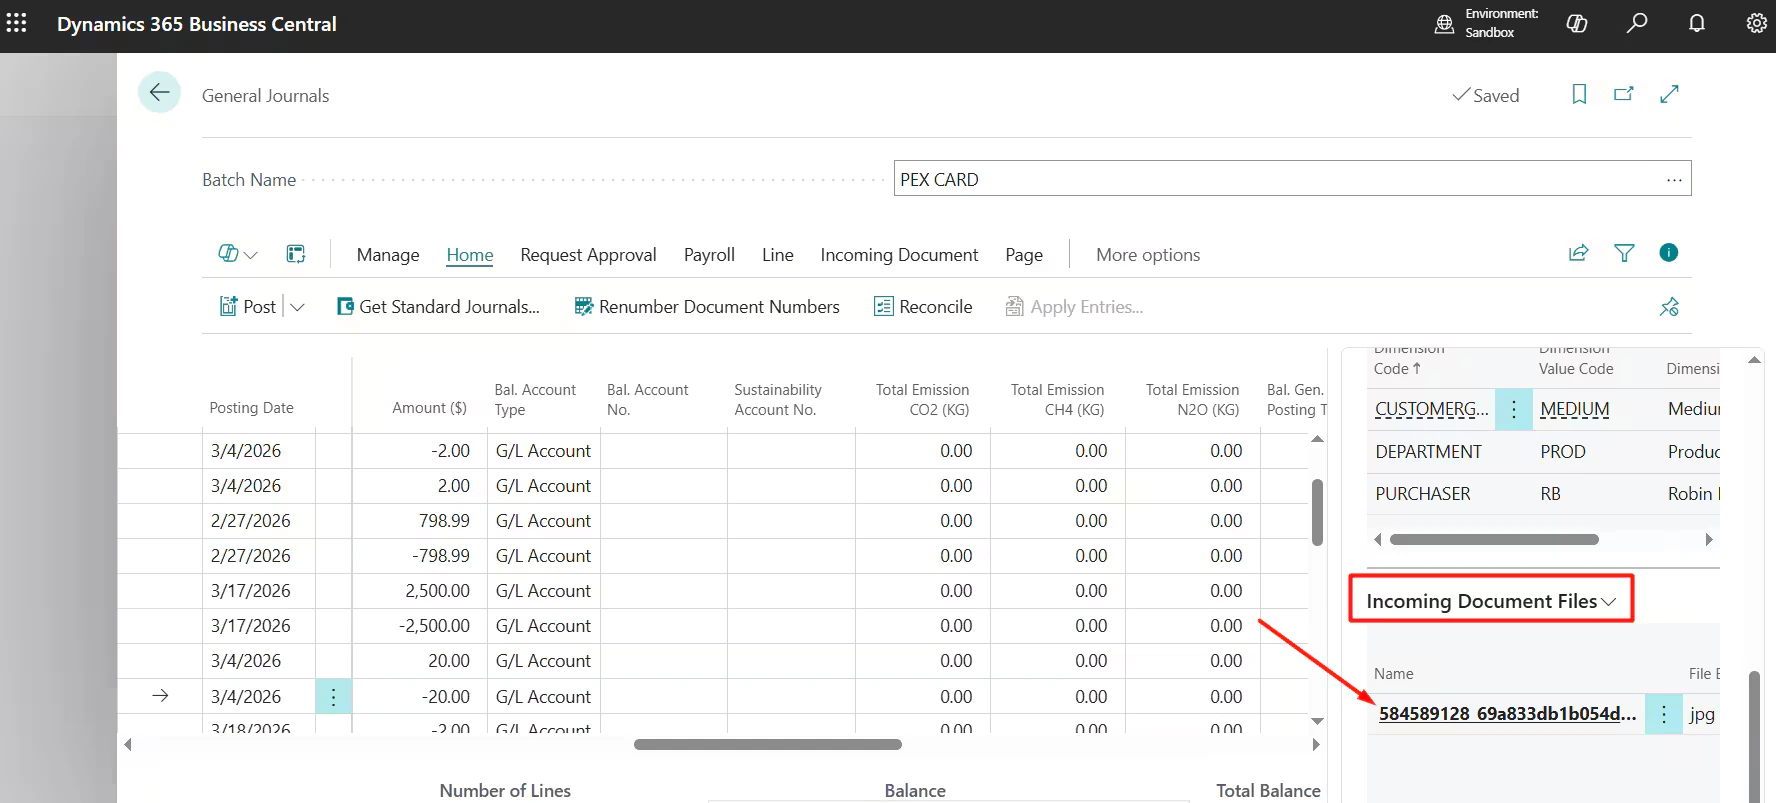
If receipt syncing is enabled, images are stored as incoming document files on journal entries. Go to **Finance →** **General Journals →** click on the **PEX Card** journal →
## View Synced Receipts in Dynamics 365
If receipt syncing is enabled, images are stored as incoming document files on journal entries. Go to **Finance →** **General Journals →** click on the **PEX Card** journal →
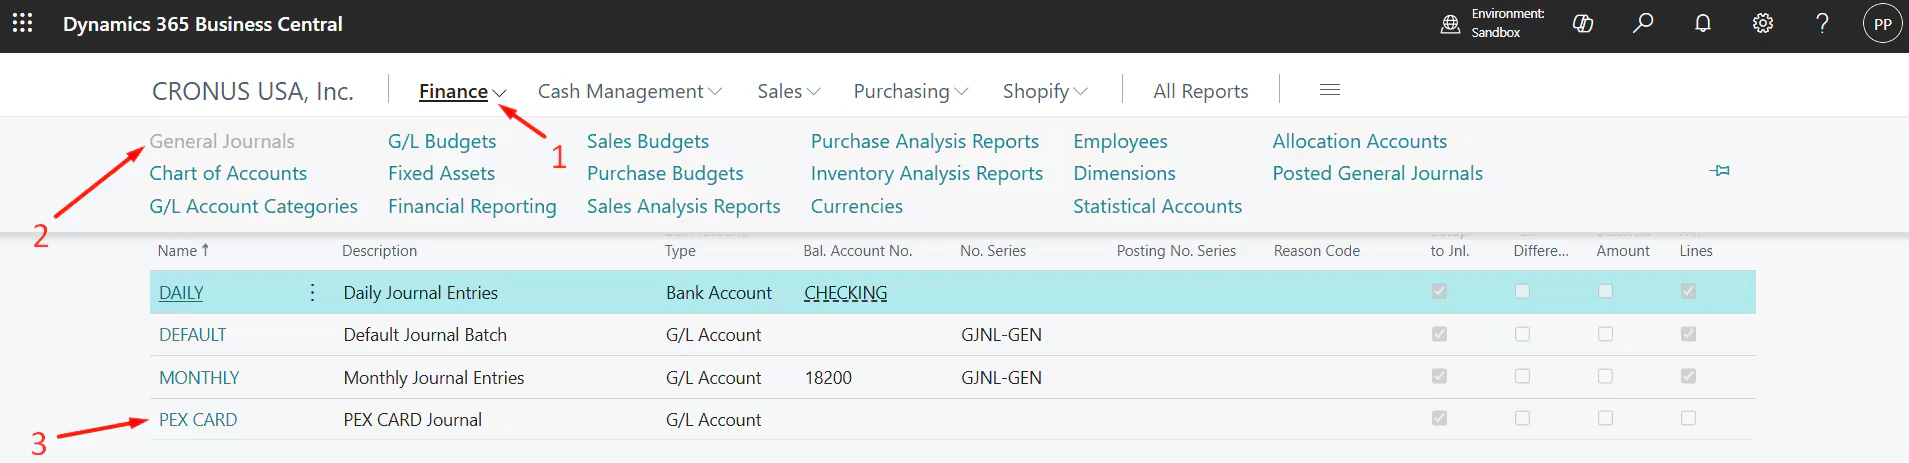 → click on the *credit line* of a journal entry → scroll to the **Incoming Document Files** section in the *Journal Check panel* →
 → click the file name.
 ## FAQ
As incoming document files on journal entries, serving as your system of record.
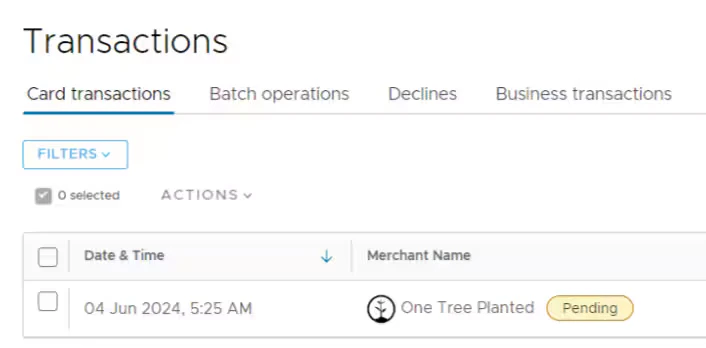
No. Only settled transactions sync. "Pending" next to a merchant name means the transaction hasn't settled.
## FAQ
As incoming document files on journal entries, serving as your system of record.
No. Only settled transactions sync. "Pending" next to a merchant name means the transaction hasn't settled.
 Yes. The connector syncs both open and closed cardholder transactions.
We strongly recommend using automatic sync of tag options from Dynamics 365 to PEX. This will keep your PEX tags and Dynamics 365 fields in sync. For more information, check out the support article ["Create PEX tags for Microsoft Dynamics 365"](/administrator-guide/create-pex-tags-for-microsoft-dynamics-365).
Yes. The connector syncs both open and closed cardholder transactions.
We strongly recommend using automatic sync of tag options from Dynamics 365 to PEX. This will keep your PEX tags and Dynamics 365 fields in sync. For more information, check out the support article ["Create PEX tags for Microsoft Dynamics 365"](/administrator-guide/create-pex-tags-for-microsoft-dynamics-365).
 No. Contact PEX support to resync a transaction.
Yes. Link an existing connection from another PEX account to skip re-authentication.
See our [Troubleshooting article](/administrator-guide/accounting-software-connector-troubleshooting).
## Support & Inquiries
For any questions or for more information, please email [appsupport+dynamics365@pexcard.com](mailto:appsupport+dynamics365@pexcard.com)
No. Contact PEX support to resync a transaction.
Yes. Link an existing connection from another PEX account to skip re-authentication.
See our [Troubleshooting article](/administrator-guide/accounting-software-connector-troubleshooting).
## Support & Inquiries
For any questions or for more information, please email [appsupport+dynamics365@pexcard.com](mailto:appsupport+dynamics365@pexcard.com)