> ## Documentation Index
> Fetch the complete documentation index at: https://support.pexcard.com/llms.txt
> Use this file to discover all available pages before exploring further.
# Create PEX tags for QuickBooks Desktop
> Import expense accounts, items, classes, and customer jobs from QuickBooks Desktop into PEX Tag Manager so transactions sync back with the correct coding.
PEX Tag manager is your one stop shop to import QuickBooks Desktop fields to PEX tags. Each PEX tag corresponds to a QuickBooks Desktop field. Import your expense accounts, items, classes, customer jobs from QuickBooks, so you don't have to add them manually in PEX.
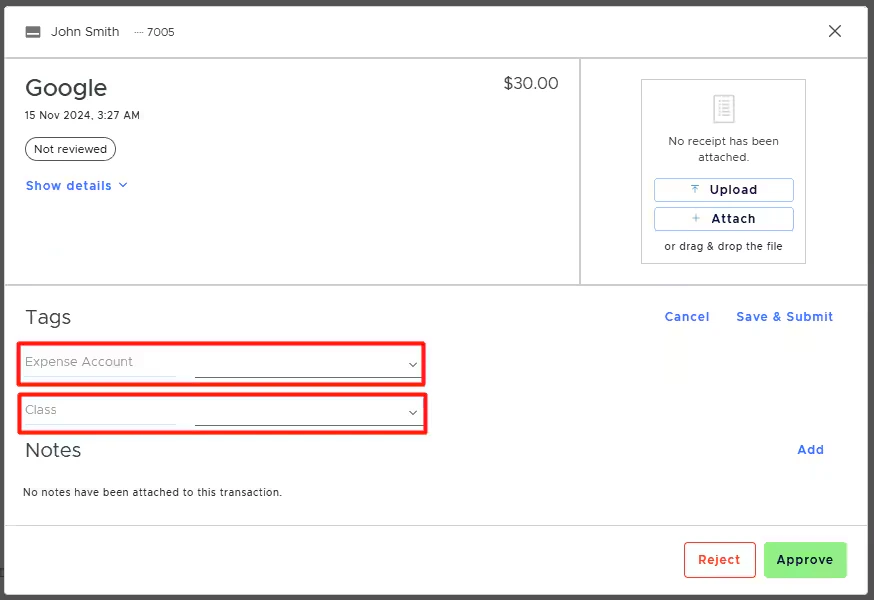
Once they're in PEX, you can easily code/tag transactions before they sync to QuickBooks. They will then sync to QuickBooks with the correct expense account, item, class, customer job.
Follow these steps:
Open your QuickBooks Desktop account.
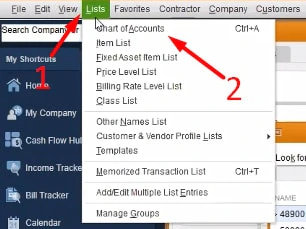
Go to **Lists** > **Chart of Accounts**.
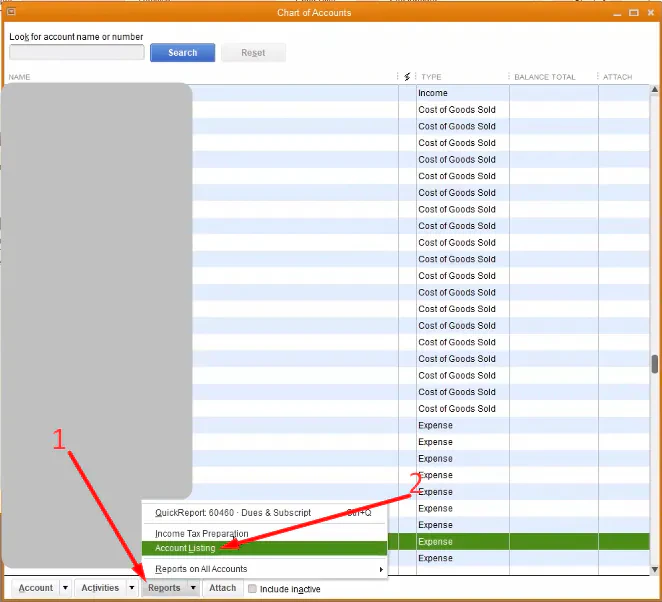
 Click **Reports** > **Account Listing**.
 Click **Excel** > **Create New Worksheet** > **Export**.
 Log in to [http://dashboard.pexcard.com/](http://dashboard.pexcard.com/?utm_source=support)
Go to [Business Settings > Tag manager](https://dashboard.pexcard.com/business-settings/tag-manager?utm_source=support)
Click **Add Tag**.
Select **Dropdown** as the type.
Enter a name: **Expense Account**.
Optionally, add a description like "Expense Accounts".
Check **Enabled** to make this tag visible on transactions.
Choose whether or not this tag is required.
* If the "Required" checkbox is checked, cardholders must tag a transaction with it.
Click **Save tag**.
Click **Import CSV**.
Click **Download sample CSV file**, then open it.
Log in to [http://dashboard.pexcard.com/](http://dashboard.pexcard.com/?utm_source=support)
Go to [Business Settings > Tag manager](https://dashboard.pexcard.com/business-settings/tag-manager?utm_source=support)
Click **Add Tag**.
Select **Dropdown** as the type.
Enter a name: **Expense Account**.
Optionally, add a description like "Expense Accounts".
Check **Enabled** to make this tag visible on transactions.
Choose whether or not this tag is required.
* If the "Required" checkbox is checked, cardholders must tag a transaction with it.
Click **Save tag**.
Click **Import CSV**.
Click **Download sample CSV file**, then open it.
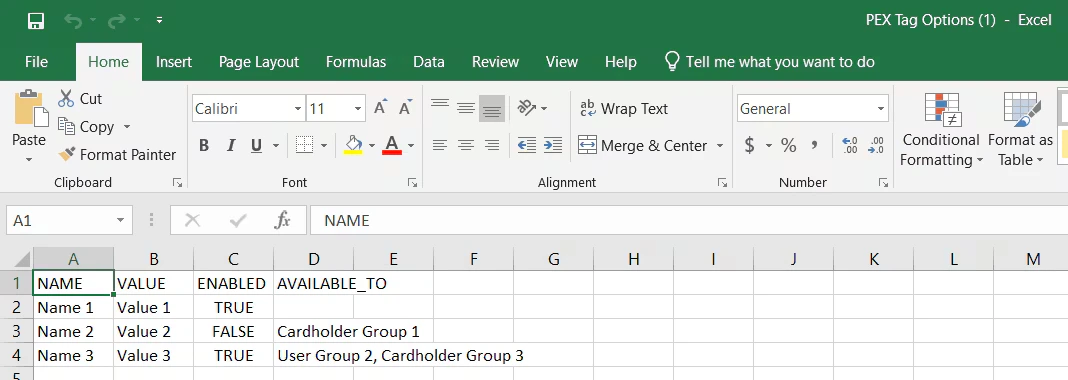 Copy the following information from the worksheet you exported from QuickBooks into the sample CSV file from PEX:
* **NAME** column: copy *account names* to this column. You can rename the accounts to display them as you want to your cardholders.
* Include only active accounts.
* We recommend including only the accounts that you and your cardholders will use when tagging purchases.
* **VALUE** column: copy *account names* from the *Account* column in QuickBooks to the VALUE column.
Copy the following information from the worksheet you exported from QuickBooks into the sample CSV file from PEX:
* **NAME** column: copy *account names* to this column. You can rename the accounts to display them as you want to your cardholders.
* Include only active accounts.
* We recommend including only the accounts that you and your cardholders will use when tagging purchases.
* **VALUE** column: copy *account names* from the *Account* column in QuickBooks to the VALUE column.
 * The VALUE column **must not include numbers** unless they are part of the name; otherwise, **transactions will fail to sync**. For example, in QuickBooks, the Equipment account name is displayed as *201 · Equipment.* You must exclude *201 ·* and enter only Equipment (see above).
* If the account is a child account, add the parent account name at the beginning, recursively. For example, if the *Video* account is a child of *Technology*, the VALUE should be *Technology:Video* (see above). Do not add spaces.
* For example, if the *Hotel* account is a child of *Travel*, which is a child of *Expenses*, the VALUE should be *Expenses:Travel:Hotel*. Do not add spaces.
* **ENABLED** column:
* Enter TRUE for accounts you want visible on transactions when you or your cardholders tag purchases.
* Enter FALSE for accounts you do not want visible when tagging purchases.
* **`AVAILABLE_TO`** column:
* Leave a cell empty to make the account available to all cardholders, **or** add a relevant group name to limit visibility to cardholders in that group.
* Ensure the group name in the CSV file matches exactly the name in your PEX account. If it does not match exactly, the account will not be available to that group.
* Adding multiple groups is not supported at this time.
Save your updates.
Return to the PEX screen with the import CSV window open.
Click **Select file**, choose the updated file, then click **Open**.
Click **Import**.
You should see a success message:
* The VALUE column **must not include numbers** unless they are part of the name; otherwise, **transactions will fail to sync**. For example, in QuickBooks, the Equipment account name is displayed as *201 · Equipment.* You must exclude *201 ·* and enter only Equipment (see above).
* If the account is a child account, add the parent account name at the beginning, recursively. For example, if the *Video* account is a child of *Technology*, the VALUE should be *Technology:Video* (see above). Do not add spaces.
* For example, if the *Hotel* account is a child of *Travel*, which is a child of *Expenses*, the VALUE should be *Expenses:Travel:Hotel*. Do not add spaces.
* **ENABLED** column:
* Enter TRUE for accounts you want visible on transactions when you or your cardholders tag purchases.
* Enter FALSE for accounts you do not want visible when tagging purchases.
* **`AVAILABLE_TO`** column:
* Leave a cell empty to make the account available to all cardholders, **or** add a relevant group name to limit visibility to cardholders in that group.
* Ensure the group name in the CSV file matches exactly the name in your PEX account. If it does not match exactly, the account will not be available to that group.
* Adding multiple groups is not supported at this time.
Save your updates.
Return to the PEX screen with the import CSV window open.
Click **Select file**, choose the updated file, then click **Open**.
Click **Import**.
You should see a success message:
 The new tag appears on the Tag Manager page.
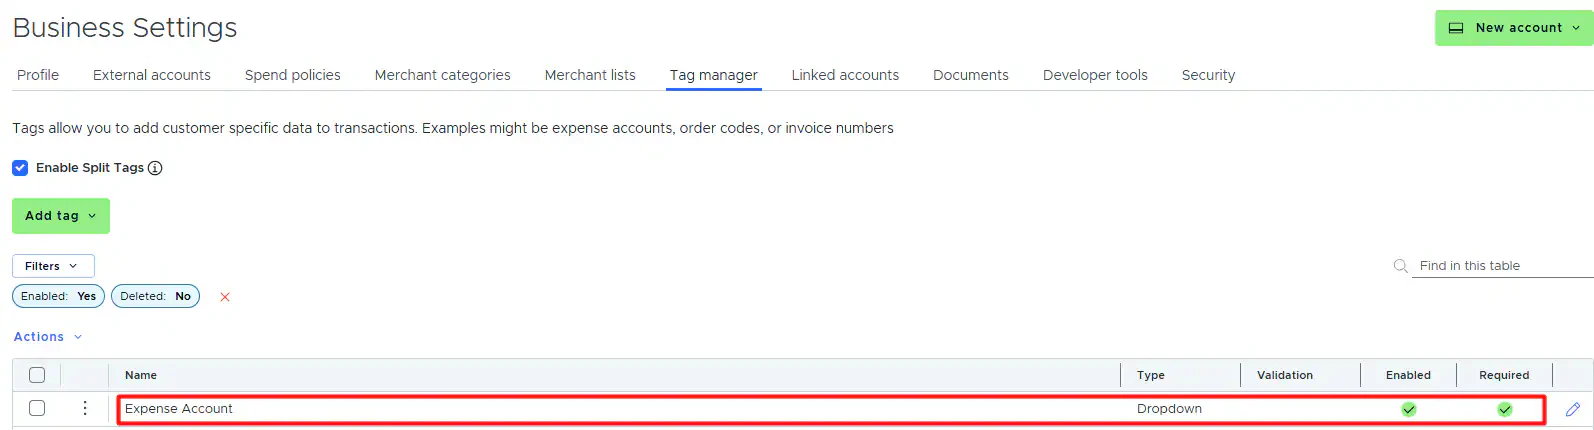 Create one tag for each QuickBooks Desktop field mapped to a PEX tag (such as Item, Class, Customer:Job) by repeating the steps above.
* To export an Items list: **Lists** > **Item List** > **Excel** > **Create New Worksheet** > **Export**.
* To export a Classes list: **Lists** > **Class List** > **Excel** > **Create New Worksheet** > **Export**.
## Where tags appear in PEX
Once the tags are set up, you will also see them:
In the PEX Tag dropdown lists in connector setup steps.
Create one tag for each QuickBooks Desktop field mapped to a PEX tag (such as Item, Class, Customer:Job) by repeating the steps above.
* To export an Items list: **Lists** > **Item List** > **Excel** > **Create New Worksheet** > **Export**.
* To export a Classes list: **Lists** > **Class List** > **Excel** > **Create New Worksheet** > **Export**.
## Where tags appear in PEX
Once the tags are set up, you will also see them:
In the PEX Tag dropdown lists in connector setup steps.
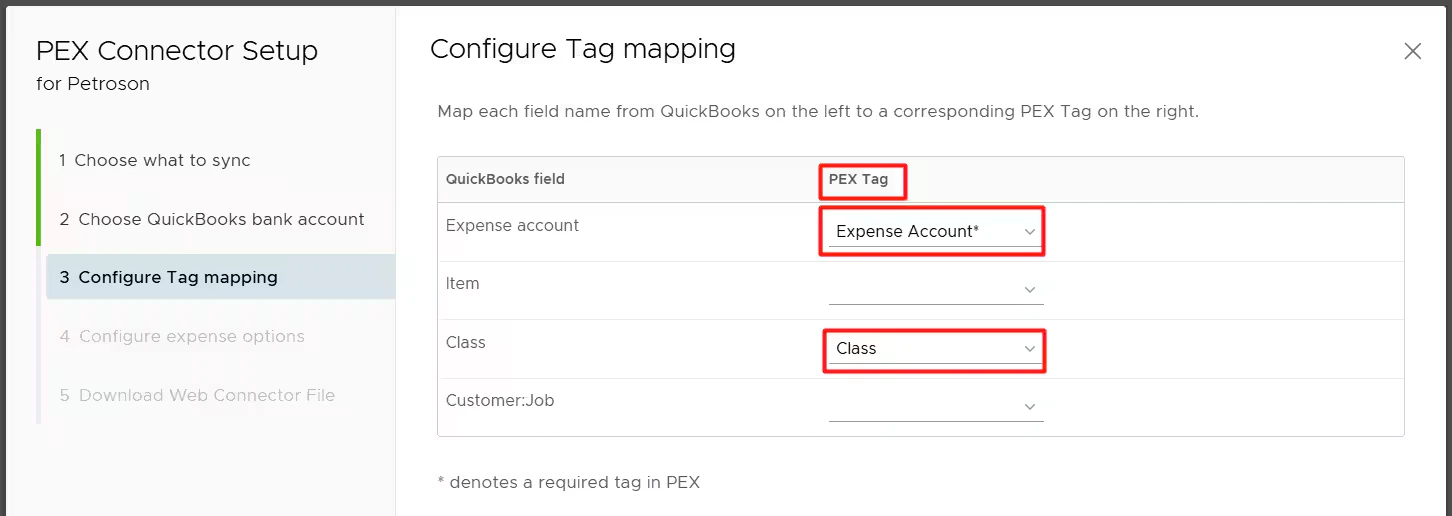 On the PEX transaction details screen, so you and your cardholders can tag transactions.