> ## Documentation Index
> Fetch the complete documentation index at: https://support.pexcard.com/llms.txt
> Use this file to discover all available pages before exploring further.
# Expense Envelopes for Admin
> Expense Envelopes allow you to convert PEX transactions and receipt images to review cardholder transactions.
## Access App
To access the app:
* Log in to [http://dashboard.pexcard.com/](http://dashboard.pexcard.com/?utm_source=support)
* Navigate to [Apps > Available](https://dashboard.pexcard.com/apps/available?utm_source=support)
* Locate **Expense Envelope**.
* Click **More info** > **Install** > **Launch**.
**Note:**
To install the app, you need to enable the following permissions: *Edit business settings & apps*, *Manage cardholder*, *View card transactions*. You can enable them in [My Profile -> Permissions](https://dashboard.pexcard.com/account/permissions?utm_source=support).
## Configure
To configure your settings select your Envelope Account Code value:
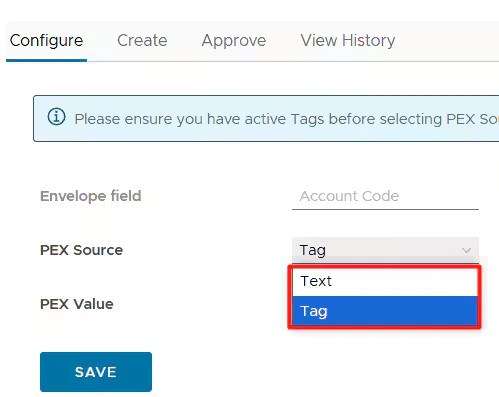
1. **PEX Source**. The source can be:
* Tag. It is recommended if you have multiple Accounts. Tags are based on your business' active PEX tags.
* To get started, navigate to [Business Settings > Tag Manager](https://dashboard.pexcard.com/business-settings/tag-manager?utm_source=support)
* Click **Add Tag**.
* Name it **Account Code**.
* Choose whether or not this tag is "Required".
* If the "Required" checkbox is checked, cardholders must tag a transaction with it.
* Select **Dropdown** as the Type.
* Click **Add a New Option**.
* Enter your account name and code in the **Display as** and **Option value** fields.
* Every new option is a new account.
* Check the **Enabled?** box to enable the option.
* Click **Create tag** to finish. More details on how to create a tag can be found [here](/administrator-guide/how-to-setup-and-create-tags-with-tag-manager).
* Text is recommended if you only have 1 account. This will essentially be a hard coded number used for all transactions made on your PEX cards.
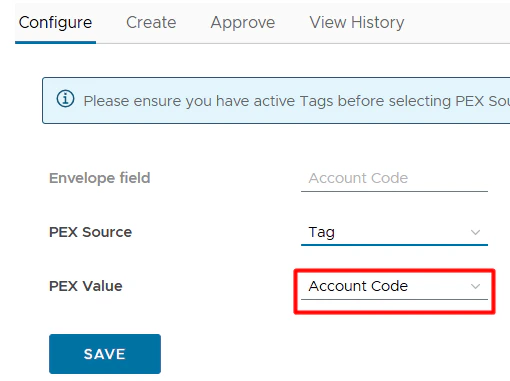
2. **PEX Value**. Depending on the selected Source, you can select/enter the PEX Value.
Once the configuration is set, click **Save**. Now you can navigate to the Create tab.
Please note that you also need to configure this before your cardholders can start creating and sending envelopes for your review.
## Create
A date range (one month) and approval status (approved) are prepopulated by default. Feel free to edit the dates and approval status as needed. Next, select the cardholder name from the dropdown and click **Select**. *Note: only one cardholder can be selected at a time.*
PEX will display the transactions that match your search criteria. Every transaction has:
* Purchase Date - when the transaction was made.
* Merchant Name - where the transaction was made.
* Paper clip - whether or not a receipt was attached to the transaction. No paper clip means no receipt attached.
* Amount - how much the transaction is.
* Account Code - the account corresponding to the transaction.
* Click it to update if necessary.
* Notes - any notes on the transaction.
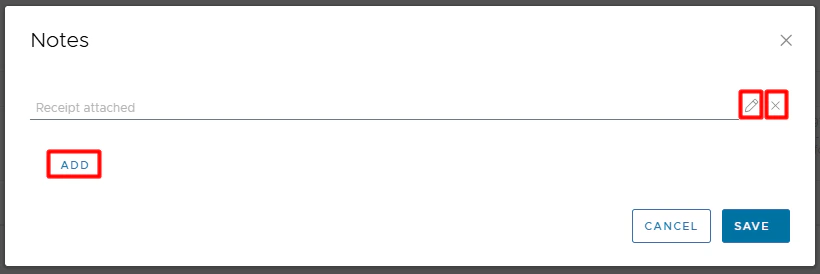
* Click on the pencil icon
to add, edit or delete a note.
The transaction list includes only:
1. Settled cardholder transactions.
2. New (not exported yet) purchase transactions: we've added in logic so you do not have to worry about duplicate transactions showing up in the export.
You can filter the transaction list by:
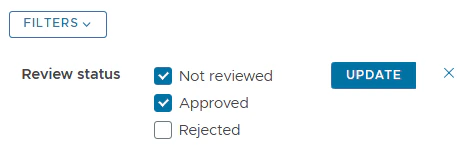
1. Review status (Not reviewed; Approved; Rejected).
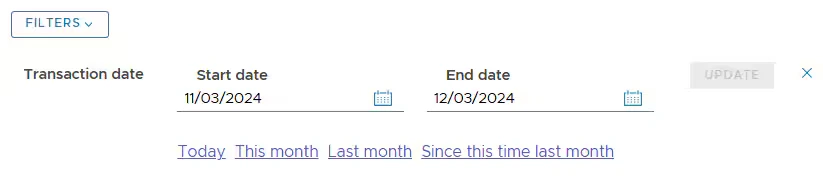
2. Transaction date. The limit is up to 1 year. You might use predefined filters: Today, This month, Last month, Since this time last month.
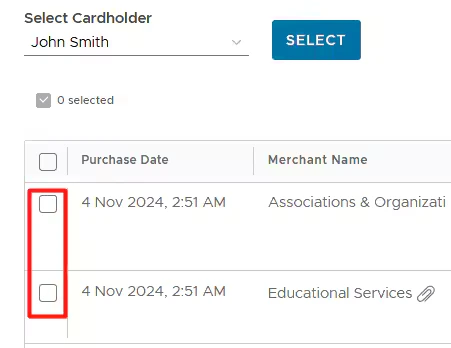
Check transactions that you want to export and click **Export**.
If you have multiple Account Codes please ensure your transactions are tagged with the Account Code. Tag manually or use [PEX Auto Tagger](/administrator-guide/pex-auto-tagger) to create rules that automatically tag transactions.
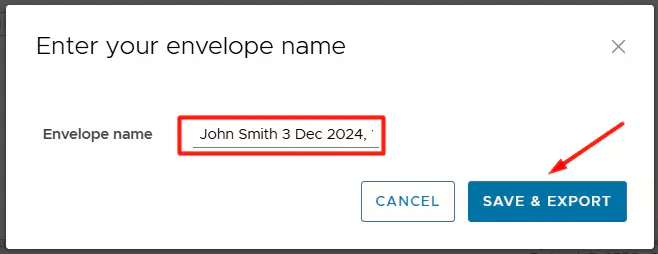
Enter a name for your envelope and click **Save & Export**.
You will see a success message: "The envelope has been successfully exported". You can locate the exported envelope in the table under the "View History" tab and download it once its status is updated to "Completed".
## Approve Cardholder Envelope
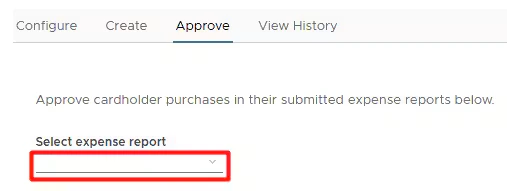
You can approve cardholder purchases in their submitted envelopes. First, select an envelope from a dropdown list.
PEX will display the transactions of the selected envelope. Every transaction has:
* Purchase Date - when the transaction was made.
* Merchant Name - where the transaction was made.
* Paper clip - whether or not a receipt was attached to the transaction. No paper clip means no receipt attached.
* Amount - how much the transaction is.
* Account Code - the account corresponding to the transaction.
* Ensure that the account code is selected.
* Click it to update if necessary.
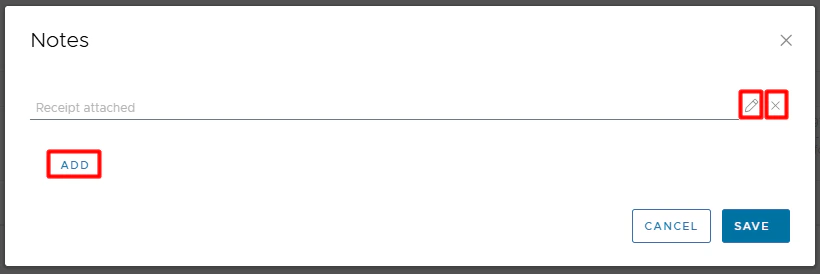
* Notes - any notes on the transaction.
* Click on the pencil icon
to add, edit or delete a note.
* Review Status - status of the transaction.
The envelope includes only:
* Settled purchases.
* Purchases with a status of Not Reviewed or Rejected.
* New (not exported yet) purchases: we've added in logic so you do not have to worry about duplicate transactions showing up in the export.
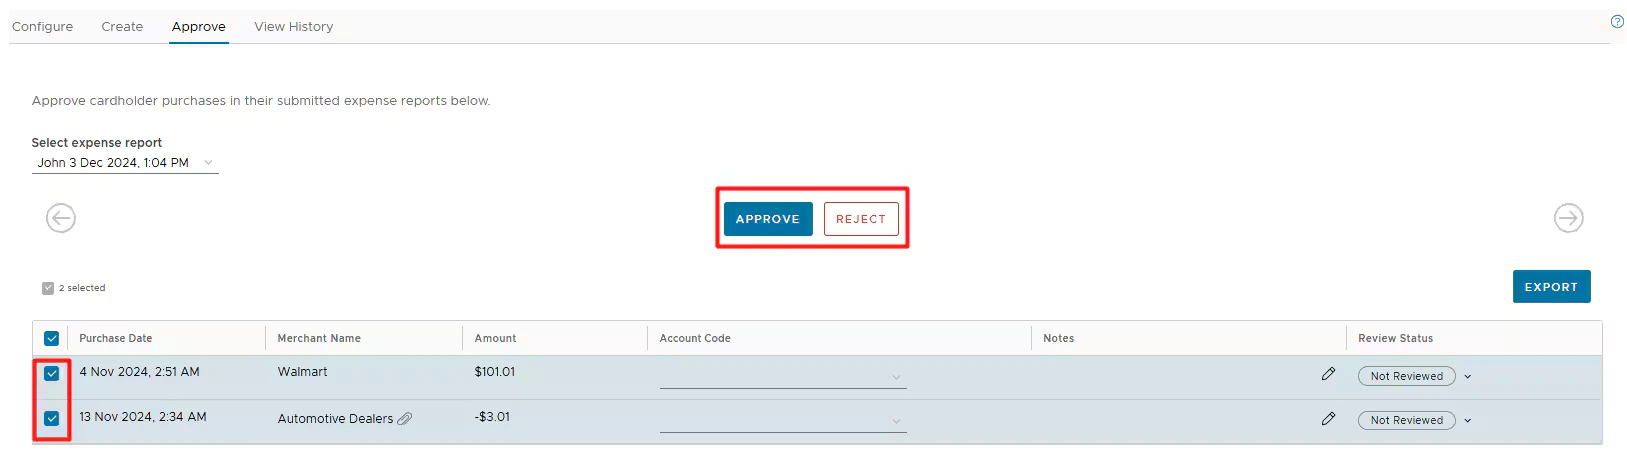
You can approve or reject a purchase right in the Review Status column.
If you want to bulk approve or reject purchases, check the ones you need and click **Approve** or **Reject** from the top bar.
Finally, you can check transactions that you want to export and click **Export** -> **Save & Export**. You will see a success message: "The envelope has been successfully exported". You can locate the exported envelope in the table under the "View History" tab and download it once its status is updated to "Completed".
## View History
On this screen, you can view a list of envelopes that have been exported by you from either the "Create" tab or the "Approve" tab, as well as those exported by your cardholders. Every envelope will have these details:
* Export time
* Envelope name
* Status
* Transactions
* Exported transactions categorized by the status.
* Total amount
* Total \$ amount of all transactions included in an envelope.
You can download any envelope by clicking on the download icon. This will download the PDF file containing all exported transactions and their details including receipt images (where applicable).
## View PDF
Within the PDF you will see a summary view showing the cardholder, last 4 digits of the card and a summary of the transactions included in the envelope. Later pages show a detail of each transaction including receipt images where available.
## Support & Inquiries
Launch the Envelope app and map an Account Code to a PEX tag or text value following the guidelines outlined in the [Configure](#settings) section. This will enable your cardholders to add an Account Code to their purchases, and then create and send envelopes for your review. The Envelope app supports [tag restrictions](/administrator-guide/how-to-limit-tag-values-with-tag-restrictions).
Launch the Envelope app and map an Account Code to a PEX tag or text value following the guidelines outlined in the [Configure](#settings) section. This will enable your cardholders to add an Account Code to their purchases, and then create and send envelopes for your review.
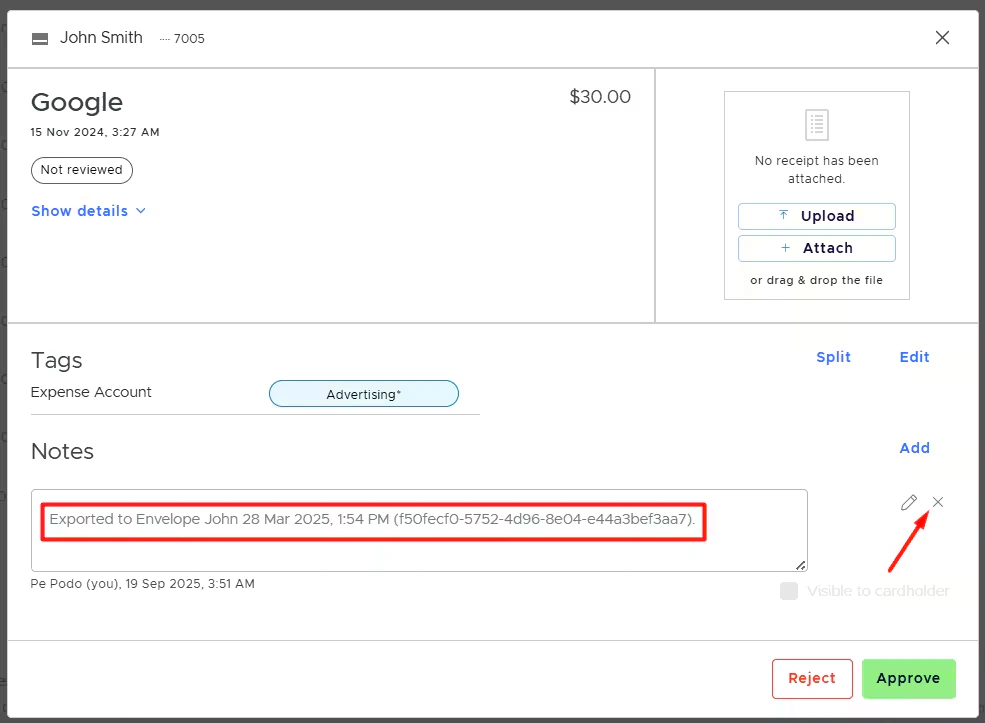
View the History tab of the Envelope to review previously exported transactions. You can also navigate to Transactions -> Card transactions -> click on the transaction line -> scroll down to the Notes section. Each exported transaction will contain a note: "Exported to Envelope ` ()`". This note can be edited and deleted. Be aware that if it is deleted or edited then this transaction will re-appear in the transaction list and can be exported again.
No, we've added in logic so you do not have to worry about duplicate transactions showing up in the export. If you would like to include a transaction in a future export navigate to Transactions -> Card transactions -> click on the transaction line -> and edit the note.
To find your transaction, make sure that:
* It meets your search criteria (status, date).
* It either has a receipt attached, a tag added, or both; otherwise, it wouldn’t have a "Not Reviewed" status.
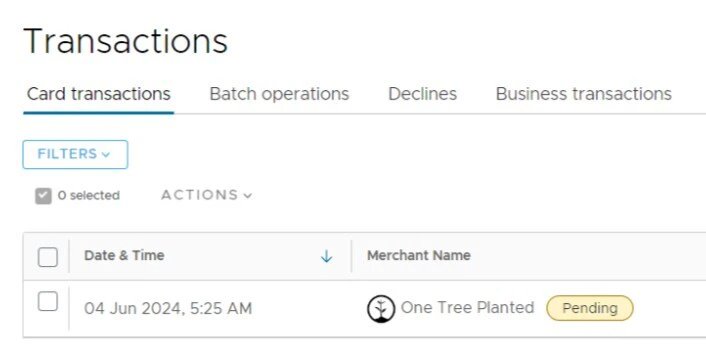
* It is already settled. There is no "Pending" label next to the merchant name.
* It has not been exported yet.
* Exported transactions will not be shown in the transaction table.
Once a cardholder submits the envelope, it immediately appears in the History tab with the status *Pending*. When you (Admin) export some or all transactions from that envelope, the status changes from *Pending* to *Completed*, and a download icon appears next to it. Click on the icon to download the file.
Yes.
It is not recommended to export transactions with multi-page PDFs attached as receipts. If you happen to attach a PDF receipt, please ensure that it is a single-page file. If it has more than one page, please take a picture or screenshot of each PDF page and attach those pictures/screenshots to a transaction as PNG or JPG files.
It includes all notes—both personal and system-generated.
It includes all purchase tags, not just the Account Code tag.
It includes the purchase date, merchant name, amount, and receipts for split purchases. However, it does not show the individual split amounts or their associated tags for now.
To re-export a purchase that has already been exported, you need to remove the export note from that purchase.
Unfortunately, this is not possible at the moment.
For any questions, please email [appsupport+envelope@pexcard.com](mailto:appsupport+envelope@pexcard.com)
 * It has not been exported yet.
* Exported transactions will not be shown in the transaction table.
* It has not been exported yet.
* Exported transactions will not be shown in the transaction table.
 2. **PEX Value**. Depending on the selected Source, you can select/enter the PEX Value.
 Once the configuration is set, click **Save**. Now you can navigate to the Create tab.
Please note that you also need to configure this before your cardholders can start creating and sending envelopes for your review.
## Create
A date range (one month) and approval status (approved) are prepopulated by default. Feel free to edit the dates and approval status as needed. Next, select the cardholder name from the dropdown and click **Select**. *Note: only one cardholder can be selected at a time.*
Once the configuration is set, click **Save**. Now you can navigate to the Create tab.
Please note that you also need to configure this before your cardholders can start creating and sending envelopes for your review.
## Create
A date range (one month) and approval status (approved) are prepopulated by default. Feel free to edit the dates and approval status as needed. Next, select the cardholder name from the dropdown and click **Select**. *Note: only one cardholder can be selected at a time.*
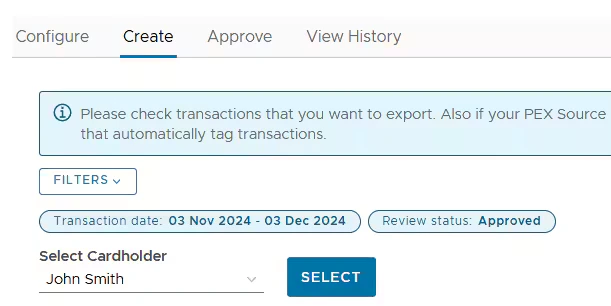 PEX will display the transactions that match your search criteria. Every transaction has:
* Purchase Date - when the transaction was made.
* Merchant Name - where the transaction was made.
* Paper clip - whether or not a receipt was attached to the transaction. No paper clip means no receipt attached.
* Amount - how much the transaction is.
* Account Code - the account corresponding to the transaction.
* Click it to update if necessary.
* Notes - any notes on the transaction.
* Click on the pencil icon
PEX will display the transactions that match your search criteria. Every transaction has:
* Purchase Date - when the transaction was made.
* Merchant Name - where the transaction was made.
* Paper clip - whether or not a receipt was attached to the transaction. No paper clip means no receipt attached.
* Amount - how much the transaction is.
* Account Code - the account corresponding to the transaction.
* Click it to update if necessary.
* Notes - any notes on the transaction.
* Click on the pencil icon
 to add, edit or delete a note.
 The transaction list includes only:
1. Settled cardholder transactions.
2. New (not exported yet) purchase transactions: we've added in logic so you do not have to worry about duplicate transactions showing up in the export.
You can filter the transaction list by:
1. Review status (Not reviewed; Approved; Rejected).
The transaction list includes only:
1. Settled cardholder transactions.
2. New (not exported yet) purchase transactions: we've added in logic so you do not have to worry about duplicate transactions showing up in the export.
You can filter the transaction list by:
1. Review status (Not reviewed; Approved; Rejected).
 2. Transaction date. The limit is up to 1 year. You might use predefined filters: Today, This month, Last month, Since this time last month.
 Check transactions that you want to export and click **Export**.
 If you have multiple Account Codes please ensure your transactions are tagged with the Account Code. Tag manually or use [PEX Auto Tagger](/administrator-guide/pex-auto-tagger) to create rules that automatically tag transactions.
Enter a name for your envelope and click **Save & Export**.
If you have multiple Account Codes please ensure your transactions are tagged with the Account Code. Tag manually or use [PEX Auto Tagger](/administrator-guide/pex-auto-tagger) to create rules that automatically tag transactions.
Enter a name for your envelope and click **Save & Export**.
 You will see a success message: "The envelope has been successfully exported". You can locate the exported envelope in the table under the "View History" tab and download it once its status is updated to "Completed".
## Approve Cardholder Envelope
You will see a success message: "The envelope has been successfully exported". You can locate the exported envelope in the table under the "View History" tab and download it once its status is updated to "Completed".
## Approve Cardholder Envelope
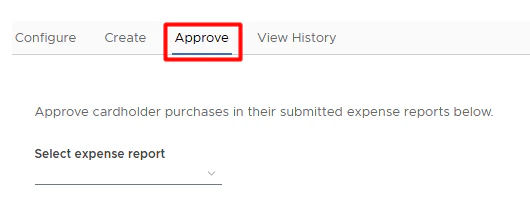 You can approve cardholder purchases in their submitted envelopes. First, select an envelope from a dropdown list.
 PEX will display the transactions of the selected envelope. Every transaction has:
* Purchase Date - when the transaction was made.
* Merchant Name - where the transaction was made.
* Paper clip - whether or not a receipt was attached to the transaction. No paper clip means no receipt attached.
* Amount - how much the transaction is.
* Account Code - the account corresponding to the transaction.
* Ensure that the account code is selected.
* Click it to update if necessary.
* Notes - any notes on the transaction.
* Click on the pencil icon
PEX will display the transactions of the selected envelope. Every transaction has:
* Purchase Date - when the transaction was made.
* Merchant Name - where the transaction was made.
* Paper clip - whether or not a receipt was attached to the transaction. No paper clip means no receipt attached.
* Amount - how much the transaction is.
* Account Code - the account corresponding to the transaction.
* Ensure that the account code is selected.
* Click it to update if necessary.
* Notes - any notes on the transaction.
* Click on the pencil icon
 to add, edit or delete a note.
 * Review Status - status of the transaction.
The envelope includes only:
* Settled purchases.
* Purchases with a status of Not Reviewed or Rejected.
* New (not exported yet) purchases: we've added in logic so you do not have to worry about duplicate transactions showing up in the export.
You can approve or reject a purchase right in the Review Status column.
* Review Status - status of the transaction.
The envelope includes only:
* Settled purchases.
* Purchases with a status of Not Reviewed or Rejected.
* New (not exported yet) purchases: we've added in logic so you do not have to worry about duplicate transactions showing up in the export.
You can approve or reject a purchase right in the Review Status column.
 If you want to bulk approve or reject purchases, check the ones you need and click **Approve** or **Reject** from the top bar.
 Finally, you can check transactions that you want to export and click **Export** -> **Save & Export**. You will see a success message: "The envelope has been successfully exported". You can locate the exported envelope in the table under the "View History" tab and download it once its status is updated to "Completed".
## View History
Finally, you can check transactions that you want to export and click **Export** -> **Save & Export**. You will see a success message: "The envelope has been successfully exported". You can locate the exported envelope in the table under the "View History" tab and download it once its status is updated to "Completed".
## View History
 On this screen, you can view a list of envelopes that have been exported by you from either the "Create" tab or the "Approve" tab, as well as those exported by your cardholders. Every envelope will have these details:
* Export time
* Envelope name
* Status
* Transactions
* Exported transactions categorized by the status.
* Total amount
* Total \$ amount of all transactions included in an envelope.
You can download any envelope by clicking on the download icon. This will download the PDF file containing all exported transactions and their details including receipt images (where applicable).
On this screen, you can view a list of envelopes that have been exported by you from either the "Create" tab or the "Approve" tab, as well as those exported by your cardholders. Every envelope will have these details:
* Export time
* Envelope name
* Status
* Transactions
* Exported transactions categorized by the status.
* Total amount
* Total \$ amount of all transactions included in an envelope.
You can download any envelope by clicking on the download icon. This will download the PDF file containing all exported transactions and their details including receipt images (where applicable).
 ## View PDF
Within the PDF you will see a summary view showing the cardholder, last 4 digits of the card and a summary of the transactions included in the envelope. Later pages show a detail of each transaction including receipt images where available.
## Support & Inquiries
## View PDF
Within the PDF you will see a summary view showing the cardholder, last 4 digits of the card and a summary of the transactions included in the envelope. Later pages show a detail of each transaction including receipt images where available.
## Support & Inquiries