> ## Documentation Index
> Fetch the complete documentation index at: https://support.pexcard.com/llms.txt
> Use this file to discover all available pages before exploring further.
# How to Export Transactions via a File Download to QuickBooks Desktop or QuickBooks Online
> If you prefer not to use the connector for auto syncing PEX transactions to your QuickBooks account every 24 hours, you can manually export transactions using a file.
## Export to QuickBooks Desktop
Log in to [dashboard.pexcard.com](https://dashboard.pexcard.com?utm_source=support).
Navigate to [Reports](https://dashboard.pexcard.com/reports/generate?utm_source=support).
Click on the dropdown to select "QuickBooks export" or type "QuickBooks export" to search.
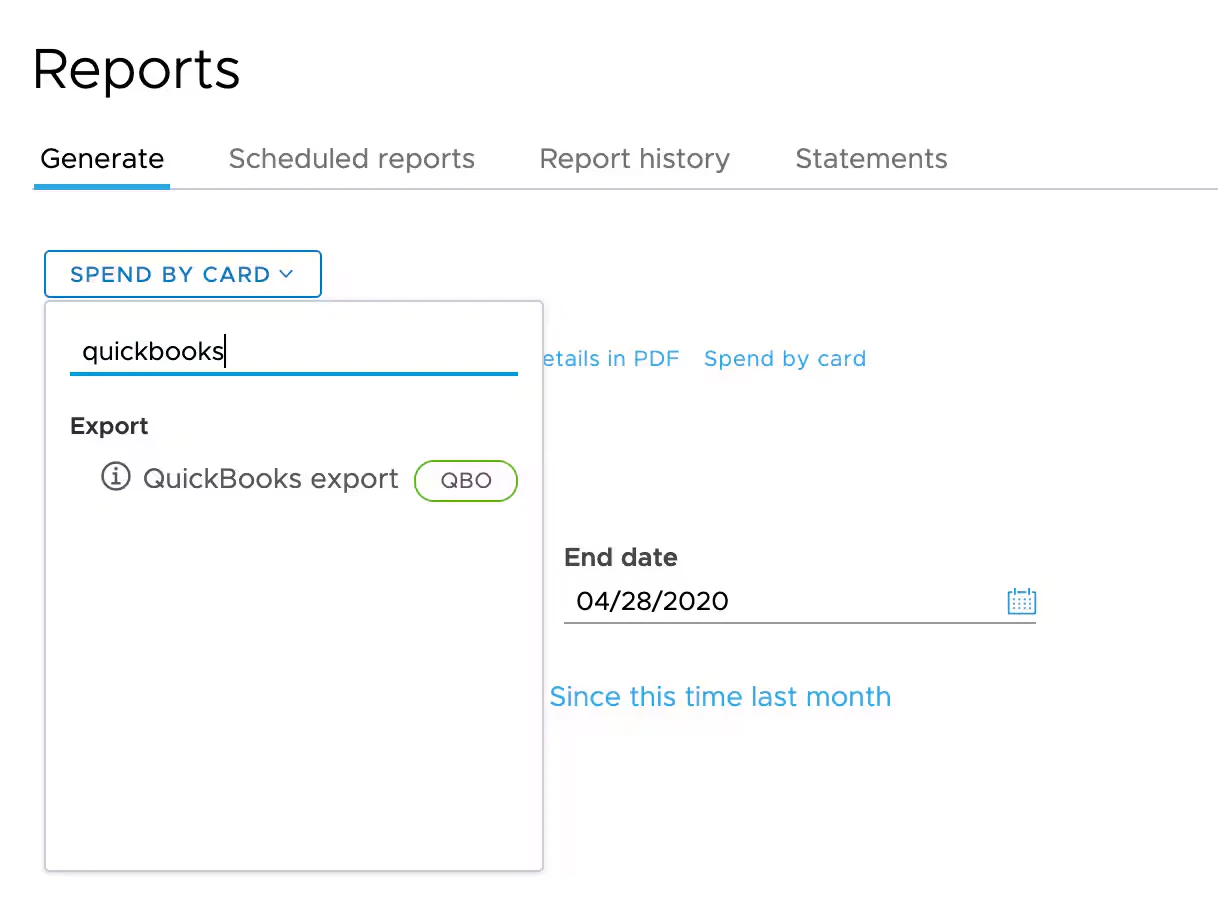 Select **Start** and **End** dates for the export.
**Important:**
To avoid creating duplicate records in QuickBooks, select dates not previously exported.
Click **Export** at the bottom of the page.
* This downloads a file ending in `.qbo` to the folder you select.
When the download completes, double-click your downloaded `.qbo` file to open it in QuickBooks.
Select the "Import new transactions now" option and click **OK**.
On the right, select the bank account you want to import the transactions into.
Click **Continue**.
* The QuickBooks dialog box will indicate that data was successfully imported.
Click **Transaction List**.
* Imported transactions will appear so you can add the payee and account and either accept or delete the transaction. Under the **ACTION** column, you can select **Quick Add** or **Add More Details** to include more information. The Memo field will include the cardholder name by default.
## Export to QuickBooks Online
Follow steps 1–4 under [Export to QuickBooks Desktop](#export-to-quickbooks-desktop) to generate and download a `.qbo` file.
In QuickBooks Online, go to **Transactions** → **Bank transactions** → select **Upload from file** → drag and drop or select the `.qbo` file you just saved.
Click **Open**.
Click **Continue**.
Select the bank account you want to import the transactions into.
Click **Continue** and confirm the import.
Return to the **Banking** tab to view your transactions.
## FAQ
* PEX statements and the .qbo file export only include settled transactions.
* Pending transactions, which appear in the card transaction history, are not final (because the transaction month and amount may change).
* Pending transactions should not be entered into QuickBooks.
* Be sure that the time period of the statement matches the .qbo file export start and end dates. The default statement period is a calendar month.
* The unique number for your PEX Account (a 13 digit number) is listed on the Transfers / ACH Instructions page of the Administrator website.
* You must log in to retrieve your account number.
**Note:**
If you have multiple PEX Accounts, each PEX Account will have its own unique account number.
* A maximum of 3 months of transactions can be exported at one time.
* PEX makes the last 12 months of spend available on the Administrator site.
* Older months can be sourced by emailing the request, with the desired time period and file type (.qbo or .csv), to [adminsupport@pexcard.com](mailto:adminsupport@pexcard.com).
* PEX will email the information to you.
* The export contains all transactions that affect the PEX Account balance, including:
* ACH transfers
* Wire transfers
* Fees
* Merchant purchases and returns
* All cards are included — there is no .qbo file export per single PEX Card Account.
* Transaction tags and notes cannot be included in the .qbo export file.
**Note:**
Only .qbo, .ofx, and .csv files are available.
* PEX does not support .qfx.
* Please contact Intuit for file conversion options.
* Only settled transactions appear in the export and statement files.
* If a merchant has not completed the transaction process within 14 days, then:
* The pending transaction will no longer appear on the card account.
* There is no record of that transaction in the export.
* If you have a receipt, but there is no settlement, then please call the merchant.
## Support & inquiries
For any questions related to exports, please email [appsupport+quickbooksexport@pexcard.com](mailto:appsupport+quickbooksexport@pexcard.com).
Select **Start** and **End** dates for the export.
**Important:**
To avoid creating duplicate records in QuickBooks, select dates not previously exported.
Click **Export** at the bottom of the page.
* This downloads a file ending in `.qbo` to the folder you select.
When the download completes, double-click your downloaded `.qbo` file to open it in QuickBooks.
Select the "Import new transactions now" option and click **OK**.
On the right, select the bank account you want to import the transactions into.
Click **Continue**.
* The QuickBooks dialog box will indicate that data was successfully imported.
Click **Transaction List**.
* Imported transactions will appear so you can add the payee and account and either accept or delete the transaction. Under the **ACTION** column, you can select **Quick Add** or **Add More Details** to include more information. The Memo field will include the cardholder name by default.
## Export to QuickBooks Online
Follow steps 1–4 under [Export to QuickBooks Desktop](#export-to-quickbooks-desktop) to generate and download a `.qbo` file.
In QuickBooks Online, go to **Transactions** → **Bank transactions** → select **Upload from file** → drag and drop or select the `.qbo` file you just saved.
Click **Open**.
Click **Continue**.
Select the bank account you want to import the transactions into.
Click **Continue** and confirm the import.
Return to the **Banking** tab to view your transactions.
## FAQ
* PEX statements and the .qbo file export only include settled transactions.
* Pending transactions, which appear in the card transaction history, are not final (because the transaction month and amount may change).
* Pending transactions should not be entered into QuickBooks.
* Be sure that the time period of the statement matches the .qbo file export start and end dates. The default statement period is a calendar month.
* The unique number for your PEX Account (a 13 digit number) is listed on the Transfers / ACH Instructions page of the Administrator website.
* You must log in to retrieve your account number.
**Note:**
If you have multiple PEX Accounts, each PEX Account will have its own unique account number.
* A maximum of 3 months of transactions can be exported at one time.
* PEX makes the last 12 months of spend available on the Administrator site.
* Older months can be sourced by emailing the request, with the desired time period and file type (.qbo or .csv), to [adminsupport@pexcard.com](mailto:adminsupport@pexcard.com).
* PEX will email the information to you.
* The export contains all transactions that affect the PEX Account balance, including:
* ACH transfers
* Wire transfers
* Fees
* Merchant purchases and returns
* All cards are included — there is no .qbo file export per single PEX Card Account.
* Transaction tags and notes cannot be included in the .qbo export file.
**Note:**
Only .qbo, .ofx, and .csv files are available.
* PEX does not support .qfx.
* Please contact Intuit for file conversion options.
* Only settled transactions appear in the export and statement files.
* If a merchant has not completed the transaction process within 14 days, then:
* The pending transaction will no longer appear on the card account.
* There is no record of that transaction in the export.
* If you have a receipt, but there is no settlement, then please call the merchant.
## Support & inquiries
For any questions related to exports, please email [appsupport+quickbooksexport@pexcard.com](mailto:appsupport+quickbooksexport@pexcard.com).