> ## Documentation Index
> Fetch the complete documentation index at: https://support.pexcard.com/llms.txt
> Use this file to discover all available pages before exploring further.
# How to review transactions with receipts, tags and user notes
> Administrators and cardholders can add receipts to transactions using the PEX Web App (via a web browser) or the PEX mobile apps.
## Review
To review transactions with receipts and tags:
* Log in as an Administrator to [https://dashboard.pexcard.com](https://dashboard.pexcard.com?utm_source=support)
* Click on the Review tab in the left navigation.
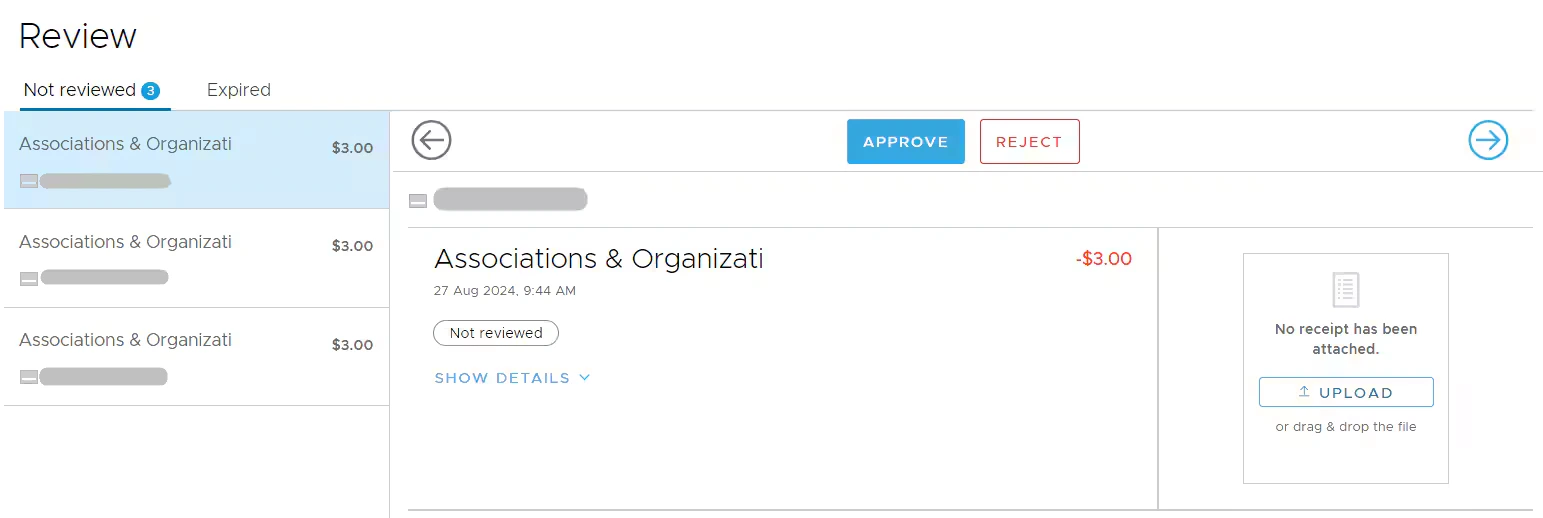
* The Review tab will open to show all "Not reviewed" transactions in the first tab.
* Receipts uploaded to pending transactions that did not match to a settlement are listed on the "Expired" tab.
* To view a receipt in full, hover over the receipt and click on the receipt anywhere outside of the "Edit" button.
* The receipt will open as a full screen modal.
* Alternatively, hover over the receipt and click "Edit" to review the receipt in medium size.
* You can also download the image from the receipt screen by clicking the download button.
* Review the receipt image and corresponding transaction details and notes.
* To complete the review of a receipt, assign it to one of these three statuses:
* **Approve.** The receipt matches the transaction details and/or the tags assigned to the transaction are correct.
* Click the "Approve" button.
* Approved status is indicated by a green badge in the transaction history for the card.
* The cardholder cannot replace or delete an approved receipt.
* **Reject:** The receipt does not match the transaction details and/or the tags applied are inaccurate.
* Click the "Reject" button with the red "x".
* Reach out to the cardholder to have them attach the correct receipt.
* When a new receipt is attached, the status will change from "Rejected" to "Not reviewed".
* "Rejected" status is indicated by a red badge in the transaction history for the card.
* **Not Reviewed:** A transaction with a receipt will have this status until it is approved or rejected. Admins can choose to scroll to another transaction and leave the transaction in the Not Reviewed status.
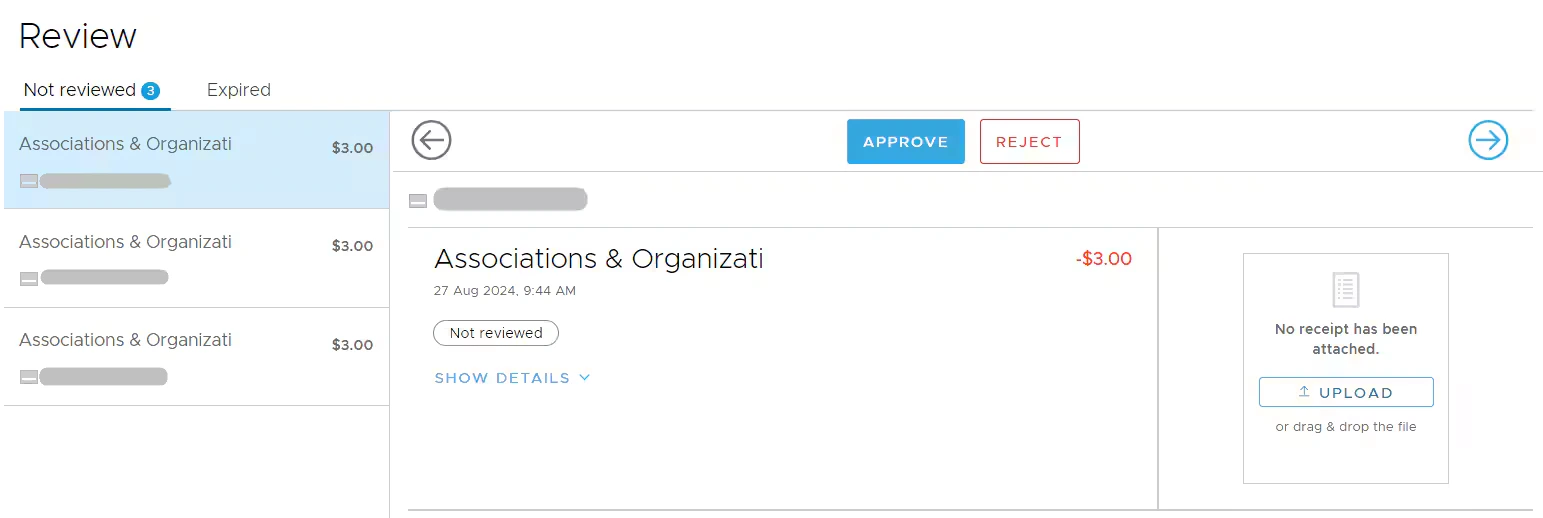 Once the Approved or Rejected status is assigned to a transaction with a receipt, it is considered to have been reviewed. The transaction will no longer appear in the "Review" menu unless someone updates the receipt image and/or tag data.
Administrators can replace or delete receipts if the transaction status is "Not Reviewed" or "Rejected".
**Note**:
* Cardholders CANNOT modify a receipt or notes once it has been approved by an administrator. To update a receipt or note, the administrator must unapprove the transaction, make the required changes, Save, then approve the transaction again.
* Transactions can be approved from the PEX Web App. The ability to approve or reject is unavailable on the PEX mobile app.
* If you are unable to approve or reject a transaction, first ensure a receipt is attached, then download the receipt, delete it, then reattach.
* If a receipt is not attached and a review to approve/decline the transaction is required for the transaction to sync, you may instead add a tag to the transaction.
## How to configure the 'Transaction review requirements & missing info reminders' feature
The "Transaction review requirements & missing data reminders" business setting controls when the transactions are sent for the manager's review. You can find it by navigating to [Business settings -> Workflows-> click "Edit" -> find the "Transaction review requirements & missing info reminders" section](https://dashboard.pexcard.com/business-settings/update-business-settings?utm_source=support).
Once the Approved or Rejected status is assigned to a transaction with a receipt, it is considered to have been reviewed. The transaction will no longer appear in the "Review" menu unless someone updates the receipt image and/or tag data.
Administrators can replace or delete receipts if the transaction status is "Not Reviewed" or "Rejected".
**Note**:
* Cardholders CANNOT modify a receipt or notes once it has been approved by an administrator. To update a receipt or note, the administrator must unapprove the transaction, make the required changes, Save, then approve the transaction again.
* Transactions can be approved from the PEX Web App. The ability to approve or reject is unavailable on the PEX mobile app.
* If you are unable to approve or reject a transaction, first ensure a receipt is attached, then download the receipt, delete it, then reattach.
* If a receipt is not attached and a review to approve/decline the transaction is required for the transaction to sync, you may instead add a tag to the transaction.
## How to configure the 'Transaction review requirements & missing info reminders' feature
The "Transaction review requirements & missing data reminders" business setting controls when the transactions are sent for the manager's review. You can find it by navigating to [Business settings -> Workflows-> click "Edit" -> find the "Transaction review requirements & missing info reminders" section](https://dashboard.pexcard.com/business-settings/update-business-settings?utm_source=support).
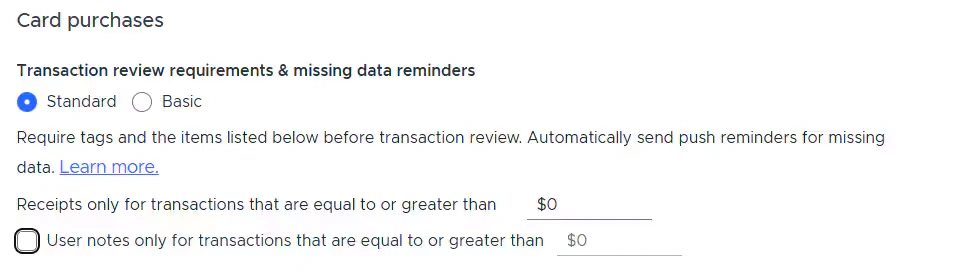
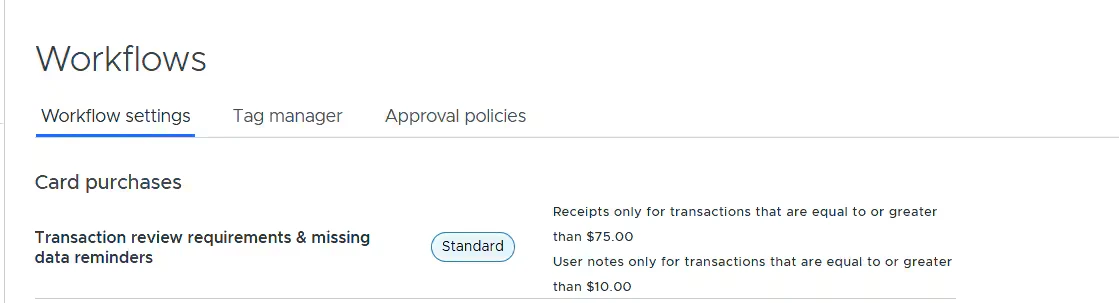 **There are two modes of the business setting: Standard and Basic**
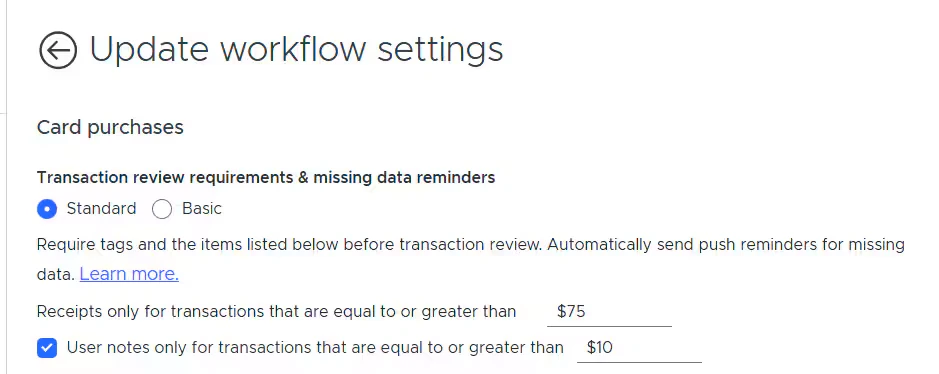
**Standard mode (use this one if you want receipts to be attached to all transactions):**
\- Transactions will not be sent for review until all required tags, receipts, or user notes are added. \
\- You can set up a threshold for the receipt requirement \
\- You can make user notes a part of transaction review requirements and set up a threshold for that.\
\- 'Admin-only control...' is enabled by default and cannot be disabled. This means that once push/email or SMS receipt reminders are enabled, cardholders won't be able to disable them.\
Mobile push notifications will be sent by default if the PEX mobile app is installed; email and sms have to be enabled by cardholders.
**There are two modes of the business setting: Standard and Basic**
**Standard mode (use this one if you want receipts to be attached to all transactions):**
\- Transactions will not be sent for review until all required tags, receipts, or user notes are added. \
\- You can set up a threshold for the receipt requirement \
\- You can make user notes a part of transaction review requirements and set up a threshold for that.\
\- 'Admin-only control...' is enabled by default and cannot be disabled. This means that once push/email or SMS receipt reminders are enabled, cardholders won't be able to disable them.\
Mobile push notifications will be sent by default if the PEX mobile app is installed; email and sms have to be enabled by cardholders.
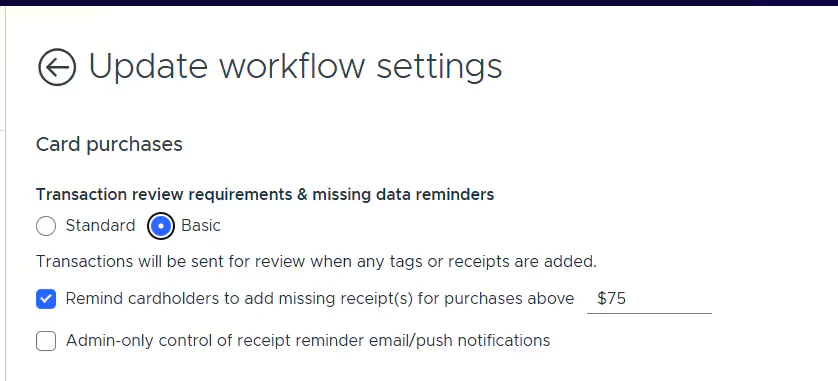
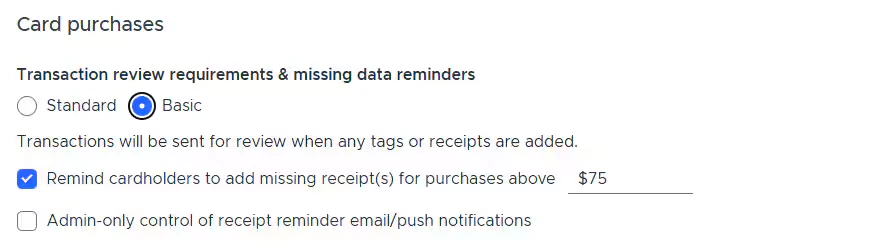
 **Basic mode:**
\- Transactions will be sent for review when any tags OR receipts are added \
\- You can set up a threshold for receipt reminders (mobile push notifications will be sent by default if the PEX mobile app is installed, email and sms have to be enabled by cardholders) \
\- 'Admin-only control...' means that once push/email or sms receipt reminders are enabled, cardholders won't be able to disable them.
**Basic mode:**
\- Transactions will be sent for review when any tags OR receipts are added \
\- You can set up a threshold for receipt reminders (mobile push notifications will be sent by default if the PEX mobile app is installed, email and sms have to be enabled by cardholders) \
\- 'Admin-only control...' means that once push/email or sms receipt reminders are enabled, cardholders won't be able to disable them.
 ## When transactions get into "Not Reviewed" status
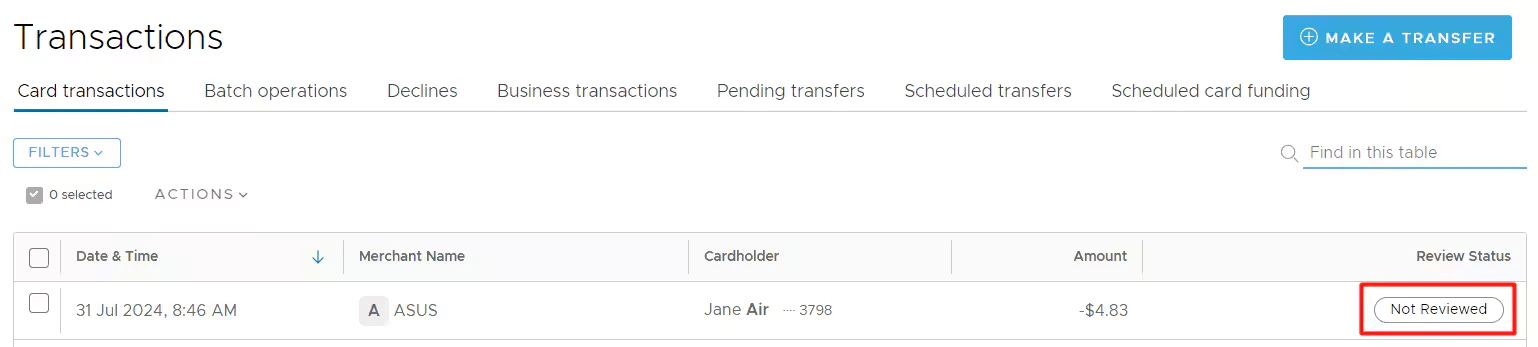
You can see that a transaction is in "Not Reviewed" status in the "Transactions" menu.
## When transactions get into "Not Reviewed" status
You can see that a transaction is in "Not Reviewed" status in the "Transactions" menu.
 And you can also find "Not Reviewed" transactions in the "Review" menu under the "Not Reviewed" tab.
 There are conditions for transactions to appear in the "Not Reviewed" status and in the "Not Reviewed" tab:
## Scenario A
* No approval policy set up.
* The “Basic” mode under the “Transaction review requirements & missing info reminders” setting is enabled.
There are conditions for transactions to appear in the "Not Reviewed" status and in the "Not Reviewed" tab:
## Scenario A
* No approval policy set up.
* The “Basic” mode under the “Transaction review requirements & missing info reminders” setting is enabled.
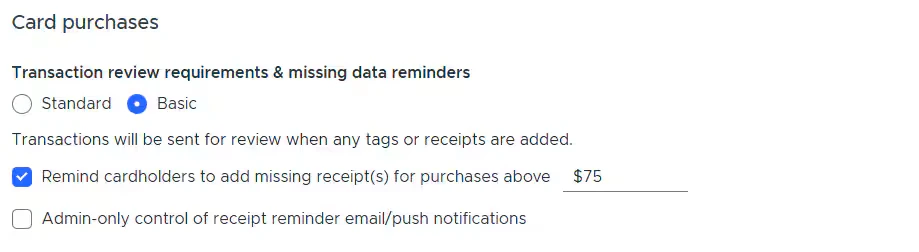 * Admin(s) or cardholders add either a tag (required or not), a receipt, or both.
* Then, the transaction appears to all Admins on the "Not Reviewed" tab.
## Scenario B
* No approval policy set up.
* The “Standard” mode under the “Transaction review requirements & missing info reminders” setting is enabled.
* Admin(s) or cardholders add either a tag (required or not), a receipt, or both.
* Then, the transaction appears to all Admins on the "Not Reviewed" tab.
## Scenario B
* No approval policy set up.
* The “Standard” mode under the “Transaction review requirements & missing info reminders” setting is enabled.
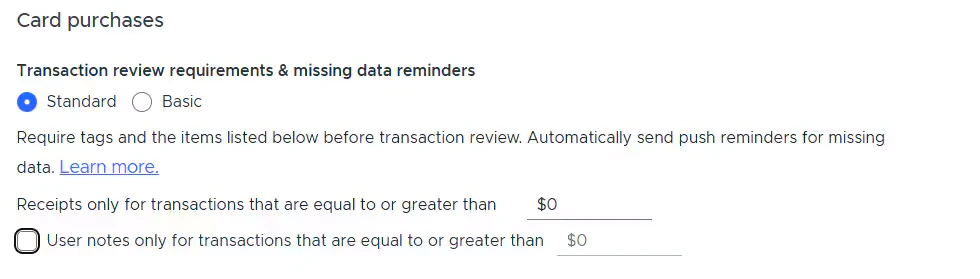 * Admins or cardholders must add required tags and receipts to all transactions to appear to all Admins on the "Not Reviewed" tab.
## Scenario C
* Approval policy is set up.
* The “Standard” mode under the “Transaction review requirements & missing info reminders” setting is enabled.
* Admins or cardholders must add required tags and receipts to all transactions to appear to all Admins on the "Not Reviewed" tab.
## Scenario C
* Approval policy is set up.
* The “Standard” mode under the “Transaction review requirements & missing info reminders” setting is enabled.
 * Admins or cardholders must add all required tags and a receipt for the transaction to appear on the "Not Reviewed" tab, visible only to the Admin(s) assigned to approve or decline the transaction.
## Scenario D
* Approval policy is set up.
* The “Basic” mode under the “Transaction review requirements & missing info reminders” setting is enabled.
* Admins or cardholders must add all required tags and a receipt for the transaction to appear on the "Not Reviewed" tab, visible only to the Admin(s) assigned to approve or decline the transaction.
## Scenario D
* Approval policy is set up.
* The “Basic” mode under the “Transaction review requirements & missing info reminders” setting is enabled.
 * Admins or cardholders must add a tag (required or not) or a receipt, or both, for the transaction to appear on the "Not Reviewed" tab, visible only to the Admin(s) assigned to approve or decline the transaction[.](#scenario-a)