> ## Documentation Index
> Fetch the complete documentation index at: https://support.pexcard.com/llms.txt
> Use this file to discover all available pages before exploring further.
# How to Setup and Create Tags with Tag Manager
> Use Tag Manager to create transaction tags for coding, categorizing, or reconciling PEX transactions to your general ledger.
*Transaction tags are currently available with* [*select account types.*](https://www.pexcard.com/pricing?utm_source=support)
***Watch a step-by-step demonstration [here](https://pex.navattic.com/pde05w9)!***
Transaction tags are an easy, flexible way to attach additional data and information to transactions. Tags can help you code/categorize transactions or assist with reconciliation:
* Tags are often used to attach GL (general ledger) codes to transactions
* You can use tags to note when a transaction should be billed to a client and the name of the client for the billing
Tags must be configured in the Administrator application before they can be used by cardholders.
**Note:**
If you are using [QuickBooks Online](/administrator-guide/create-pex-tags-for-quickbooks-online), [Aplos](/administrator-guide/pex-connector-for-aplos-preconfiguration), or one of the other accounting systems with a PEX Connector, you can use the connector to automatically create tags in PEX. The connector will keep your tab structure in sync and ensure that tagged transactions will always match your GL codes in PEX.
## How to access Tag Manager
To open Tag Manager:
Log in to [dashboard.pexcard.com](https://dashboard.pexcard.com?utm_source=support).
Click **Business Settings** in the left-hand navigation.
Click **Workflows**.
Click **Tag Manager**.
**Note:**
To see the "Tag Manager" tab and edit tags, you must have either the "Manage Cardholders" or "Edit Business Settings & Apps" permission. If you have the proper permissions but still do not see an option for "Tag Manager," please contact Admin Support for assistance.
## Create a new tag
From the [Tag Manager](https://dashboard.pexcard.com/business-settings/tags?utm_source=support) page:
* Click **Add Tag**.
* Select the tag type you want to create — this determines how it will appear to Admins and cardholders. Select the tag type based on the type of information you want to attach to a transaction. A tag can be:
* Dropdown
* It is used to code transactions with GL codes, classes, departments, etc.
* Text
* It is a free-text entry tag that can be alphabetical, numerical, alphanumeric, or none (unrestricted).
* Decimal
* It allows decimal numbers (such as a dollar amount).
* Sales Tax (\$)
* Yes/No
* Yes/No tag is shown as a checkbox.
### Dropdown
It is used to code transactions with GL codes, classes, departments, etc.
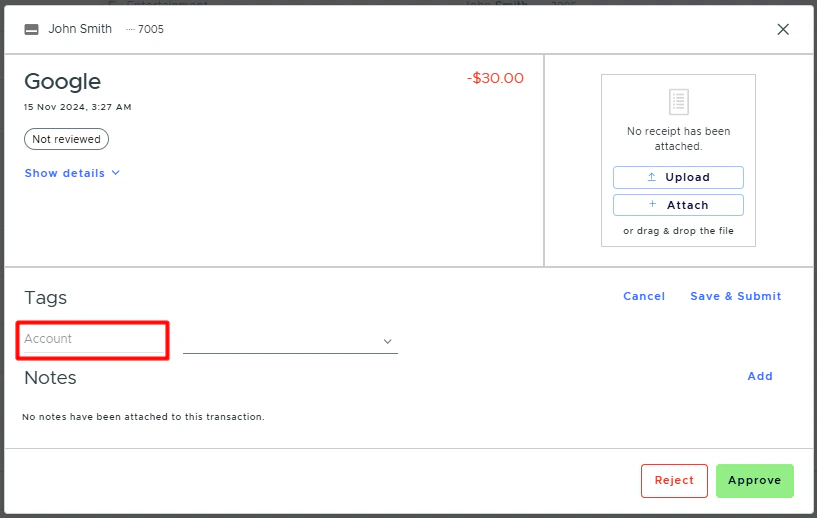
* Name your tag.
* This is what Admins and cardholders will see in the Tags section on a transaction.
 * Optionally, you can add a description.
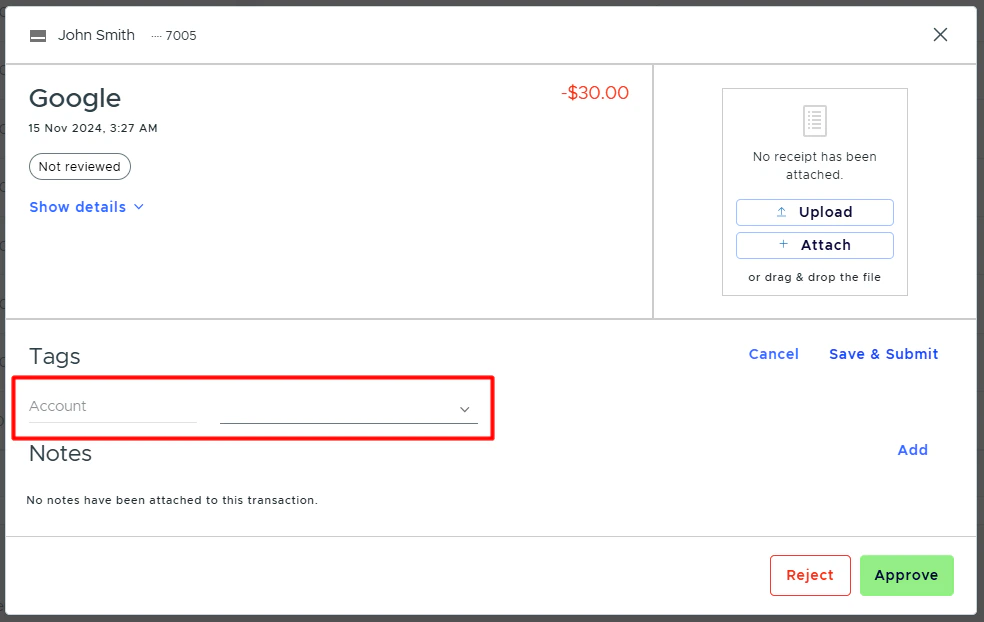
* Choose whether or not the tag is enabled.
* When the "Enabled" checkbox is selected, users will see this tag in the Tags section on a transaction.
* Optionally, you can add a description.
* Choose whether or not the tag is enabled.
* When the "Enabled" checkbox is selected, users will see this tag in the Tags section on a transaction.
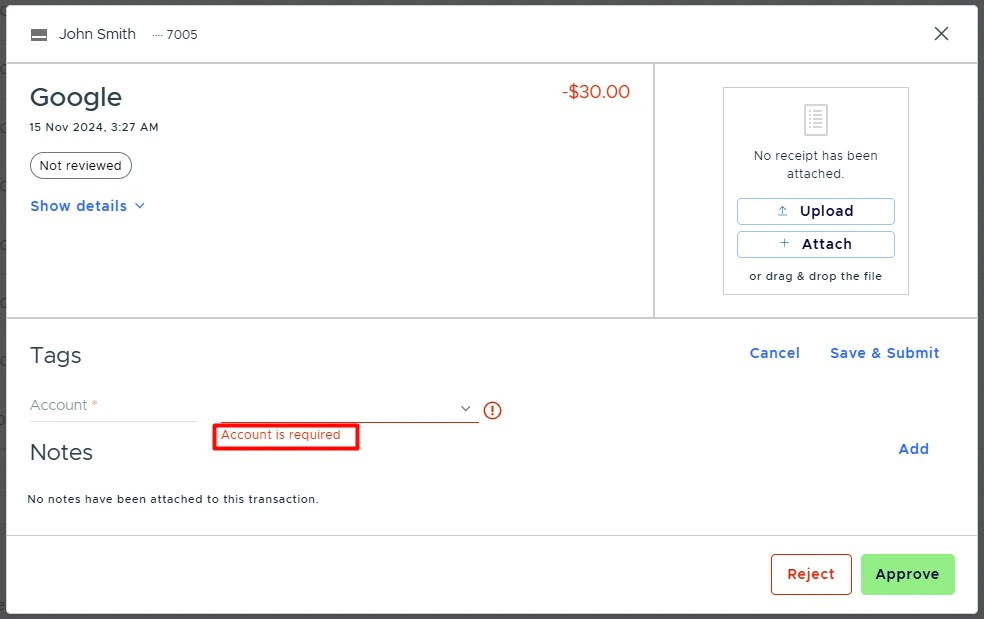
 * Choose whether or not the tag is required.
* When the "Required" checkbox is selected, users must add this tag when they click "Add" or "Edit" in the Tags section on a transaction.
* Choose whether or not the tag is required.
* When the "Required" checkbox is selected, users must add this tag when they click "Add" or "Edit" in the Tags section on a transaction.
 * Click **Save**.
#### Add options
There are three ways to add tag options:
1. [Automatically import options from your accounting system](#automatically-import-options-from-your-accounting-system)
* PEX recommends this way if you want to use existing GL codes from your accounting system.
2. [Add options manually](#add-options-manually)
3. [Import options from CSV](#import-options-from-csv)
#### Automatically Import Options from Your Accounting System
Refer to the relevant article based on your accounting system:
* **QuickBooks Online**: [Create PEX tags for QuickBooks Online](/administrator-guide/create-pex-tags-for-quickbooks-online)
* **Aplos**: [PEX Connector for Aplos: Pre-configuration](/administrator-guide/pex-connector-for-aplos-preconfiguration)
* **NetSuite**: [Create PEX tags for NetSuite](/administrator-guide/create-pex-tags-for-netsuite)
* **Blackbaud**: [Create PEX tags for Blackbaud](/administrator-guide/create-pex-tags-for-blackbaud)
* **Xero**: [Create PEX tags for Xero](/administrator-guide/create-pex-tags-for-xero)
#### Add Options Manually
* Click **Add option**.
* Click **Save**.
#### Add options
There are three ways to add tag options:
1. [Automatically import options from your accounting system](#automatically-import-options-from-your-accounting-system)
* PEX recommends this way if you want to use existing GL codes from your accounting system.
2. [Add options manually](#add-options-manually)
3. [Import options from CSV](#import-options-from-csv)
#### Automatically Import Options from Your Accounting System
Refer to the relevant article based on your accounting system:
* **QuickBooks Online**: [Create PEX tags for QuickBooks Online](/administrator-guide/create-pex-tags-for-quickbooks-online)
* **Aplos**: [PEX Connector for Aplos: Pre-configuration](/administrator-guide/pex-connector-for-aplos-preconfiguration)
* **NetSuite**: [Create PEX tags for NetSuite](/administrator-guide/create-pex-tags-for-netsuite)
* **Blackbaud**: [Create PEX tags for Blackbaud](/administrator-guide/create-pex-tags-for-blackbaud)
* **Xero**: [Create PEX tags for Xero](/administrator-guide/create-pex-tags-for-xero)
#### Add Options Manually
* Click **Add option**.
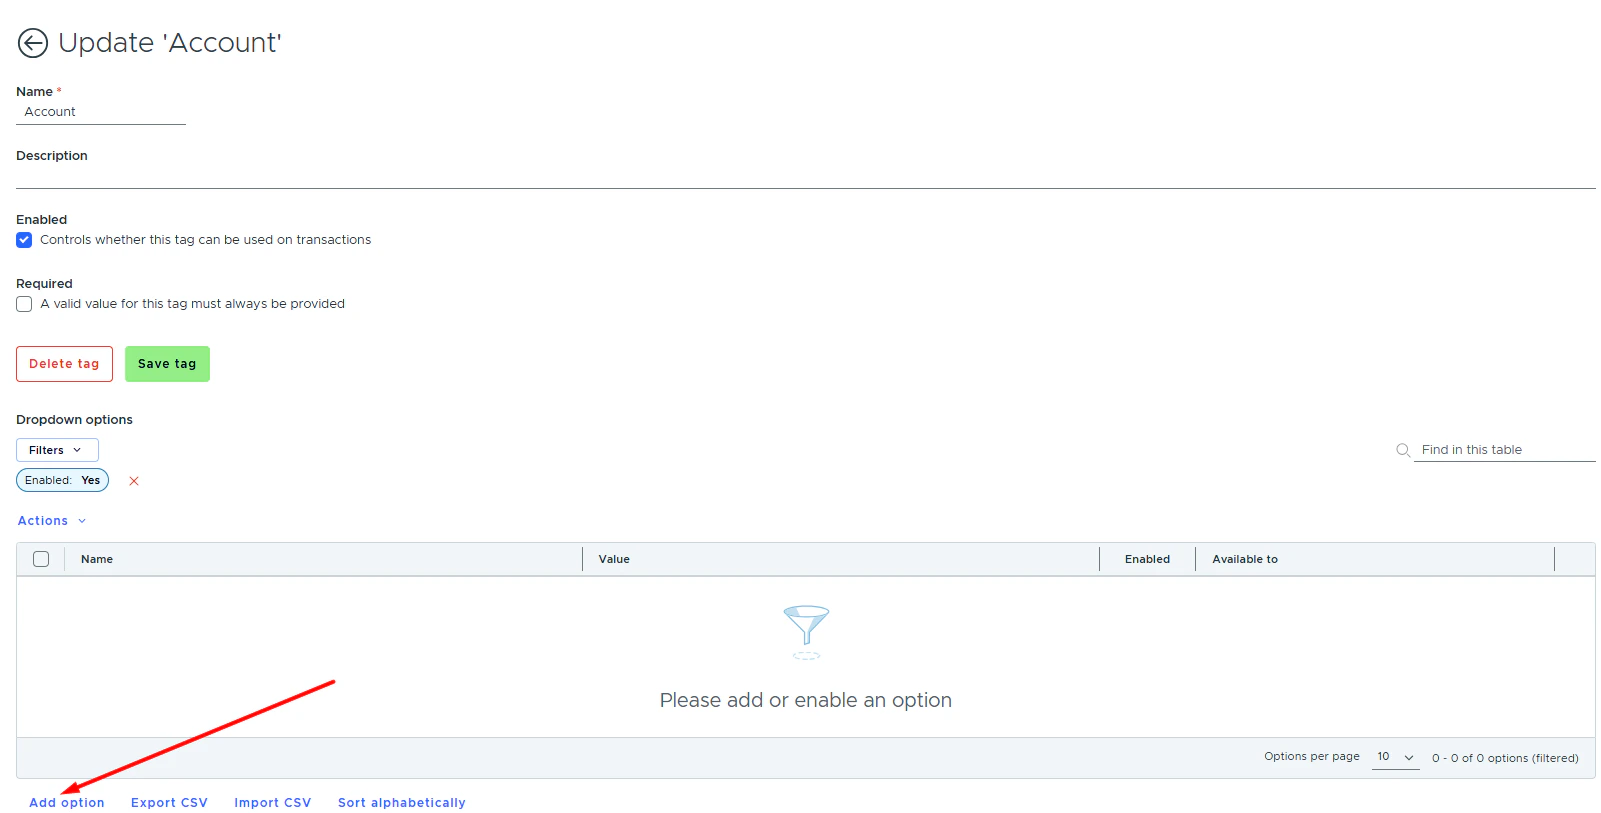 * Name your option.
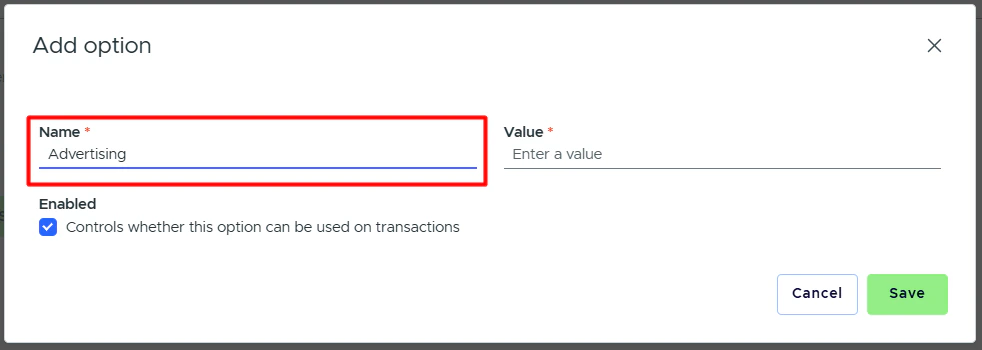 * This name is what the Admins and cardholders will see in the dropdown list.
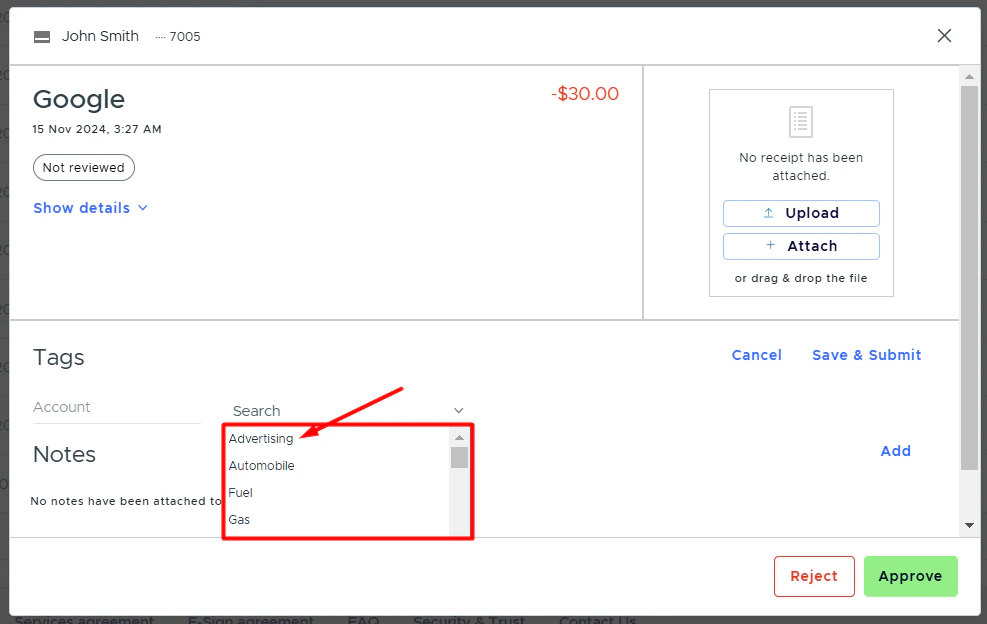 * This field is limited to 200 characters. We recommend using shorter lengths as the full name may be cut off before that on older mobile devices / smaller screens.
* Add **Option Value**.
* This field is limited to 200 characters. We recommend using shorter lengths as the full name may be cut off before that on older mobile devices / smaller screens.
* Add **Option Value**.
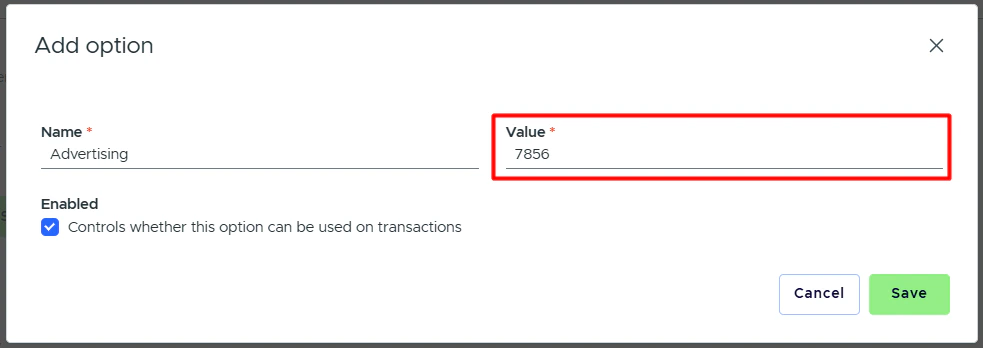 * The "Option Value" is a code used in your accounting software.
* It provides a 1-to-1 match with your system to track and analyze transactions.
* The "Option Value" is often (though not always) a number, e.g., a GL account number.
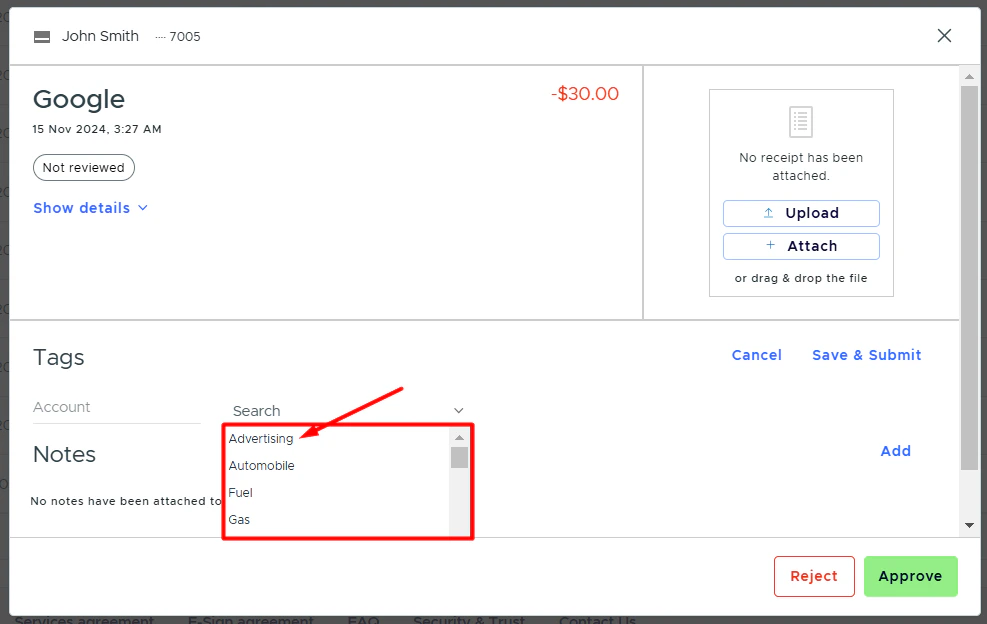
* The cardholder does not see the option value.
**Note:**
All option values must be unique. You will receive a duplicate entry error if the option values are not unique.
* **Enabled** controls whether this option can be used on transactions.
* If it is disabled, the option will not be shown in the dropdown list.
* The "Option Value" is a code used in your accounting software.
* It provides a 1-to-1 match with your system to track and analyze transactions.
* The "Option Value" is often (though not always) a number, e.g., a GL account number.
* The cardholder does not see the option value.
**Note:**
All option values must be unique. You will receive a duplicate entry error if the option values are not unique.
* **Enabled** controls whether this option can be used on transactions.
* If it is disabled, the option will not be shown in the dropdown list.
 **Set tag option availability**
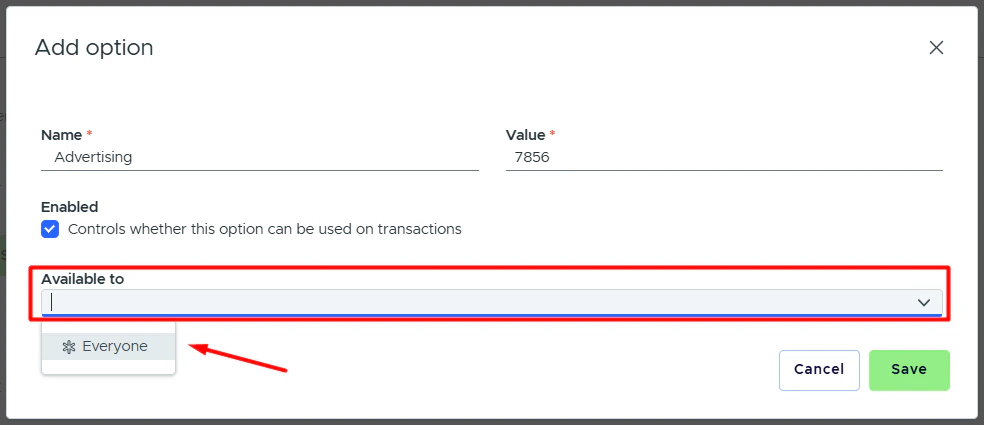
* Available to. You can show only relevant and necessary tag options to your employees when they tag their purchases. Note that this is available only to tags of a [Dropdown](#dropdown) tag type.
The "Available to" field lists all your groups. By default, every tag option is available to all cardholders. From the dropdown, select the relevant group(s) to limit the option's visibility and availability to those specific cardholders. You can select multiple groups. See more details in ["How to limit tag values with tag restrictions?"](/administrator-guide/how-to-limit-tag-values-with-tag-restrictions)
**Set tag option availability**
* Available to. You can show only relevant and necessary tag options to your employees when they tag their purchases. Note that this is available only to tags of a [Dropdown](#dropdown) tag type.
The "Available to" field lists all your groups. By default, every tag option is available to all cardholders. From the dropdown, select the relevant group(s) to limit the option's visibility and availability to those specific cardholders. You can select multiple groups. See more details in ["How to limit tag values with tag restrictions?"](/administrator-guide/how-to-limit-tag-values-with-tag-restrictions)
 * Click **Save**.
##### Import CSV
You can import tag options by uploading them to PEX in a .csv (Comma Separated Values) formatted file.
* PEX does not accept uploads in proprietary formats like .xls (Excel) or .numbers (Numbers).
* Popular programs like Excel and Numbers will let you save files as .csv
* If you have problems importing the information to PEX, please see ["Fixing Common Errors with File Imports"](/administrator-guide/fixing-common-errors-with-file-imports).
Click **Import CSV** to import option values in bulk.
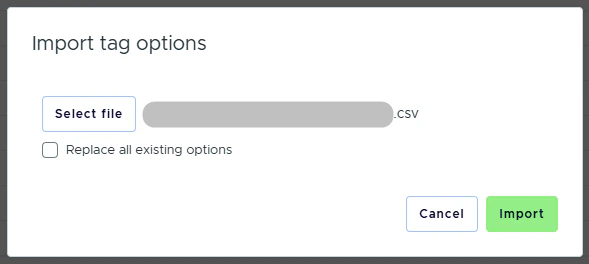
* Click **Select file**.
* Select the .csv file you want to upload
* Click **Open**.
* Click **Import** to upload the .csv file
* Click **Save**.
##### Import CSV
You can import tag options by uploading them to PEX in a .csv (Comma Separated Values) formatted file.
* PEX does not accept uploads in proprietary formats like .xls (Excel) or .numbers (Numbers).
* Popular programs like Excel and Numbers will let you save files as .csv
* If you have problems importing the information to PEX, please see ["Fixing Common Errors with File Imports"](/administrator-guide/fixing-common-errors-with-file-imports).
Click **Import CSV** to import option values in bulk.
* Click **Select file**.
* Select the .csv file you want to upload
* Click **Open**.
* Click **Import** to upload the .csv file
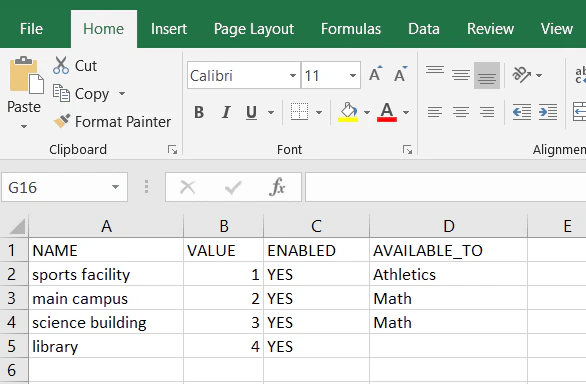
 File example:
 **Note**:
* All names must be unique. You cannot add two tag options with the identical names.
* You will receive a duplicate entry error if the names are not unique.
* All option values must be unique. You cannot add two tag options with the identical option values.
* You will receive a duplicate entry error if the option values are not unique.
* If you manually add options and later import csv option values, the system will not duplicate the same tag option values from your csv if you've already added them manually.
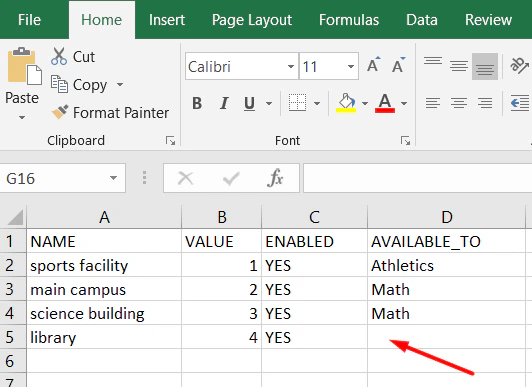
* If you want your tag option to be available to everyone, leave a blank value in the "AVAILABLE\_TO" column.
**Note**:
* All names must be unique. You cannot add two tag options with the identical names.
* You will receive a duplicate entry error if the names are not unique.
* All option values must be unique. You cannot add two tag options with the identical option values.
* You will receive a duplicate entry error if the option values are not unique.
* If you manually add options and later import csv option values, the system will not duplicate the same tag option values from your csv if you've already added them manually.
* If you want your tag option to be available to everyone, leave a blank value in the "AVAILABLE\_TO" column.
 * If the “Replace all existing options” is checked while importing a csv file then:
* All existing tag options will be **disabled**.
* New tag options will be added as enabled or disabled depending on the ENABLED column in the csv file.
* If you already have tag options saved but want to update them using a csv file, keep the following in mind:
* Scenario A
* Update name for tag option A in the csv file
* Do not update option value for tag option A in the csv file
Then after importing the file:
* No new tag option will appear
* The name of an existing tag option A will be updated.
* Scenario B
* Update name for tag option A in the csv file
* Update option value for tag option A in the csv file
Then after importing the file:
* A new tag option B will appear with updated name and option value
* An existing tag option A will not be updated.
* Scenario C
* Update option value for tag option A in the csv file
* Do not update name for tag option A in the csv file
Then after importing the file:
* You will receive a duplicate entry error because you cannot have both a new tag and an existing tag with identical names.
* Scenario D
* Update "Enabled" for tag option A in the csv file
Then after importing the file, the "Enabled" for an existing tag option A will be updated.
#### Options filters and actions
There are several actions you can take with options, including:
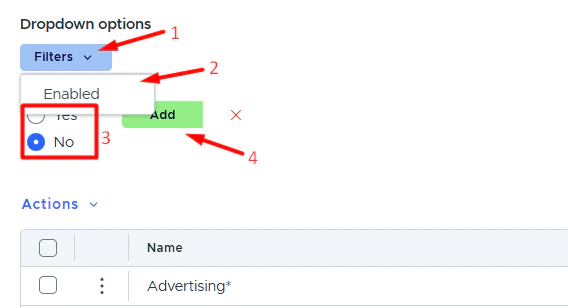
**Filtering options by:**
* Enabled/disabled status
* If the “Replace all existing options” is checked while importing a csv file then:
* All existing tag options will be **disabled**.
* New tag options will be added as enabled or disabled depending on the ENABLED column in the csv file.
* If you already have tag options saved but want to update them using a csv file, keep the following in mind:
* Scenario A
* Update name for tag option A in the csv file
* Do not update option value for tag option A in the csv file
Then after importing the file:
* No new tag option will appear
* The name of an existing tag option A will be updated.
* Scenario B
* Update name for tag option A in the csv file
* Update option value for tag option A in the csv file
Then after importing the file:
* A new tag option B will appear with updated name and option value
* An existing tag option A will not be updated.
* Scenario C
* Update option value for tag option A in the csv file
* Do not update name for tag option A in the csv file
Then after importing the file:
* You will receive a duplicate entry error because you cannot have both a new tag and an existing tag with identical names.
* Scenario D
* Update "Enabled" for tag option A in the csv file
Then after importing the file, the "Enabled" for an existing tag option A will be updated.
#### Options filters and actions
There are several actions you can take with options, including:
**Filtering options by:**
* Enabled/disabled status
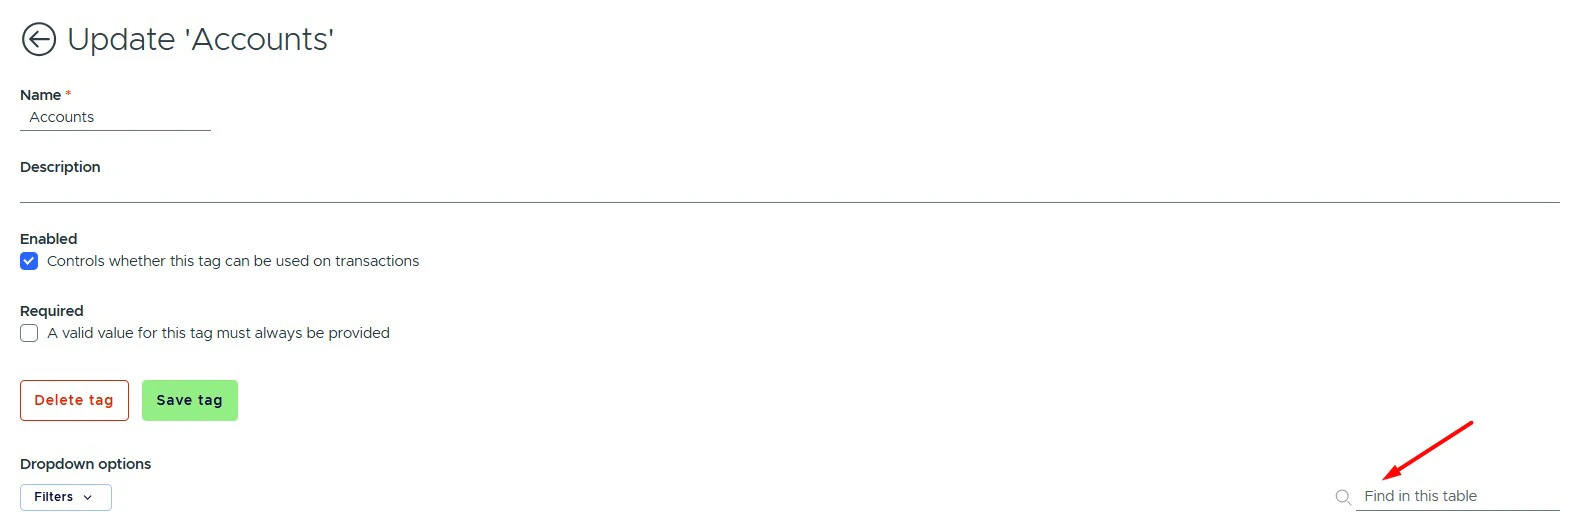
 **Finding an option by name or value:**
* If you're searching for the disabled option but the list is filtered to hide disabled options, it won’t appear in the search results.
* Clear the filters to display all options first, then run the search.
**Finding an option by name or value:**
* If you're searching for the disabled option but the list is filtered to hide disabled options, it won’t appear in the search results.
* Clear the filters to display all options first, then run the search.
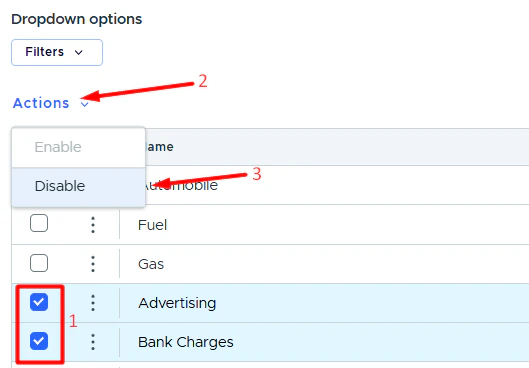
 **Disabling an option:**
Select the option(s).
Click **Actions**.
Click **Disable**.
Confirm your selection.
**Disabling an option:**
Select the option(s).
Click **Actions**.
Click **Disable**.
Confirm your selection.
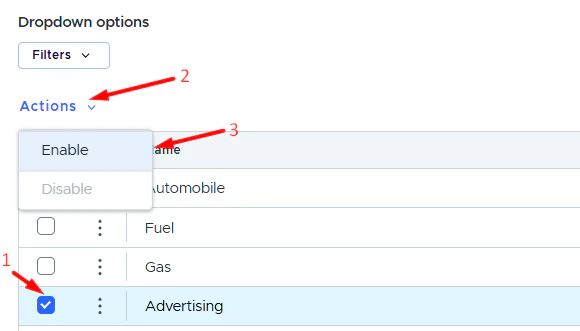
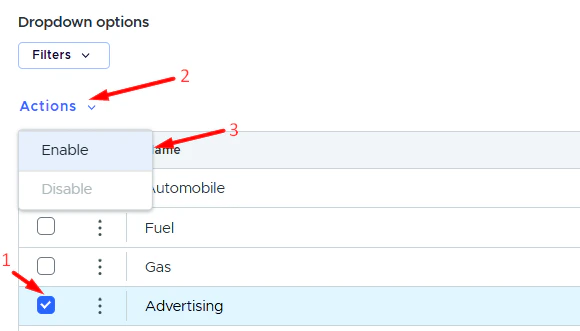
 **Enabling an option:**
Select the option(s).
Click **Actions**.
Click **Enable**.
Confirm your selection.
**Enabling an option:**
Select the option(s).
Click **Actions**.
Click **Enable**.
Confirm your selection.
 **Editing an option:**
* Click the **pencil icon** next to the option you want to edit.
**Editing an option:**
* Click the **pencil icon** next to the option you want to edit.
 **Reordering options:**
Select the option(s).
Locate the row where you want to move the option(s).
Click the **three-dot vertical menu**.
Click **Move selected here**.
**Reordering options:**
Select the option(s).
Locate the row where you want to move the option(s).
Click the **three-dot vertical menu**.
Click **Move selected here**.
 **Sorting options alphabetically:**
* Click **Sort alphabetically**.
* Confirm.
**Sorting options alphabetically:**
* Click **Sort alphabetically**.
* Confirm.
 **Exporting option csv file:**
* Click **Export CSV**.
### Text
It is a free-text entry tag that can be alphabetical, numerical, alphanumeric, or none (unrestricted).
* Name your tag.
* This is what Admins and cardholders will see in the Tags section on a transaction.
**Exporting option csv file:**
* Click **Export CSV**.
### Text
It is a free-text entry tag that can be alphabetical, numerical, alphanumeric, or none (unrestricted).
* Name your tag.
* This is what Admins and cardholders will see in the Tags section on a transaction.
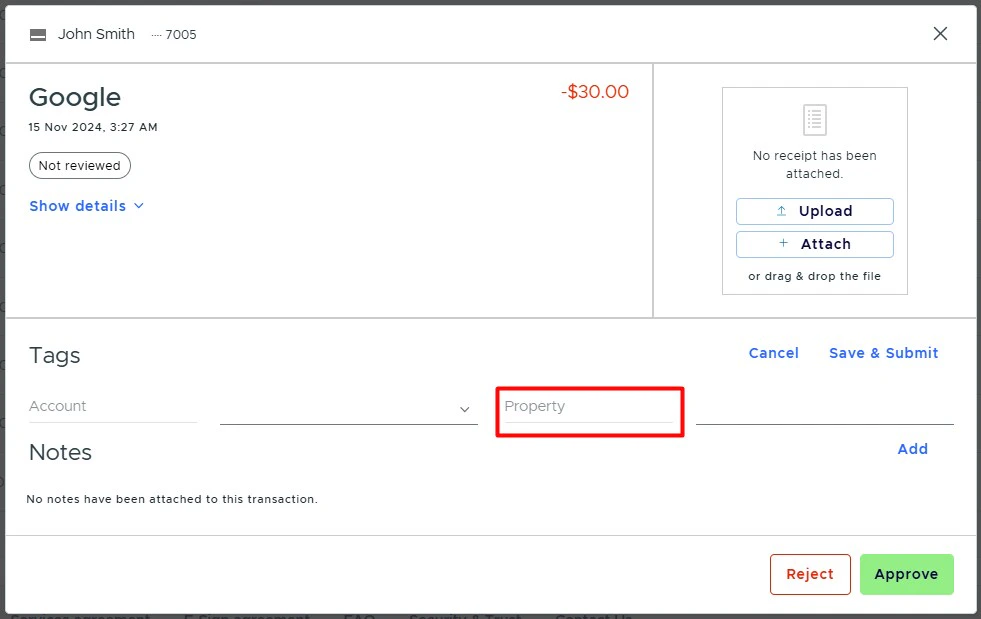 * Optionally, you can add a description.
* Choose whether or not the tag is enabled.
* When the "Enabled" checkbox is selected, users will see this tag in the Tags section on a transaction.
* Optionally, you can add a description.
* Choose whether or not the tag is enabled.
* When the "Enabled" checkbox is selected, users will see this tag in the Tags section on a transaction.
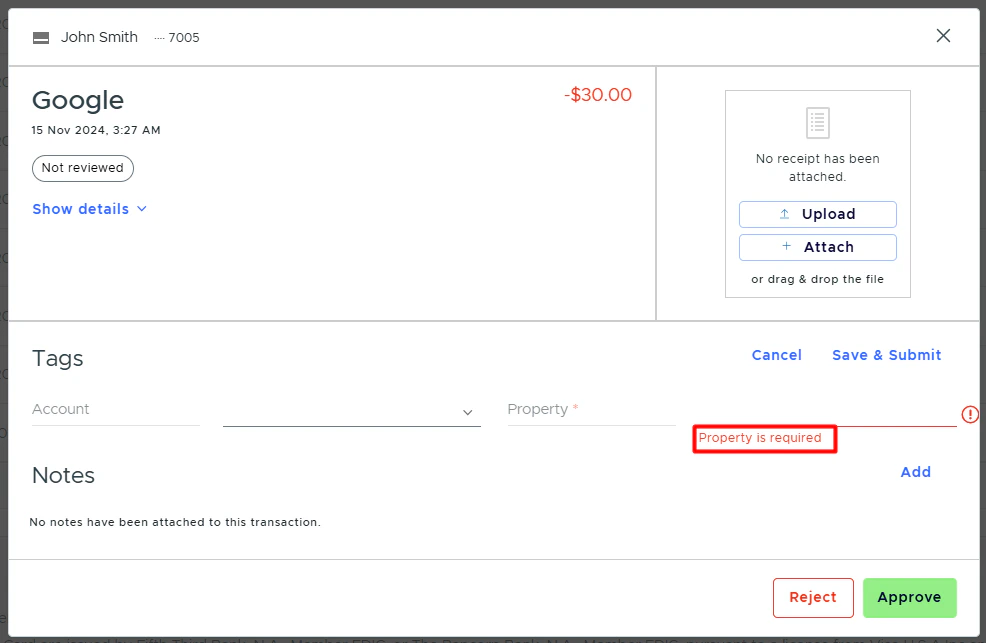
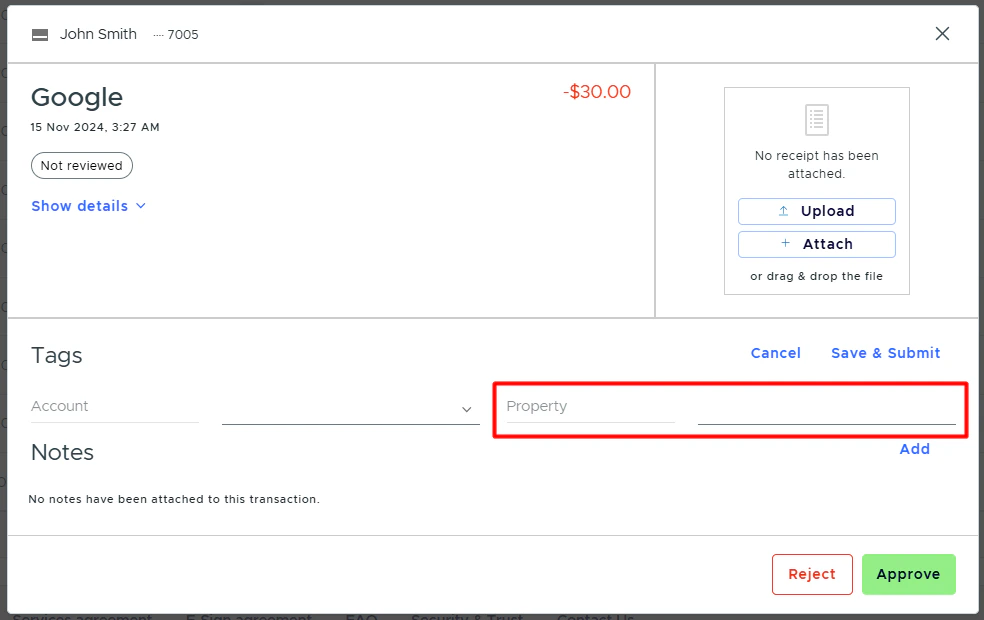 * Choose whether or not the tag is required.
* When the "Required" checkbox is selected, users must add this tag when they click "Add" or "Edit" in the Tags section on a transaction.
* Choose whether or not the tag is required.
* When the "Required" checkbox is selected, users must add this tag when they click "Add" or "Edit" in the Tags section on a transaction.
 * Select a validation type for the field:
* None
* Alphabetic
* Numeric
* Alphanumeric
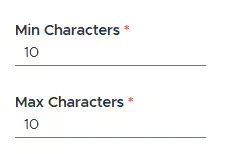
* Add Min Characters
* Add Max Characters
* If you want users to enter an exact number of characters, set the same value for both the Minimum allowed characters and Maximum allowed characters fields.
* Select a validation type for the field:
* None
* Alphabetic
* Numeric
* Alphanumeric
* Add Min Characters
* Add Max Characters
* If you want users to enter an exact number of characters, set the same value for both the Minimum allowed characters and Maximum allowed characters fields.
 * Click **Save**.
### Decimal
It allows decimal numbers (such as a dollar amount).
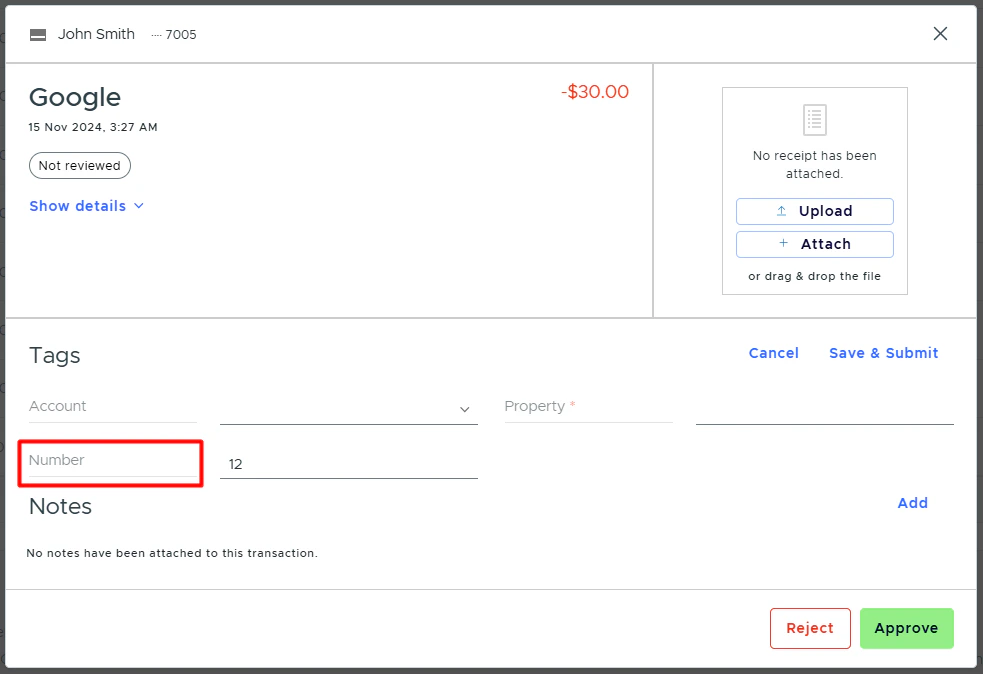
* Name your tag.
* This is what Admins and cardholders will see in the Tags section on a transaction.
* Click **Save**.
### Decimal
It allows decimal numbers (such as a dollar amount).
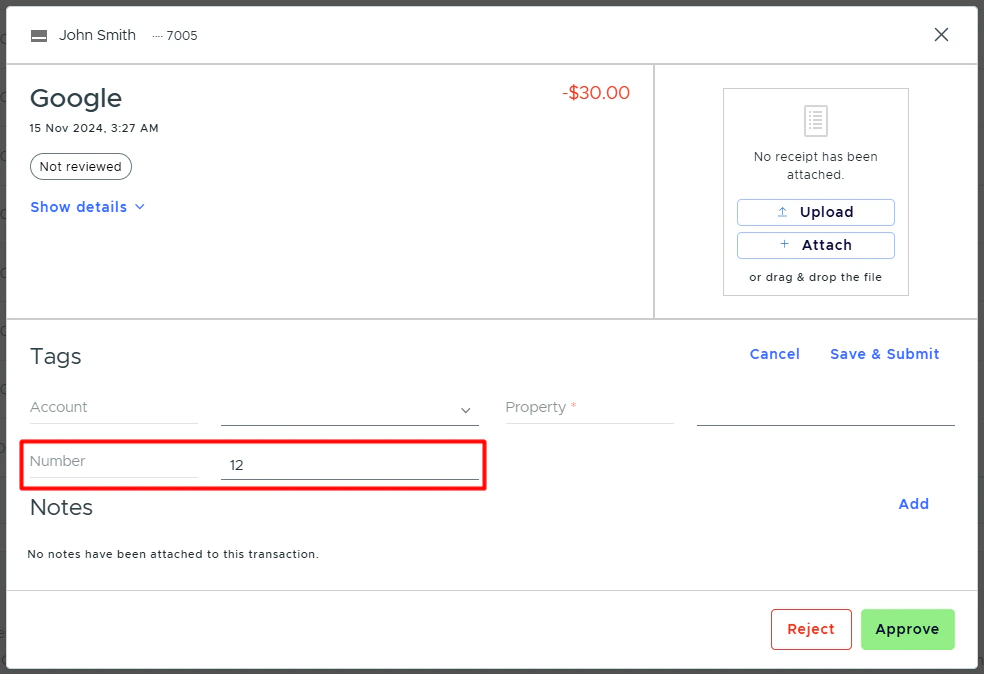
* Name your tag.
* This is what Admins and cardholders will see in the Tags section on a transaction.
 * Optionally, you can add a description.
* Choose whether or not the tag is enabled.
* When the "Enabled" checkbox is selected, users will see this tag in the Tags section on a transaction.
* Optionally, you can add a description.
* Choose whether or not the tag is enabled.
* When the "Enabled" checkbox is selected, users will see this tag in the Tags section on a transaction.
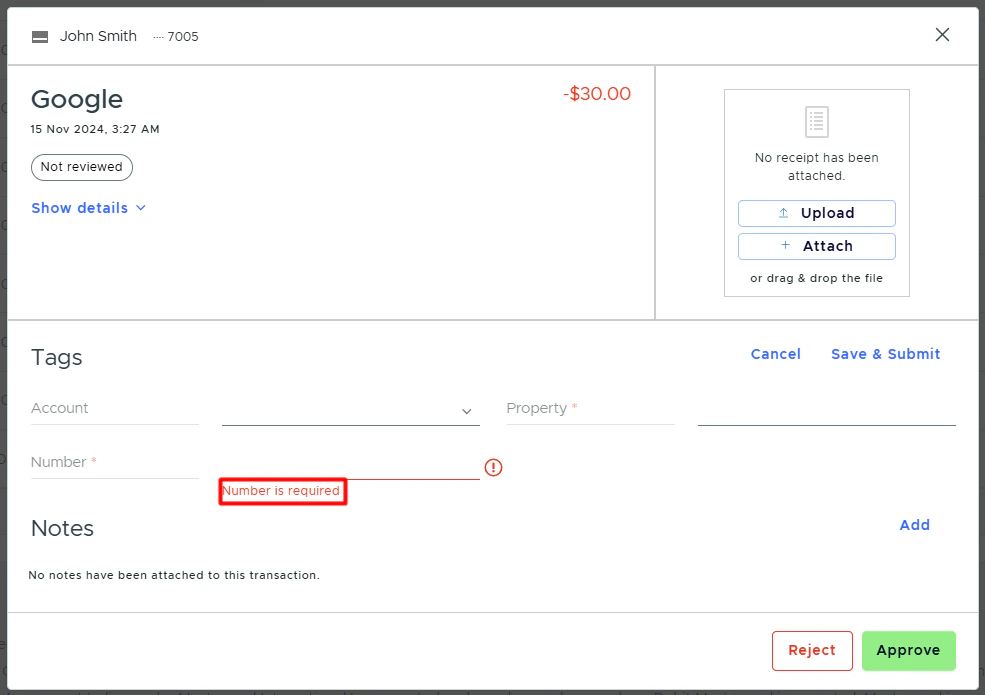
 * Choose whether or not the tag is required.
* When the "Required" checkbox is selected, users must add this tag when they click "Add" or "Edit" in the Tags section on a transaction.
* Choose whether or not the tag is required.
* When the "Required" checkbox is selected, users must add this tag when they click "Add" or "Edit" in the Tags section on a transaction.
 * Click **Save**.
### Sales Tax (\$)
* Name your tag.
* This is what Admins and cardholders will see in the Tags section on a transaction.
* Click **Save**.
### Sales Tax (\$)
* Name your tag.
* This is what Admins and cardholders will see in the Tags section on a transaction.
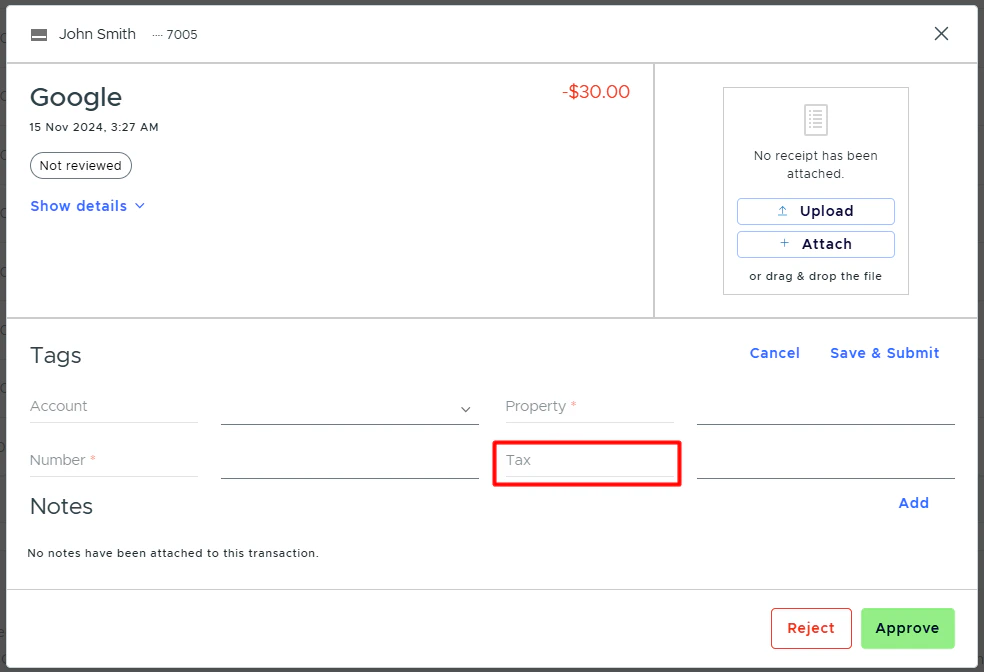 * Optionally, you can add a description.
* Choose whether or not the tag is enabled.
* When the "Enabled" checkbox is selected, users will see this tag in the Tags section on a transaction.
* Optionally, you can add a description.
* Choose whether or not the tag is enabled.
* When the "Enabled" checkbox is selected, users will see this tag in the Tags section on a transaction.
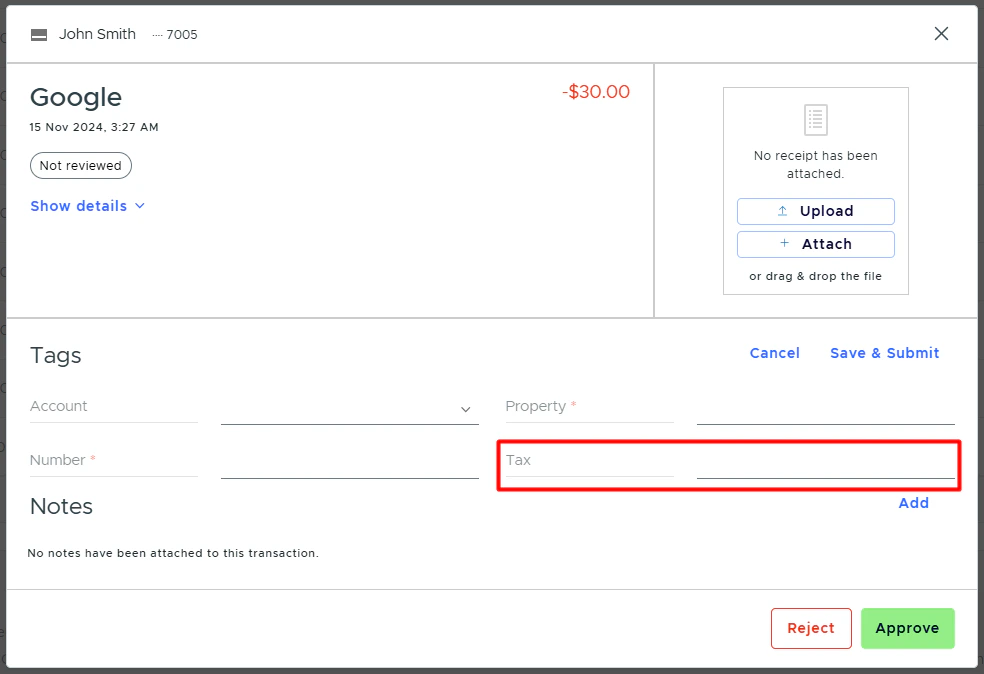 * Choose whether or not the tag is required.
* When the "Required" checkbox is selected, users must add this tag when they click "Add" or "Edit" in the Tags section on a transaction.
* Choose whether or not the tag is required.
* When the "Required" checkbox is selected, users must add this tag when they click "Add" or "Edit" in the Tags section on a transaction.
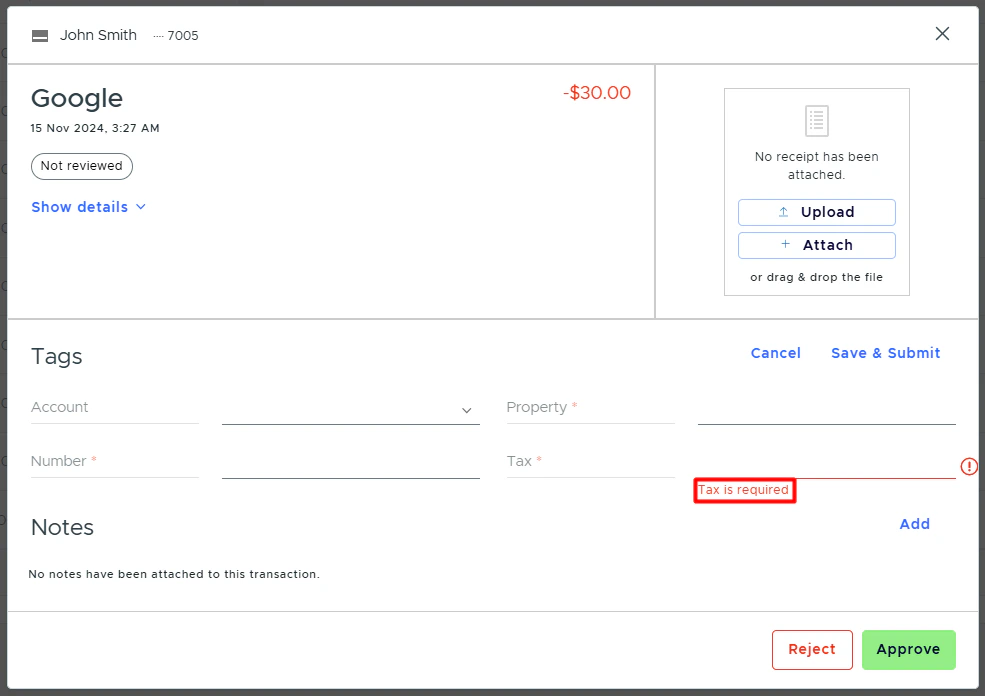 * Click **Save**.
### Yes/No
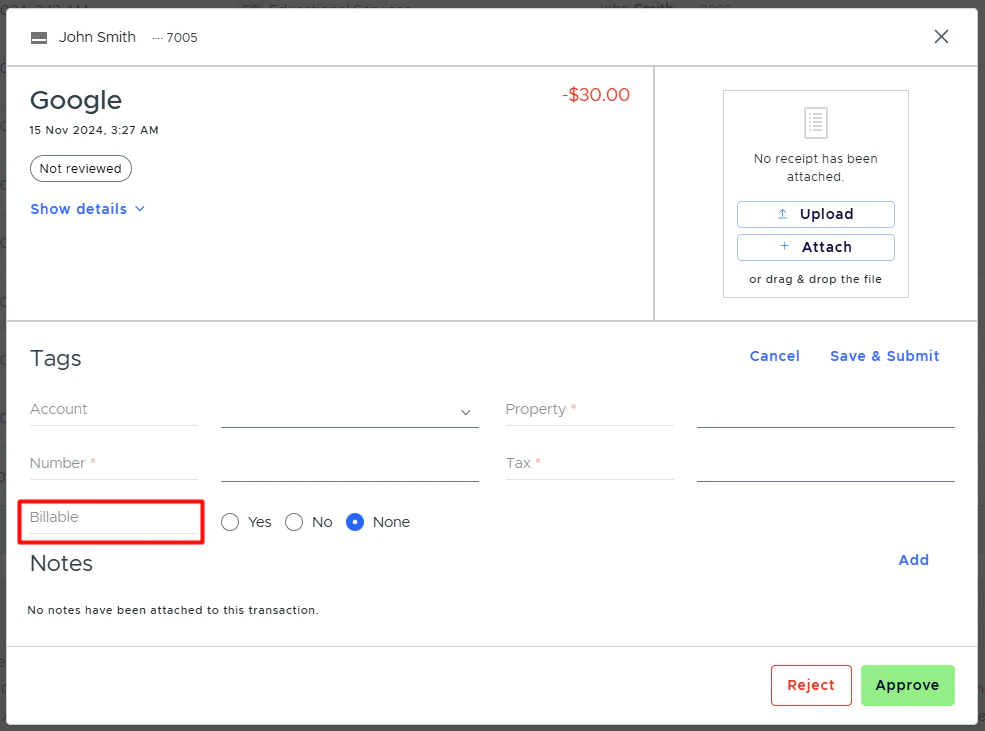
Yes/No tag is shown as a checkbox.
* Name your tag.
* This is what Admins and cardholders will see in the Tags section on a transaction.
* Click **Save**.
### Yes/No
Yes/No tag is shown as a checkbox.
* Name your tag.
* This is what Admins and cardholders will see in the Tags section on a transaction.
 * Optionally, you can add a description.
* Choose whether or not the tag is enabled.
* When the "Enabled" checkbox is selected, users will see this tag in the Tags section on a transaction.
* Optionally, you can add a description.
* Choose whether or not the tag is enabled.
* When the "Enabled" checkbox is selected, users will see this tag in the Tags section on a transaction.
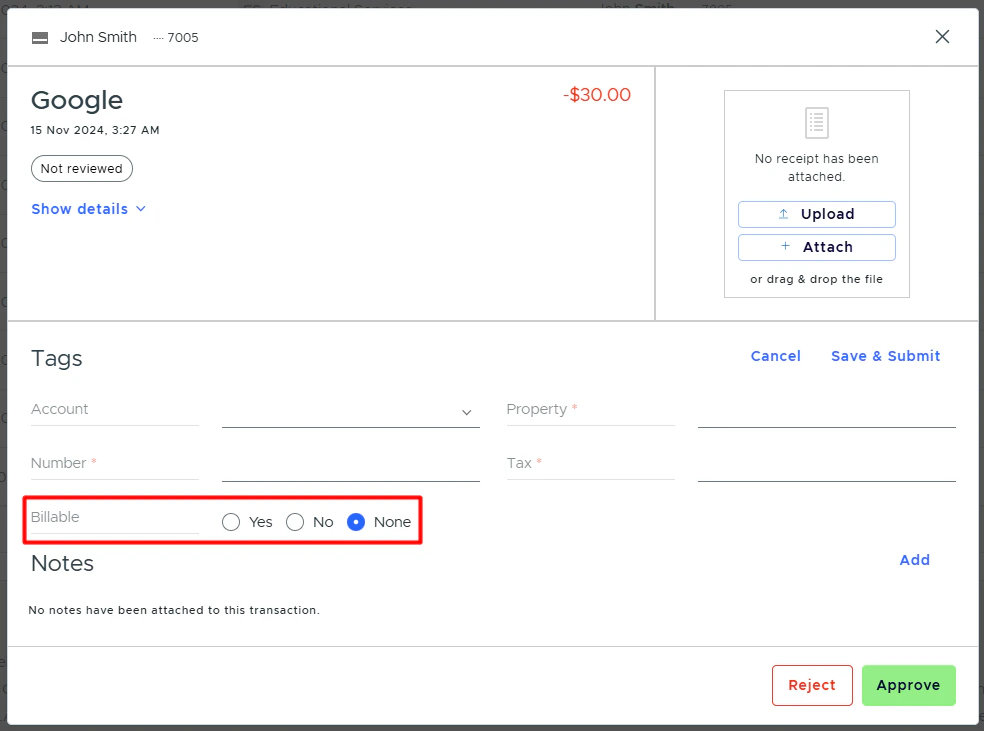 * Choose whether or not the tag is required.
* When the "Required" checkbox is selected, users must add this tag when they click "Add" or "Edit" in the Tags section on a transaction.
* Choose whether or not the tag is required.
* When the "Required" checkbox is selected, users must add this tag when they click "Add" or "Edit" in the Tags section on a transaction.
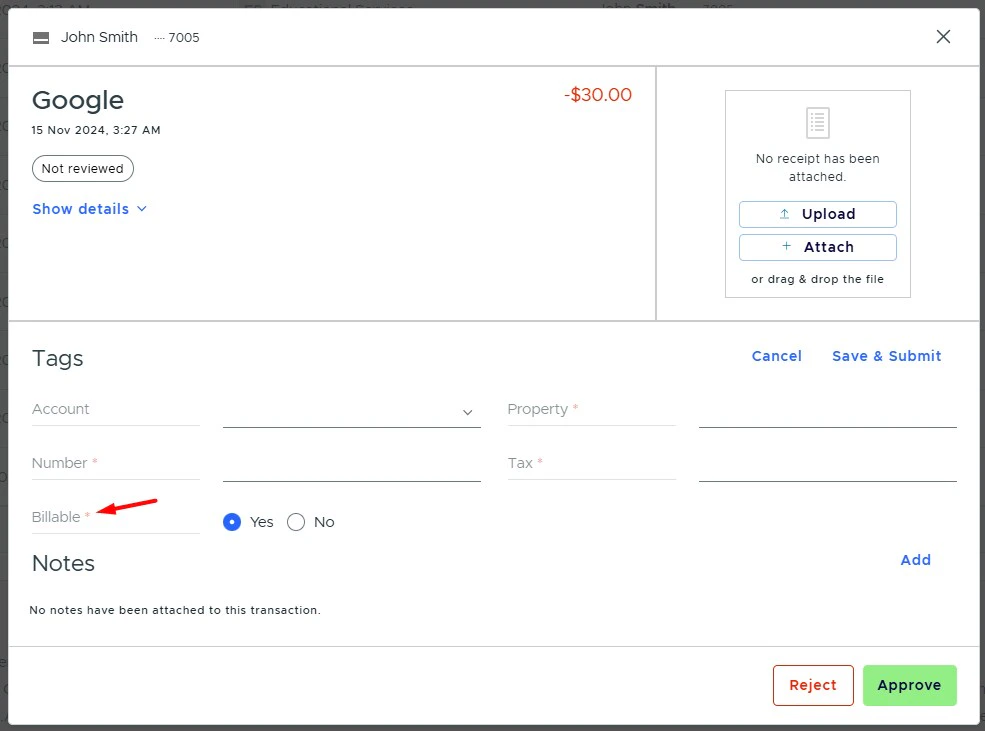 * Click **Save**.
## Tag filters and actions
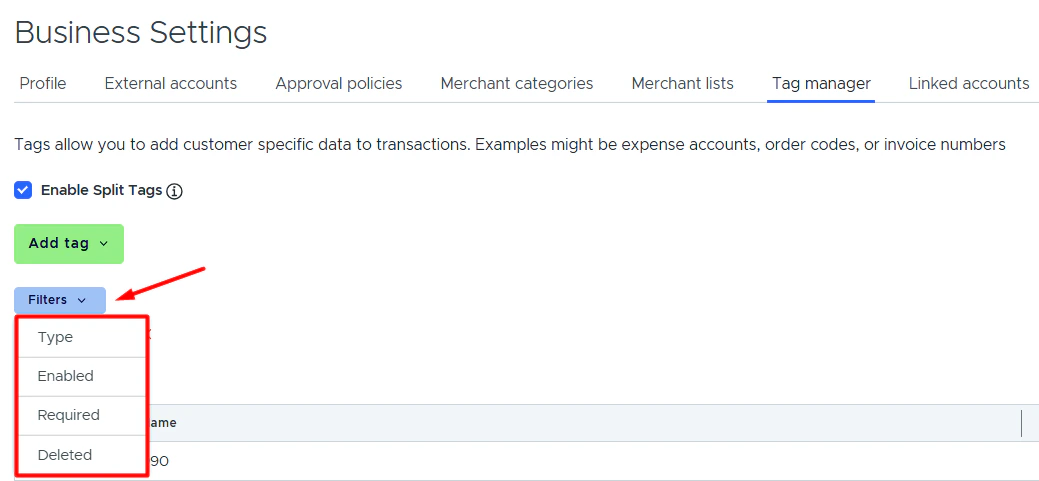
There are several actions you can take with tags, including:
**Filtering tags by:**
* Type
* Enabled status
* Required status
* Deleted status
* Click **Save**.
## Tag filters and actions
There are several actions you can take with tags, including:
**Filtering tags by:**
* Type
* Enabled status
* Required status
* Deleted status
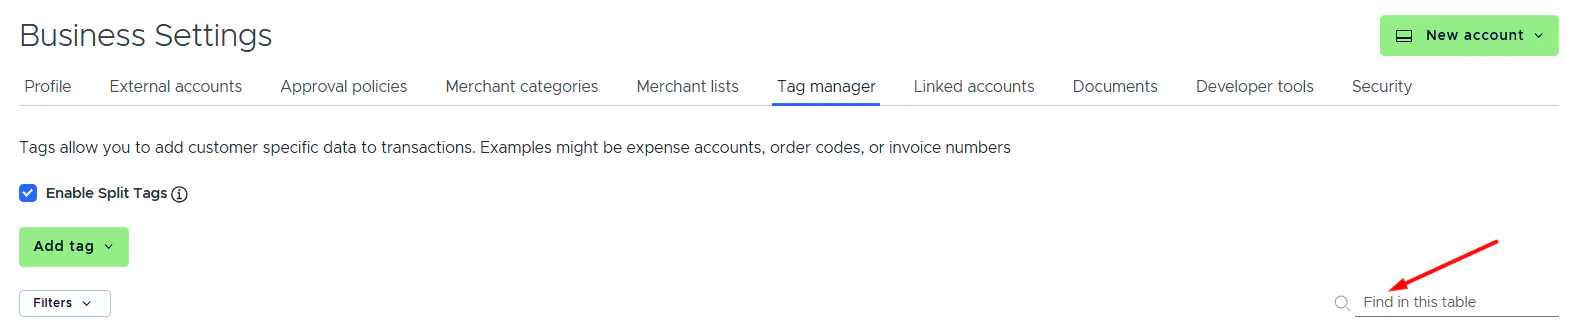
 **Finding a tag by name:**
* If you're searching for a deleted tag but the list is filtered to hide deleted tags, it won’t appear in the search results.
* The same is true for all other statuses: enabled, disabled, required, not required.
* Clear the filters to display all tags first, then run the search.
**Finding a tag by name:**
* If you're searching for a deleted tag but the list is filtered to hide deleted tags, it won’t appear in the search results.
* The same is true for all other statuses: enabled, disabled, required, not required.
* Clear the filters to display all tags first, then run the search.
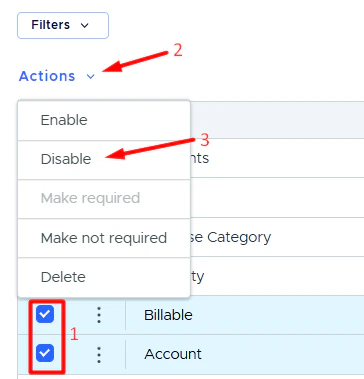
 **Disabling a tag:**
Select the tag(s).
Click **Actions**.
Click **Disable**.
Confirm your selection.
**Disabling a tag:**
Select the tag(s).
Click **Actions**.
Click **Disable**.
Confirm your selection.
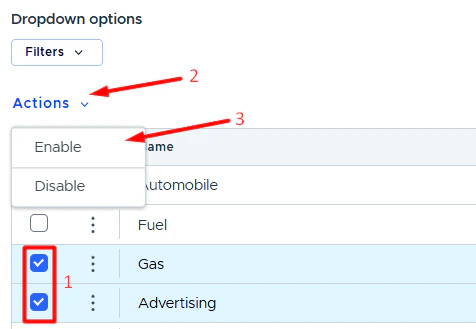
 **Enabling a tag:**
Select the tag(s).
Click **Actions**.
Click **Enable**.
Confirm your selection.
**Enabling a tag:**
Select the tag(s).
Click **Actions**.
Click **Enable**.
Confirm your selection.
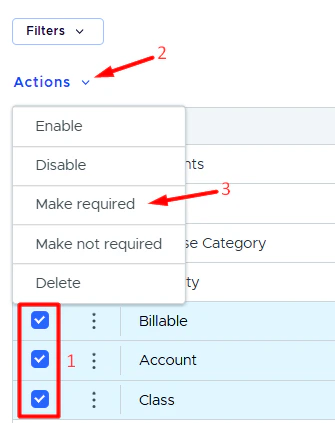
 **Making a tag required:**
Select the tag(s).
Click **Actions**.
Click **Make required**.
Confirm your selection.
**Making a tag required:**
Select the tag(s).
Click **Actions**.
Click **Make required**.
Confirm your selection.
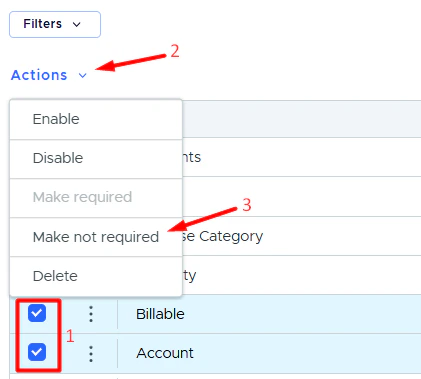
 **Making a tag not required:**
Select the tag(s).
Click **Actions**.
Click **Make not required**.
Confirm your selection.
**Making a tag not required:**
Select the tag(s).
Click **Actions**.
Click **Make not required**.
Confirm your selection.
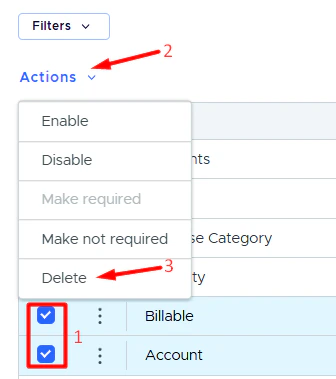
 **Deleting a tag:**
Select the tag(s).
Click **Actions**.
Click **Delete**.
Confirm your selection.
**Deleting a tag:**
Select the tag(s).
Click **Actions**.
Click **Delete**.
Confirm your selection.
 **Editing a tag:**
* Click the **pencil icon** next to the tag you want to edit.
**Editing a tag:**
* Click the **pencil icon** next to the tag you want to edit.
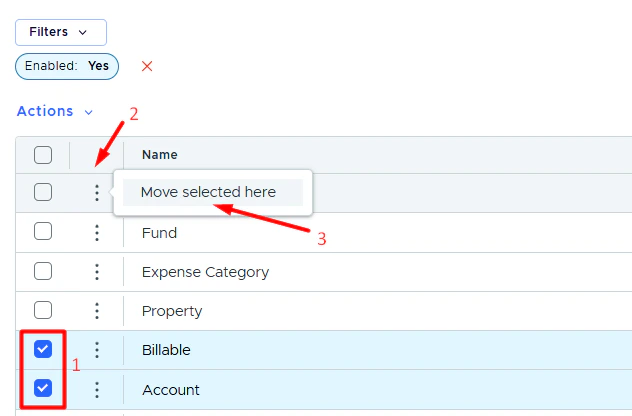
 **Reordering tags:**
Select the tag(s).
Locate the row where you want to move the tag(s).
Click the **three-dot vertical menu**.
Click **Move selected here**.
**Reordering tags:**
Select the tag(s).
Locate the row where you want to move the tag(s).
Click the **three-dot vertical menu**.
Click **Move selected here**.
 ## FAQ
**Option values (usually GL codes) must be unique.** Please ensure there are no duplicate option values in your file.
Once a transaction has been approved or rejected by an administrator, the cardholder can no longer edit or change a tag for the transaction.
Enable the "Review requirements" business setting. More details [here](/administrator-guide/how-to-review-transactions-with-receipts-tags-and-user-notes#review).
Tag restrictions do not impact Admins. Every Admin can view and use all tag options, regardless of restrictions.
The asterisk (\*) next to a tag name indicates that the tag is **required** for all purchases. When a tag is marked as required:
* Cardholders and Admins must fill in this tag before they can save tags on a transaction.
* The "Required?" setting is configured on the **Settings** tab when creating or editing a tag. Check "Required?" to ensure a valid value for this tag must always be supplied.
* If your account has [review requirements](/administrator-guide/how-to-review-transactions-with-receipts-tags-and-user-notes#review) enabled, transactions without the required tag will remain in the review queue until the tag is completed.
**How to set or change this:**
1. Go to **Business Settings** > **Workflows** > **Tag Manager**.
2. Click the **pencil icon** next to the tag you want to edit, or select the **Required** checkbox when creating a new tag.
3. Check or uncheck **Required** and click **Save**.
You can update this setting at any time — it takes effect immediately for all future transactions.
## FAQ
**Option values (usually GL codes) must be unique.** Please ensure there are no duplicate option values in your file.
Once a transaction has been approved or rejected by an administrator, the cardholder can no longer edit or change a tag for the transaction.
Enable the "Review requirements" business setting. More details [here](/administrator-guide/how-to-review-transactions-with-receipts-tags-and-user-notes#review).
Tag restrictions do not impact Admins. Every Admin can view and use all tag options, regardless of restrictions.
The asterisk (\*) next to a tag name indicates that the tag is **required** for all purchases. When a tag is marked as required:
* Cardholders and Admins must fill in this tag before they can save tags on a transaction.
* The "Required?" setting is configured on the **Settings** tab when creating or editing a tag. Check "Required?" to ensure a valid value for this tag must always be supplied.
* If your account has [review requirements](/administrator-guide/how-to-review-transactions-with-receipts-tags-and-user-notes#review) enabled, transactions without the required tag will remain in the review queue until the tag is completed.
**How to set or change this:**
1. Go to **Business Settings** > **Workflows** > **Tag Manager**.
2. Click the **pencil icon** next to the tag you want to edit, or select the **Required** checkbox when creating a new tag.
3. Check or uncheck **Required** and click **Save**.
You can update this setting at any time — it takes effect immediately for all future transactions.