> ## Documentation Index
> Fetch the complete documentation index at: https://support.pexcard.com/llms.txt
> Use this file to discover all available pages before exploring further.

# Linked Accounts and Sub-accounts on All Programs

> Manage multiple PEX accounts or departmental sub-accounts from a single login on Pro or Infinite plans.

Linked Accounts enable administrators to view and manage multiple PEX accounts within an organization. Linked accounts may be program or departmental sub-accounts tied to specific budgets and priorities. Available for organizations on a [Pro or Infinite plan](https://www.pexcard.com/pricing?utm_source=support). Please contact Administrator Support or your Customer Success Representative if you wish to open additional accounts with PEX.

<Frame>
  <iframe src="https://www.youtube.com/embed/CsACBV8YI-I" title="PEX: Link Multiple Accounts" frameborder="0" allow="accelerometer; autoplay; clipboard-write; encrypted-media; gyroscope; picture-in-picture; web-share" referrerpolicy="strict-origin-when-cross-origin" allowfullscreen />
</Frame>

## How to Access Linked Accounts

### Option 1: Via Side Menu

<Steps>
  <Step>
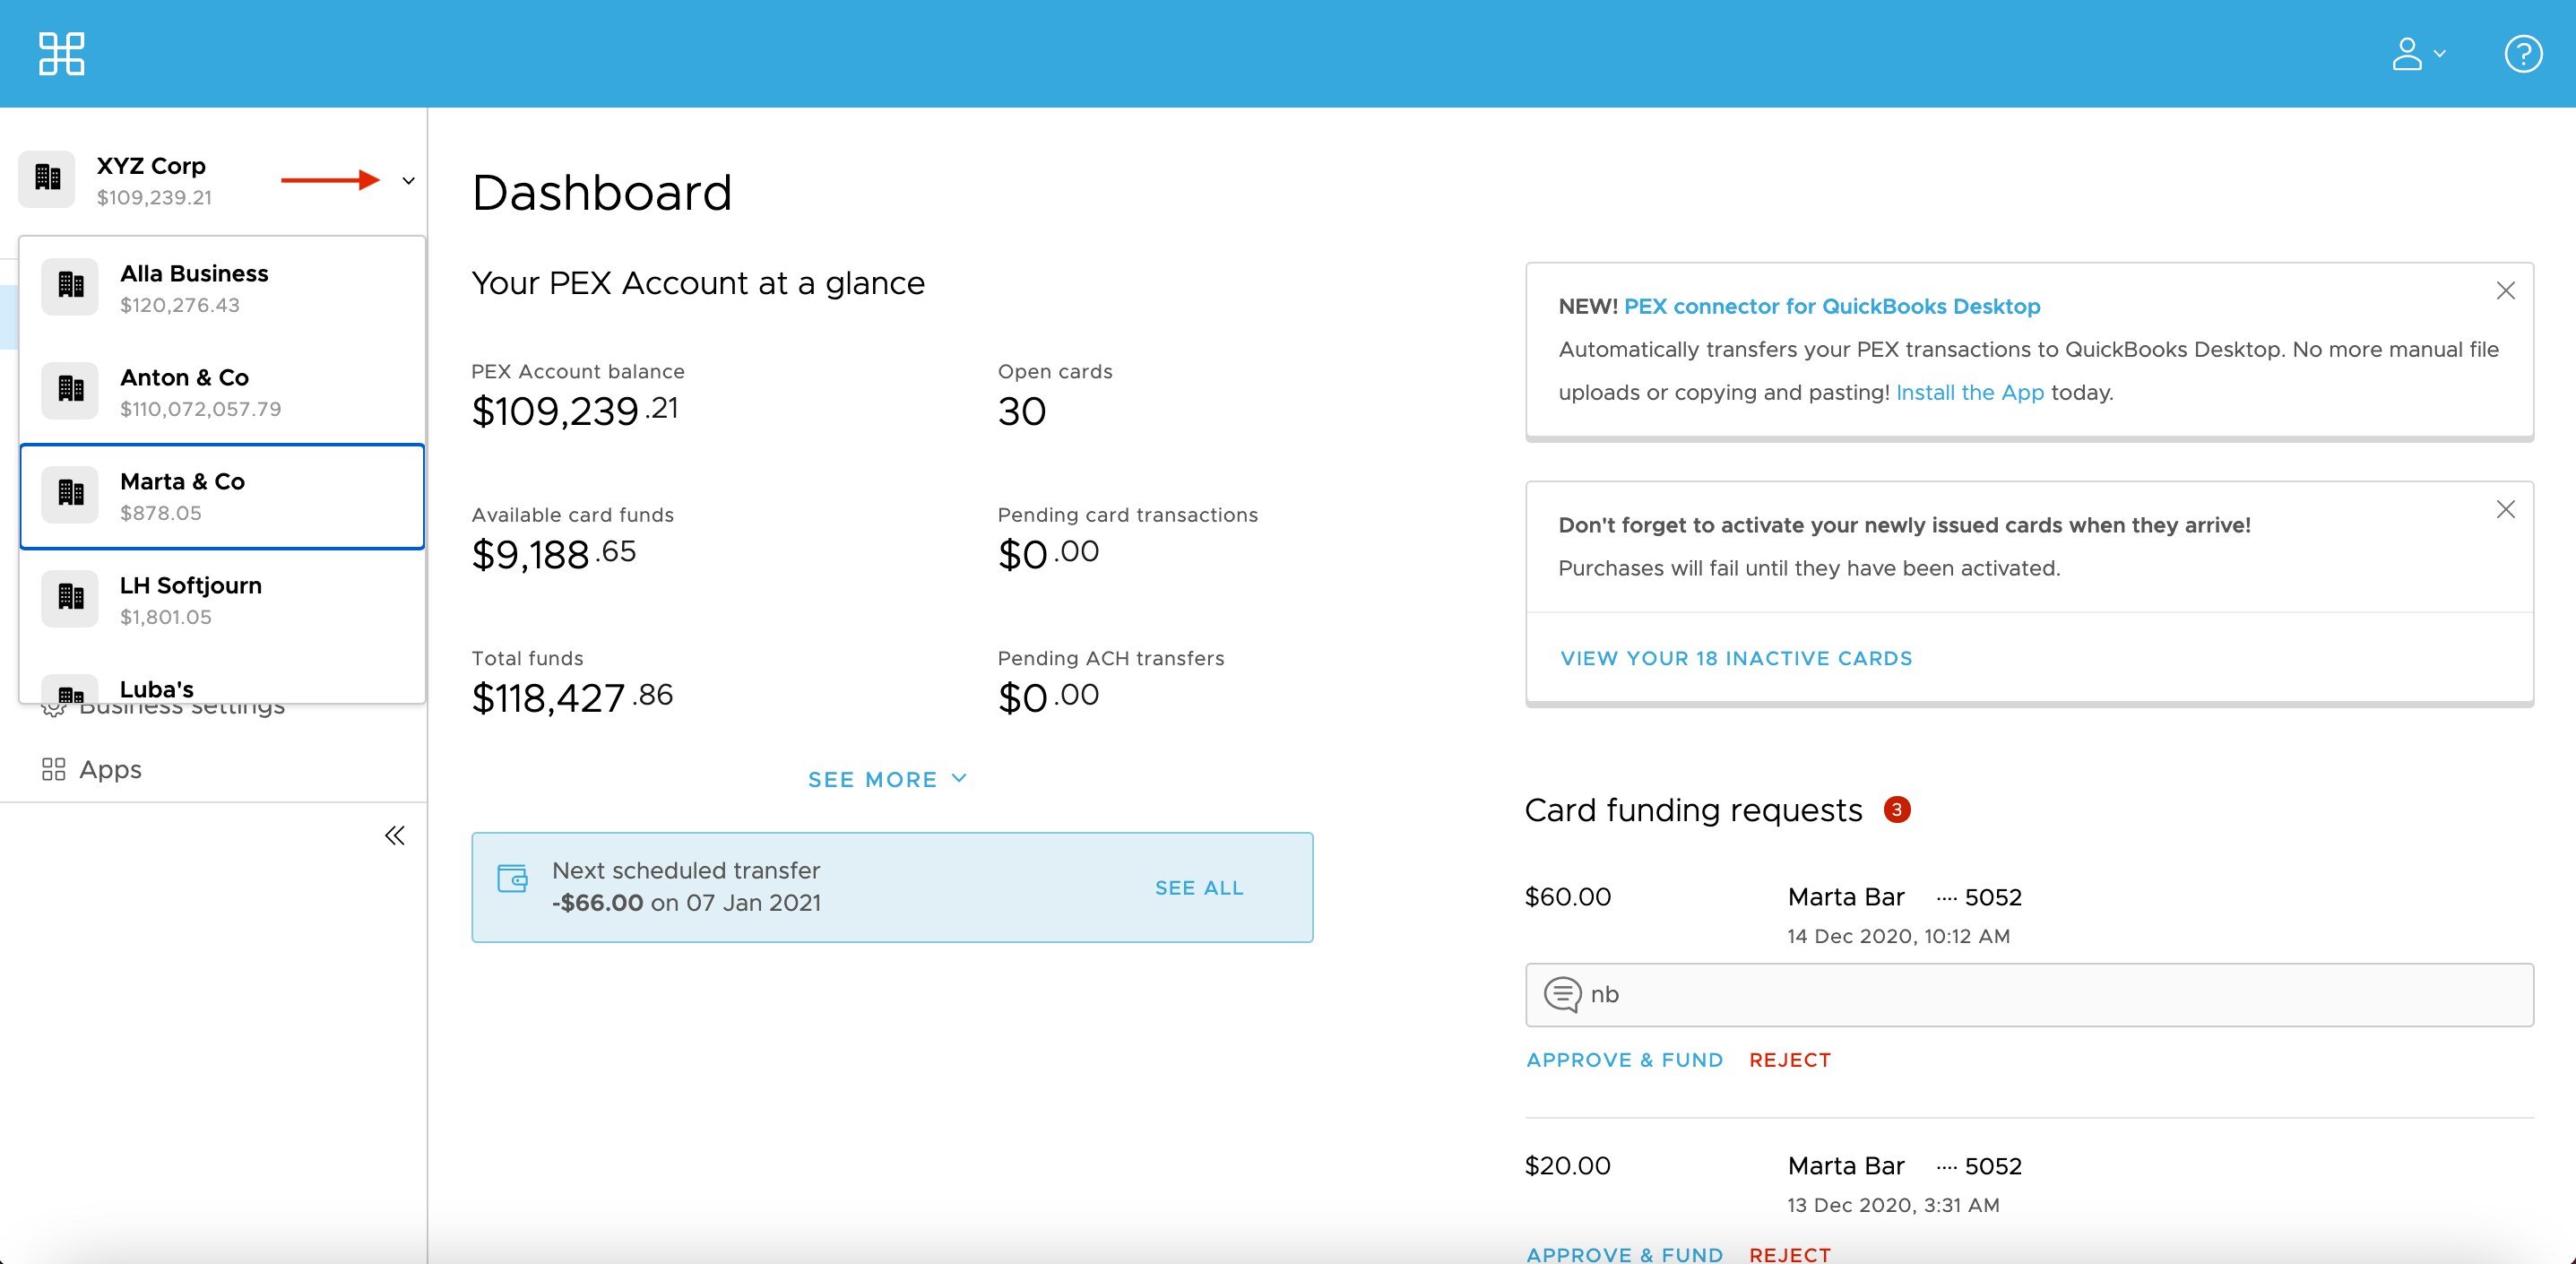
    To switch between accounts, navigate to the sidebar dropdown under your company name. 

    <Frame>
      <img src="https://mintcdn.com/pextest/JcSYjWowEW0UYuqG/images/administrator-guide/image-88.png?fit=max&auto=format&n=JcSYjWowEW0UYuqG&q=85&s=8e1322596e15ef86793d869a4aa27954" alt="" width="2874" height="1410" data-path="images/administrator-guide/image-88.png" />
    </Frame>
  </Step>

  <Step>
    Scroll through all of your open accounts and select the account you wish to access.
  </Step>
</Steps>

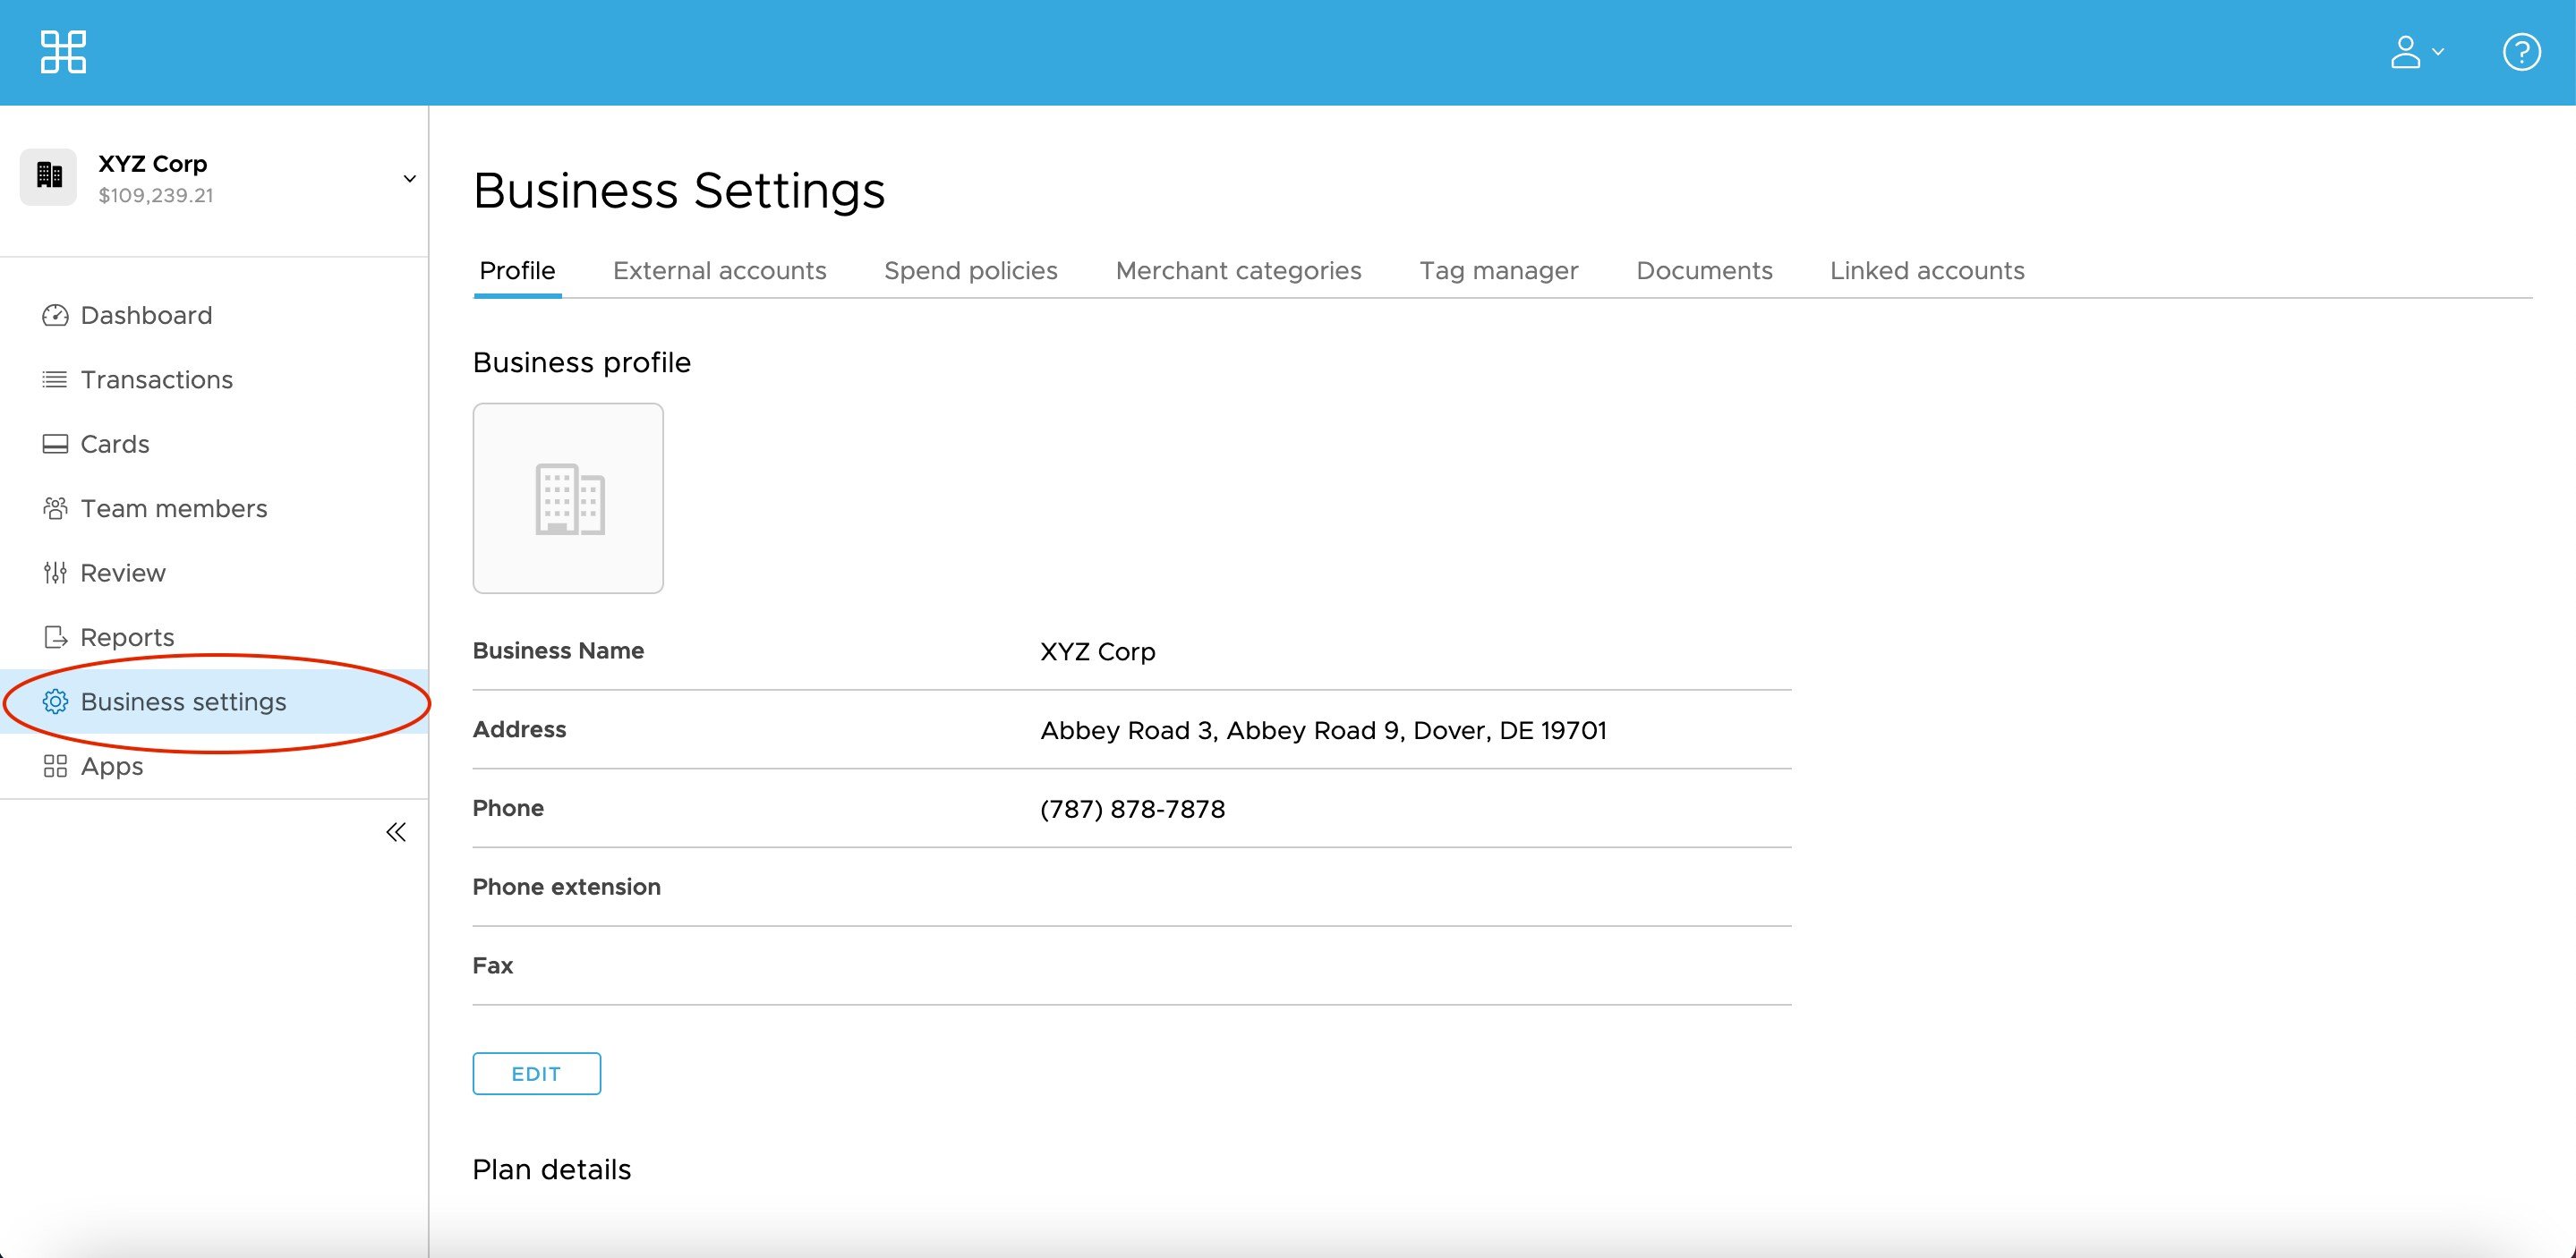
### Option 2: Via "Business Settings"

<Steps>
  <Step>
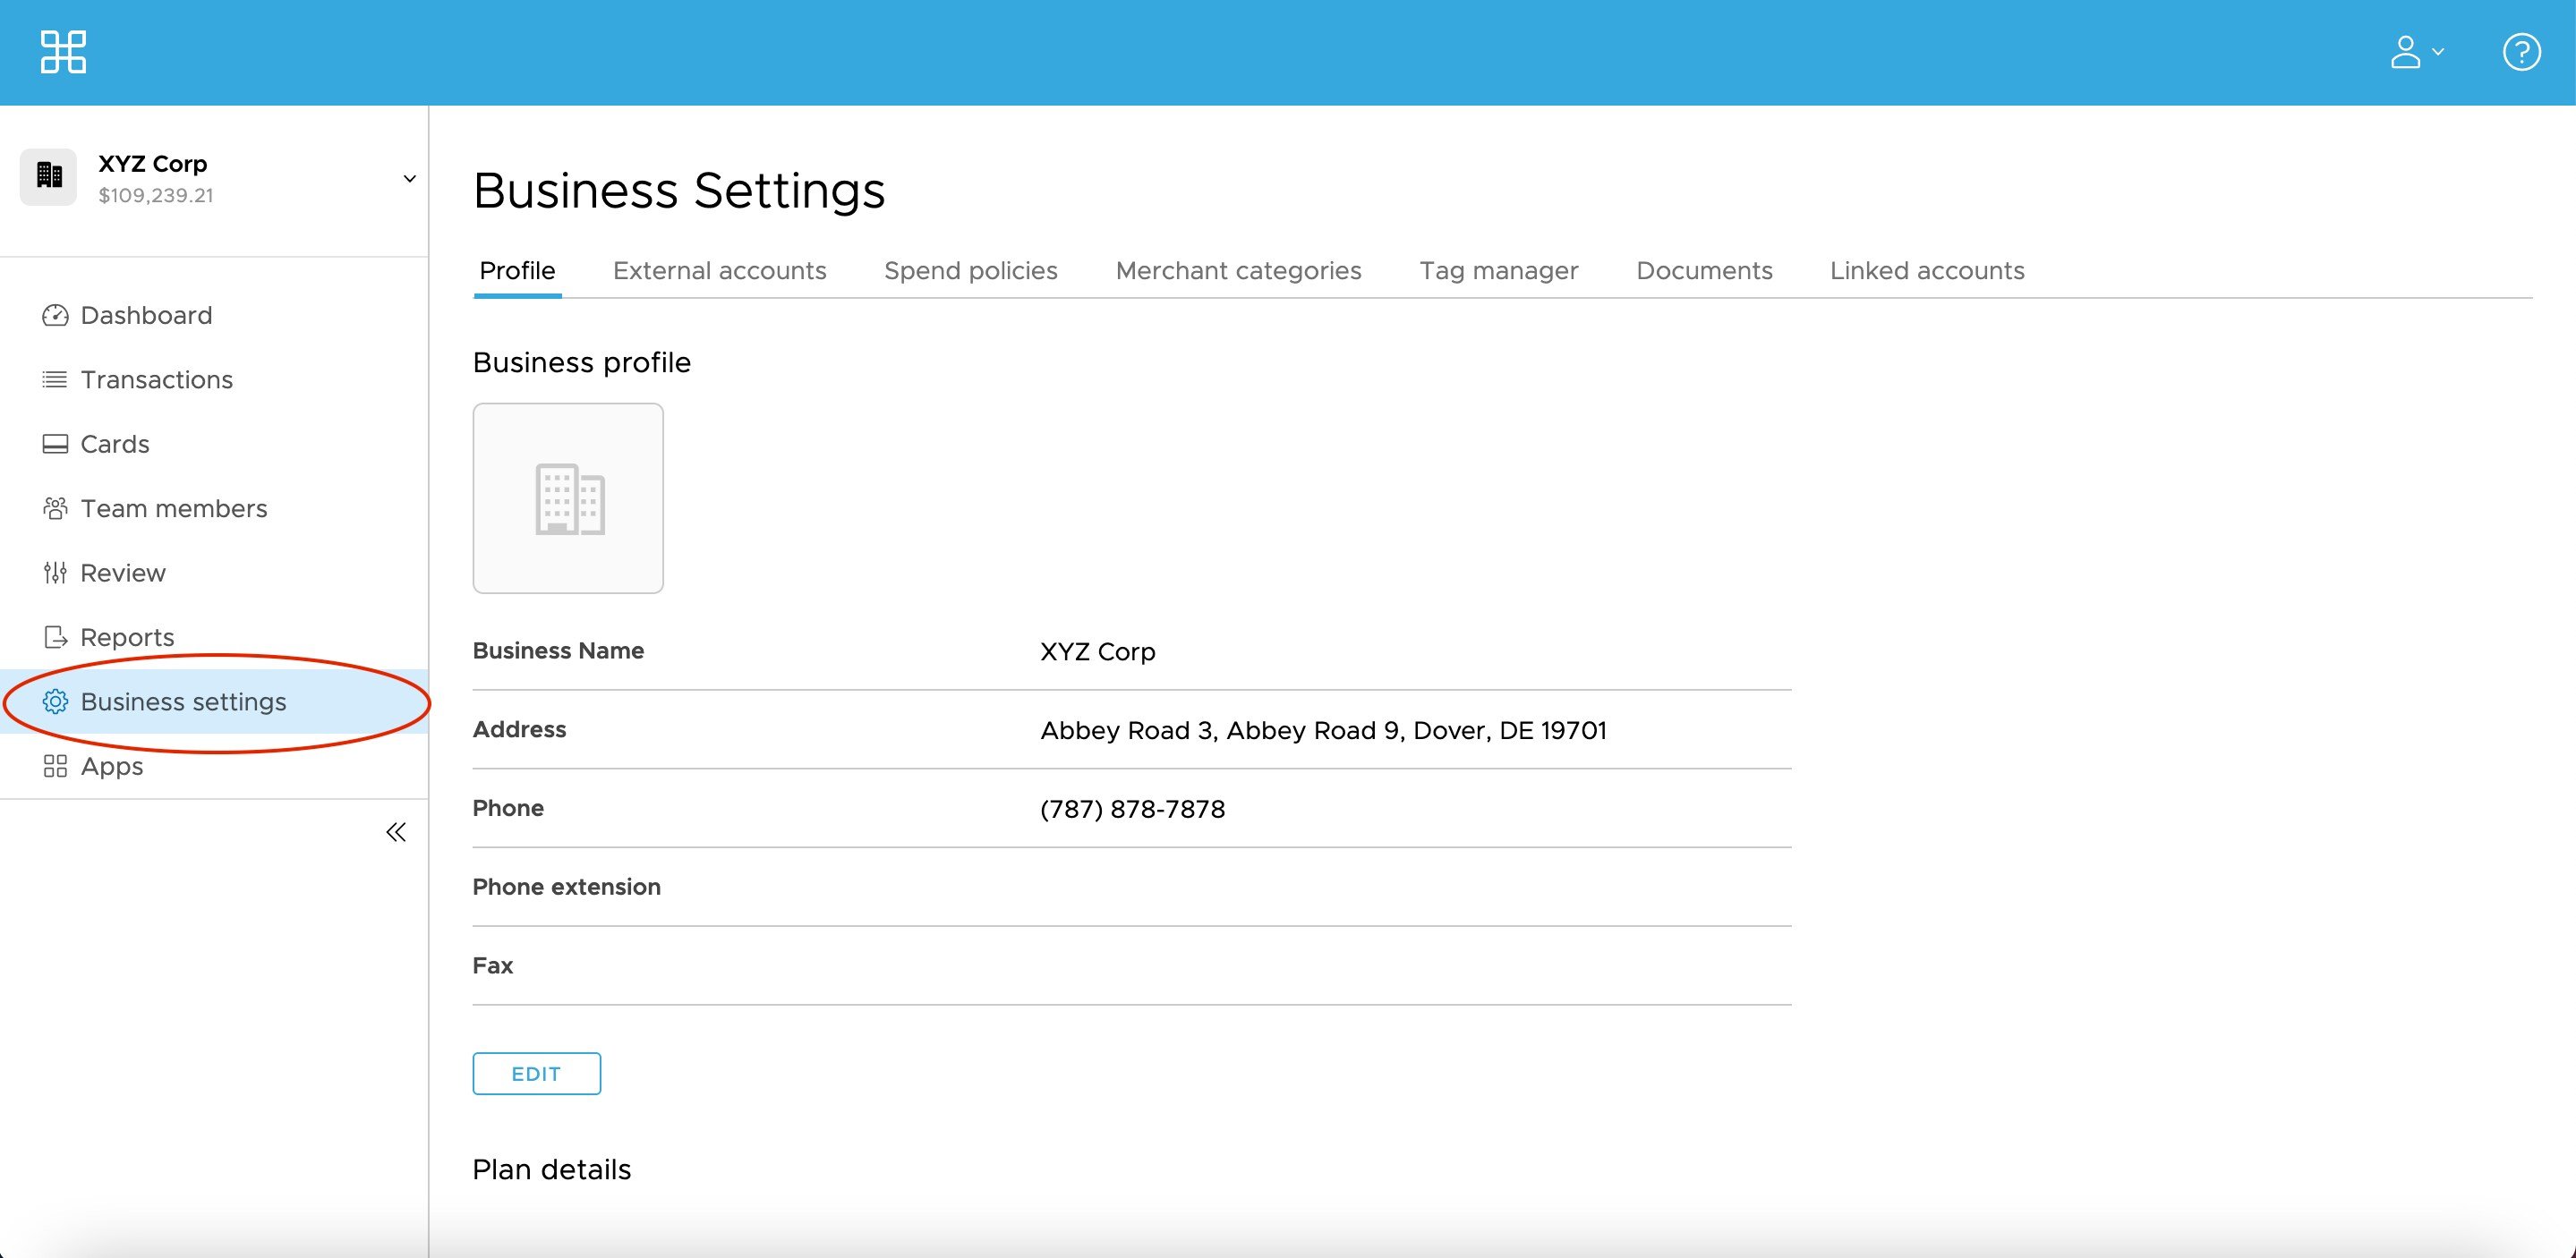
    You may also access another account by visiting ‘Business Settings.’ Choose "Business Settings" from the left menu. 

    <Frame>
      <img src="https://mintcdn.com/pextest/JcSYjWowEW0UYuqG/images/administrator-guide/image-89.png?fit=max&auto=format&n=JcSYjWowEW0UYuqG&q=85&s=a648998d99cf4d7292ecbeeedfad9e36" alt="" width="2878" height="1406" data-path="images/administrator-guide/image-89.png" />
    </Frame>
  </Step>

  <Step>
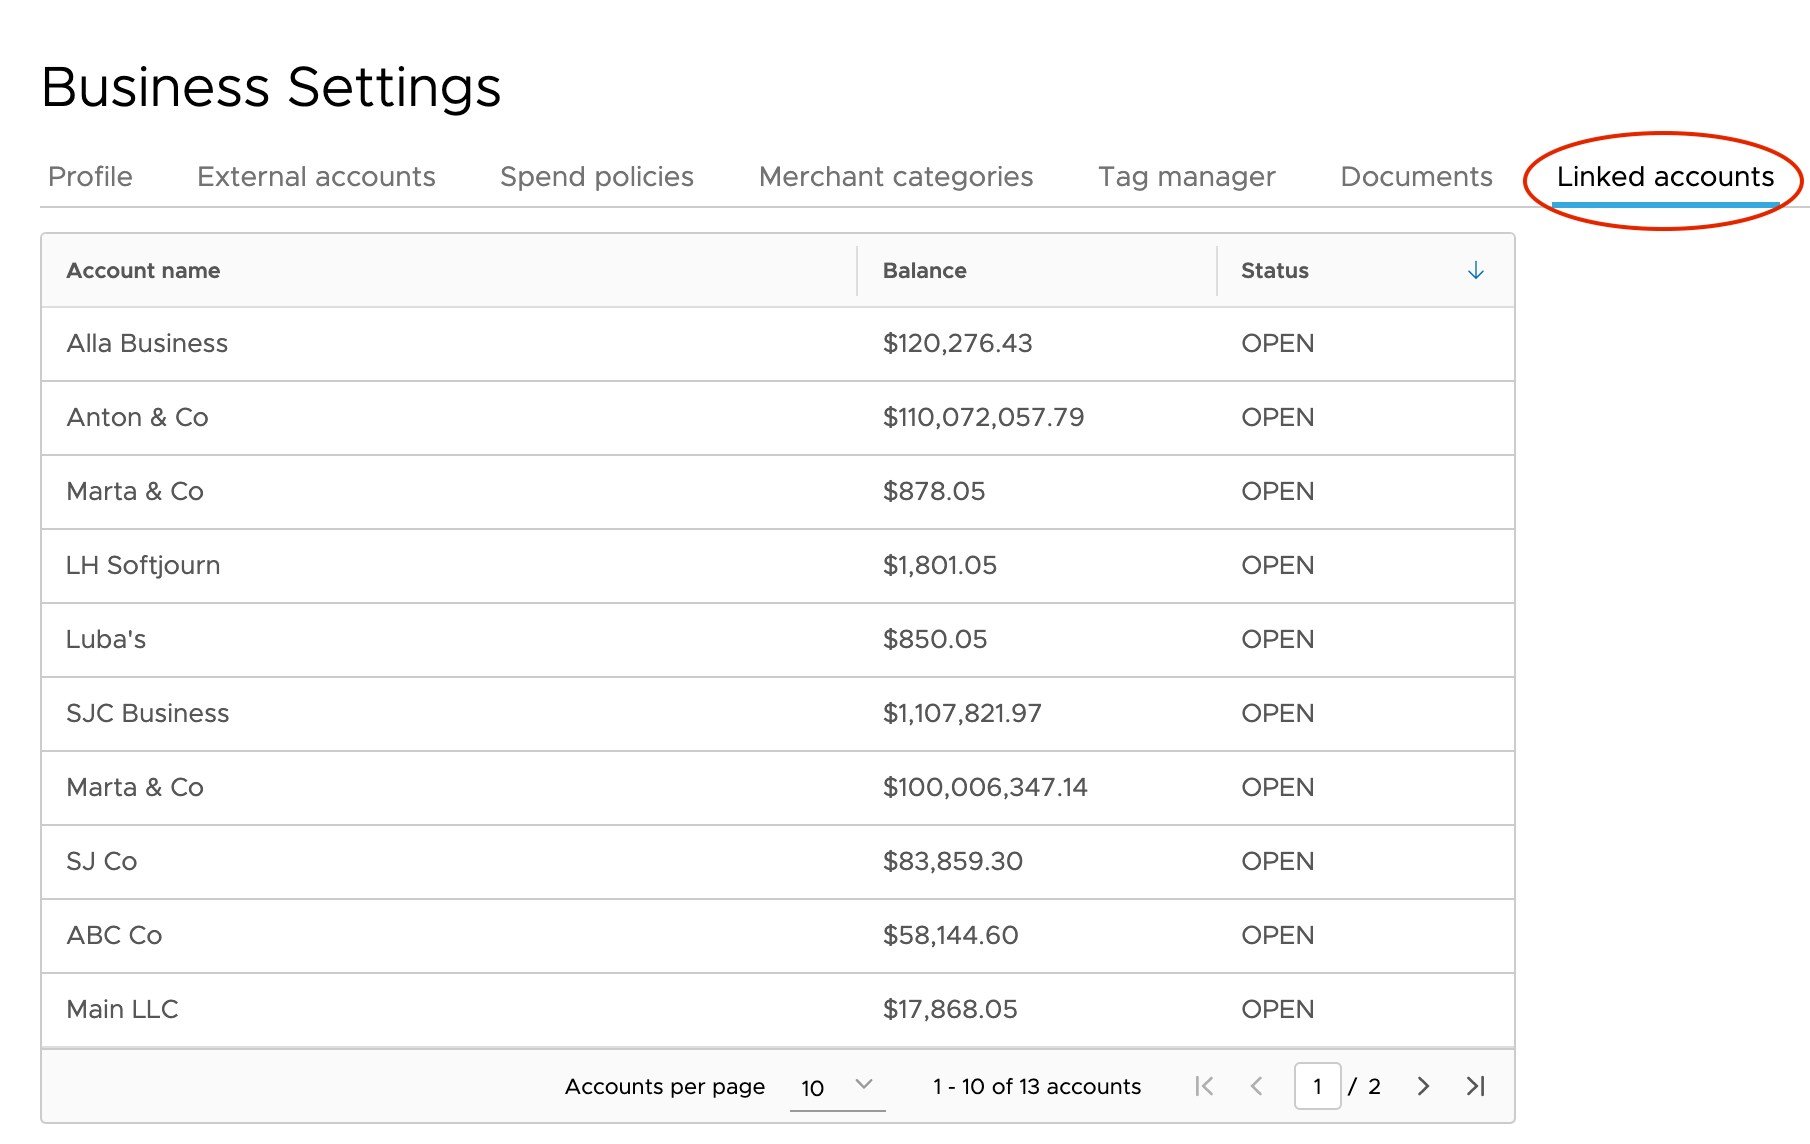
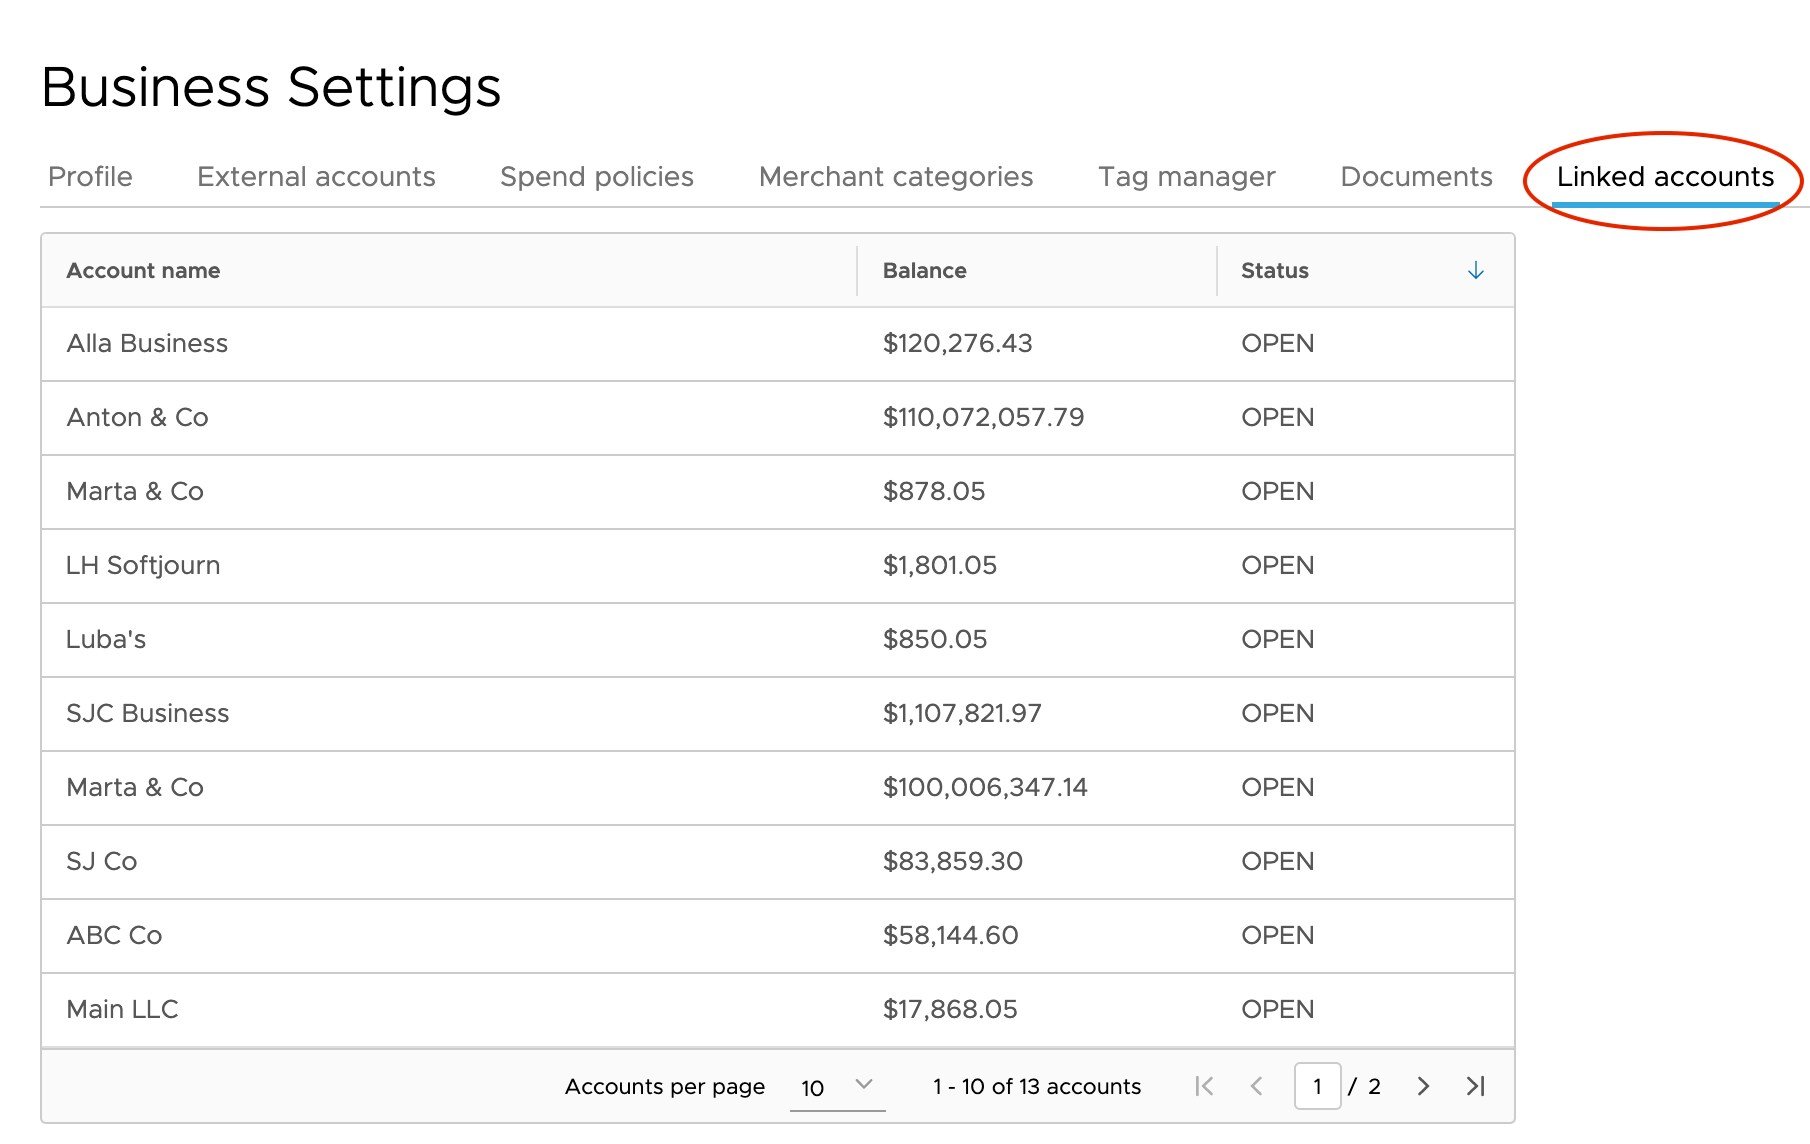
    Navigate to the ‘Linked accounts’ tab. 

    <Frame>
      <img src="https://mintcdn.com/pextest/JcSYjWowEW0UYuqG/images/administrator-guide/image-90.png?fit=max&auto=format&n=JcSYjWowEW0UYuqG&q=85&s=4c765616ab5c1c46d6f125146b7d477d" alt="" width="1810" height="1144" data-path="images/administrator-guide/image-90.png" />
    </Frame>
  </Step>

  <Step>
    Select the account you wish to access.
  </Step>
</Steps>

### Option 3: Via the mobile app

<Steps>
  <Step>
    Log in to the app and click 'Settings.'
  </Step>

  <Step>
    Your linked admin and cardholder accounts will appear at the top of the screen.
  </Step>
</Steps>

### How to Add Admins

<Steps>
  <Step>
    Navigate to the ‘Team Members’ page.
  </Step>
</Steps>

#### How to add a new admin

<Steps>
  <Step>
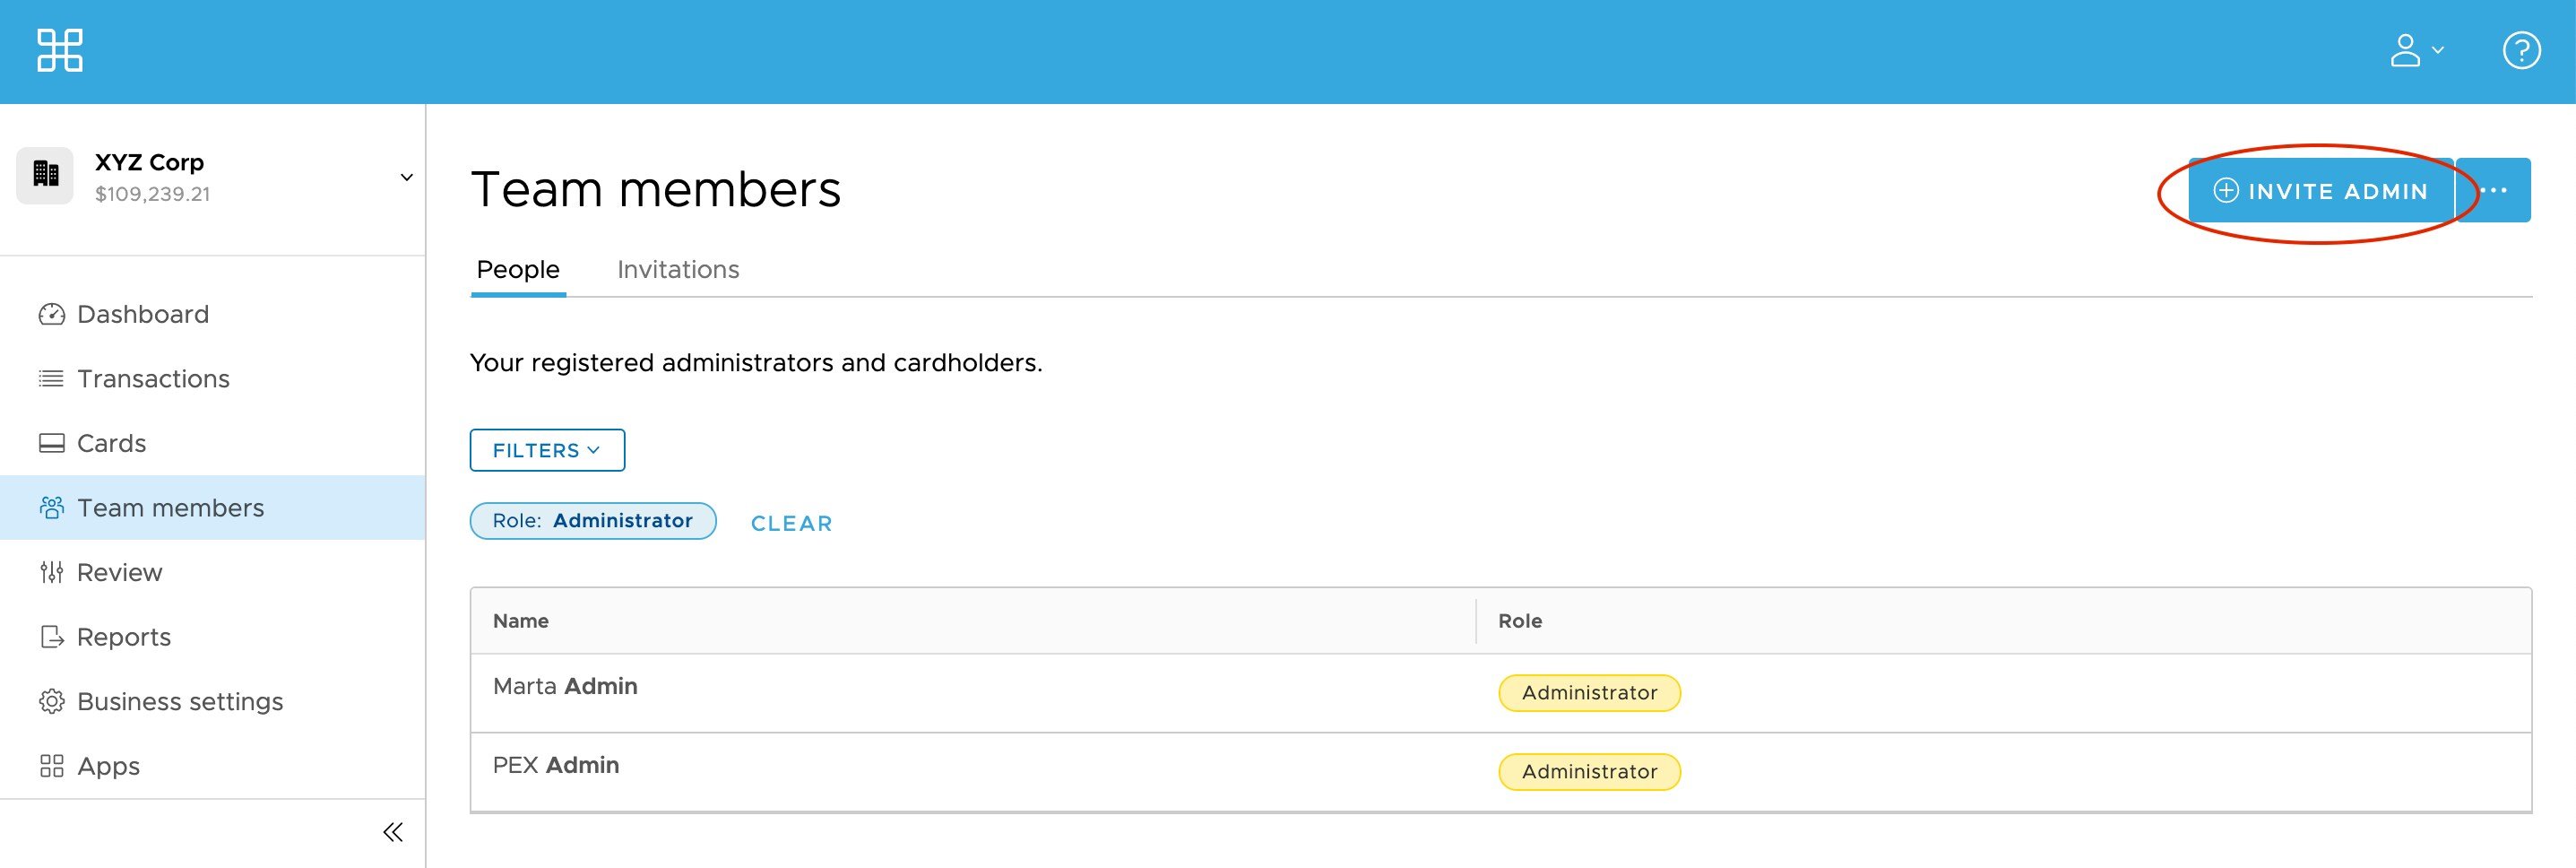
    Select ‘Invite Admin’

    <Frame>
      <img src="https://mintcdn.com/pextest/JcSYjWowEW0UYuqG/images/administrator-guide/image-91.png?fit=max&auto=format&n=JcSYjWowEW0UYuqG&q=85&s=c57c21829482ef7db480faf39fee8e63" alt="" width="2874" height="968" data-path="images/administrator-guide/image-91.png" />
    </Frame>
  </Step>

  <Step>
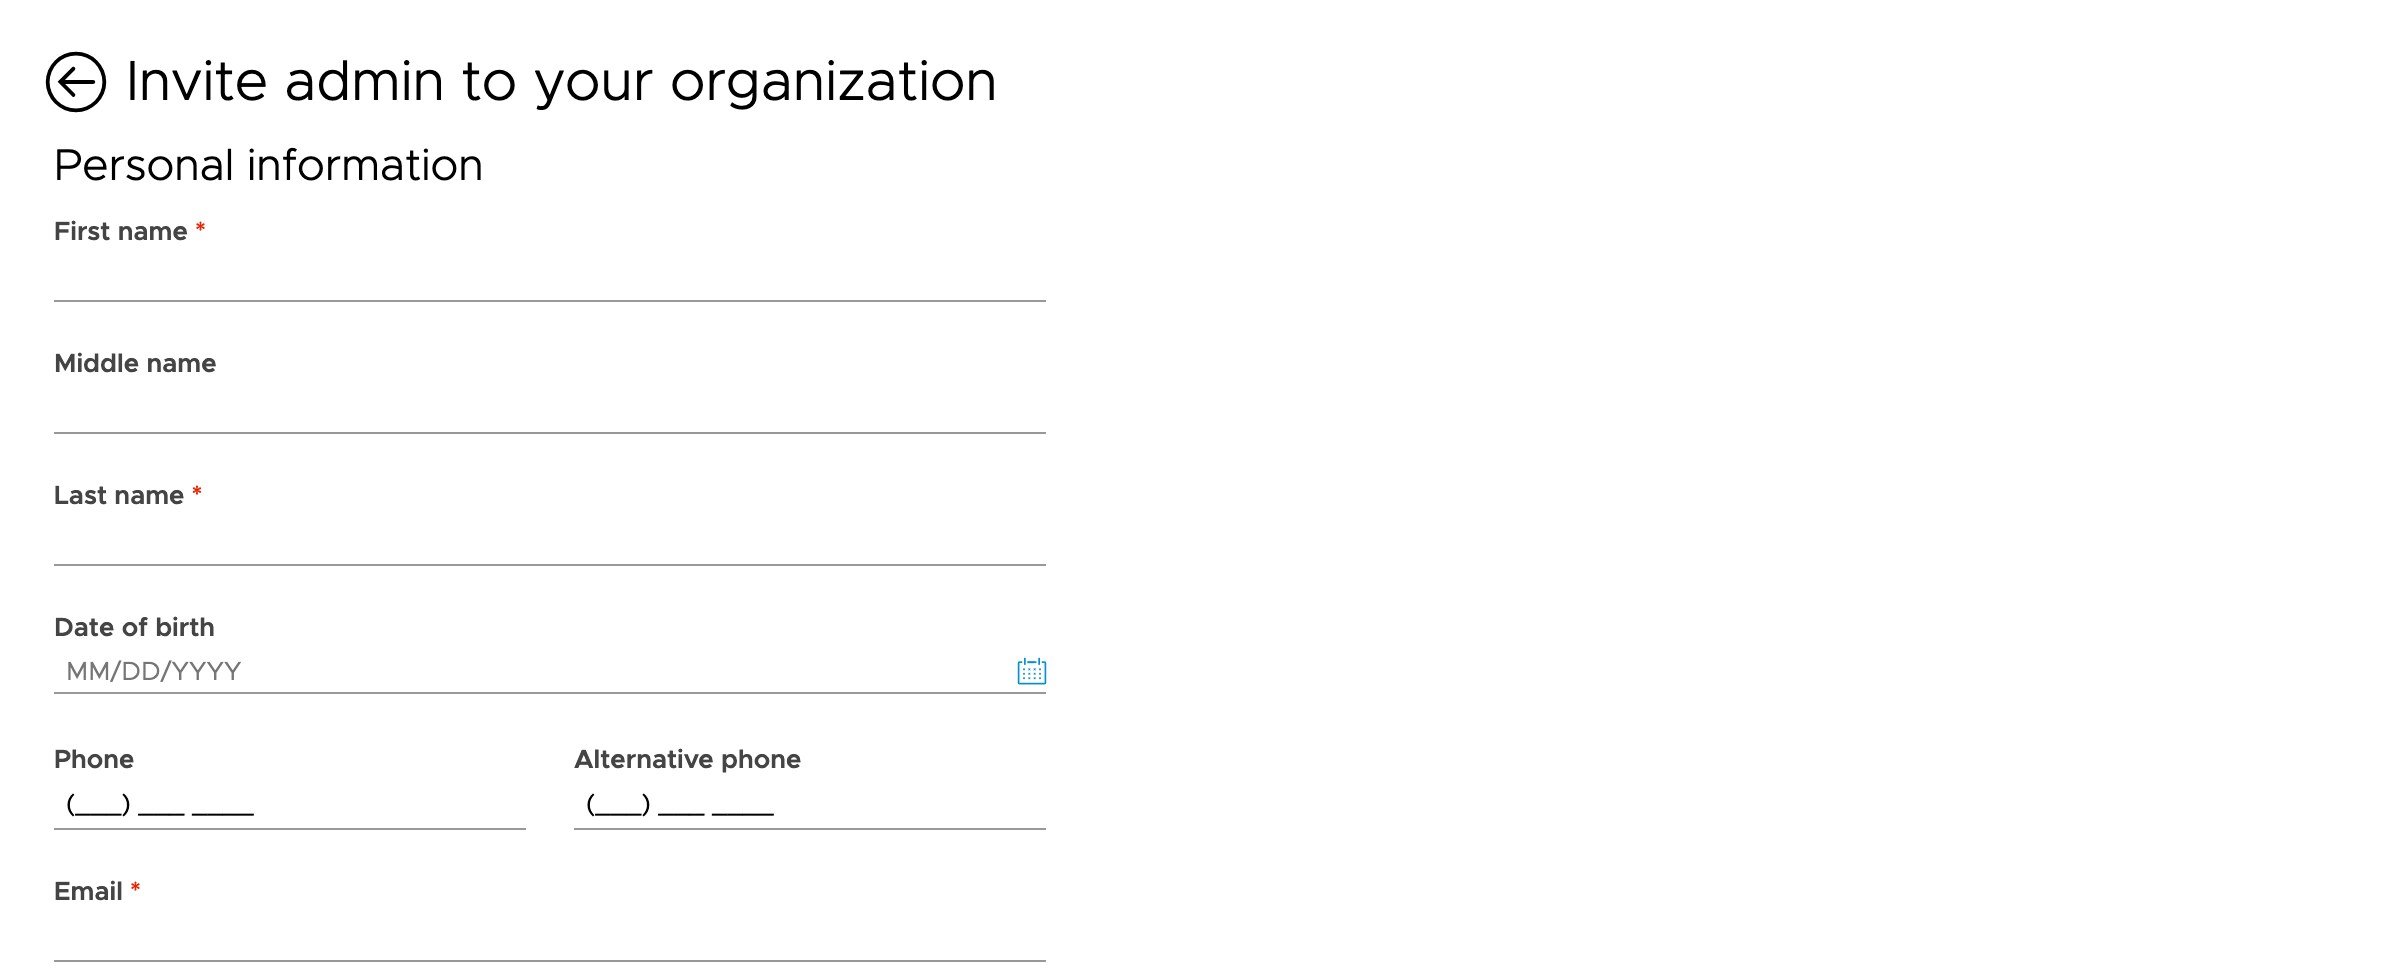
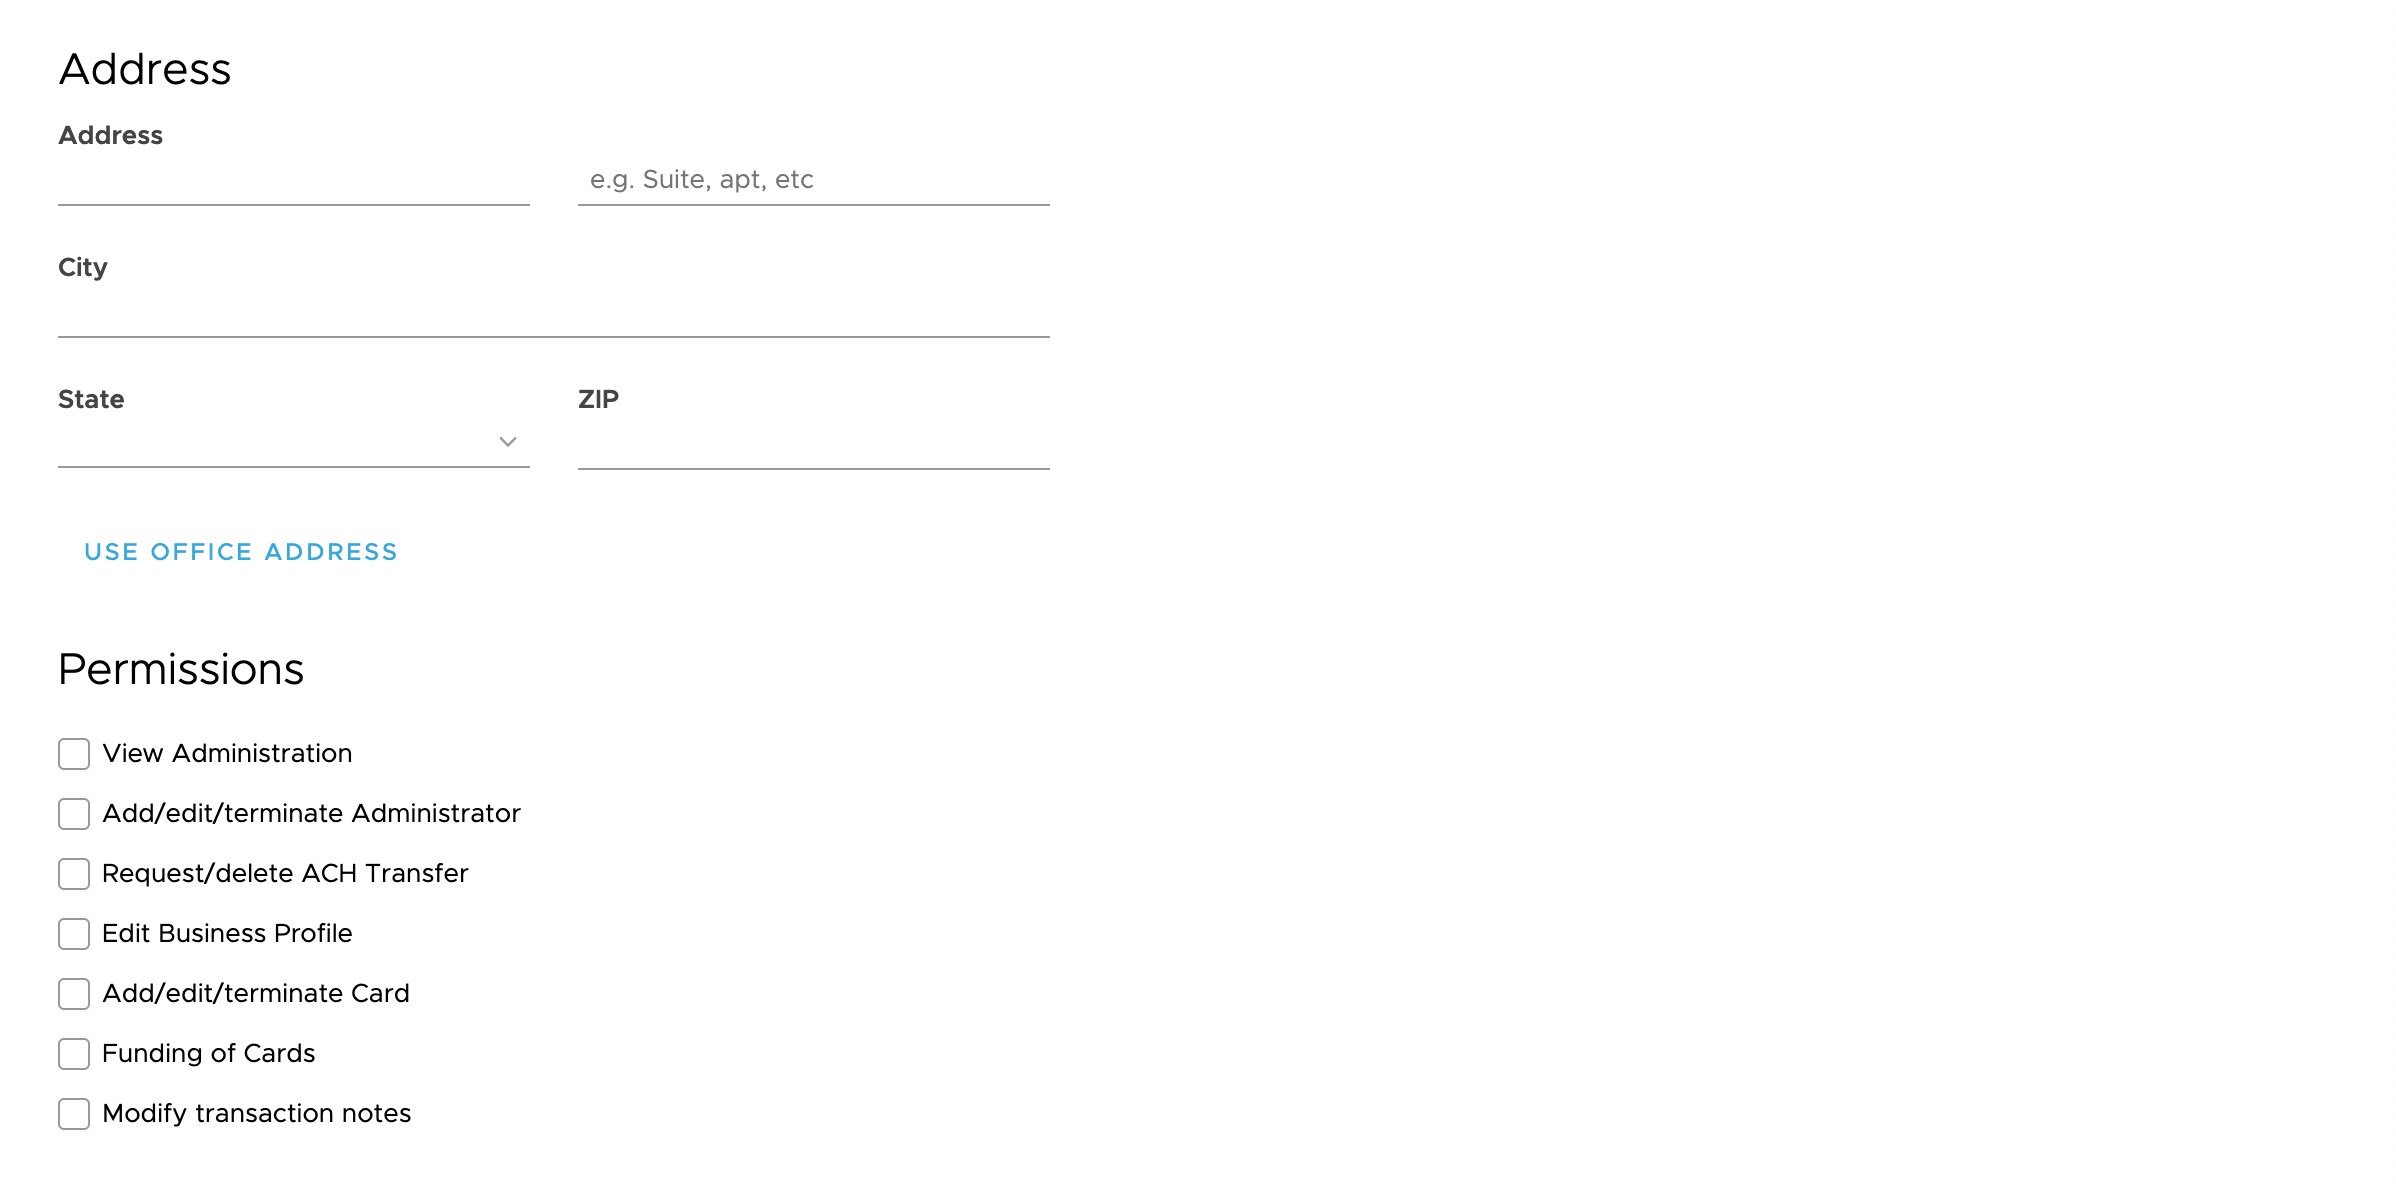
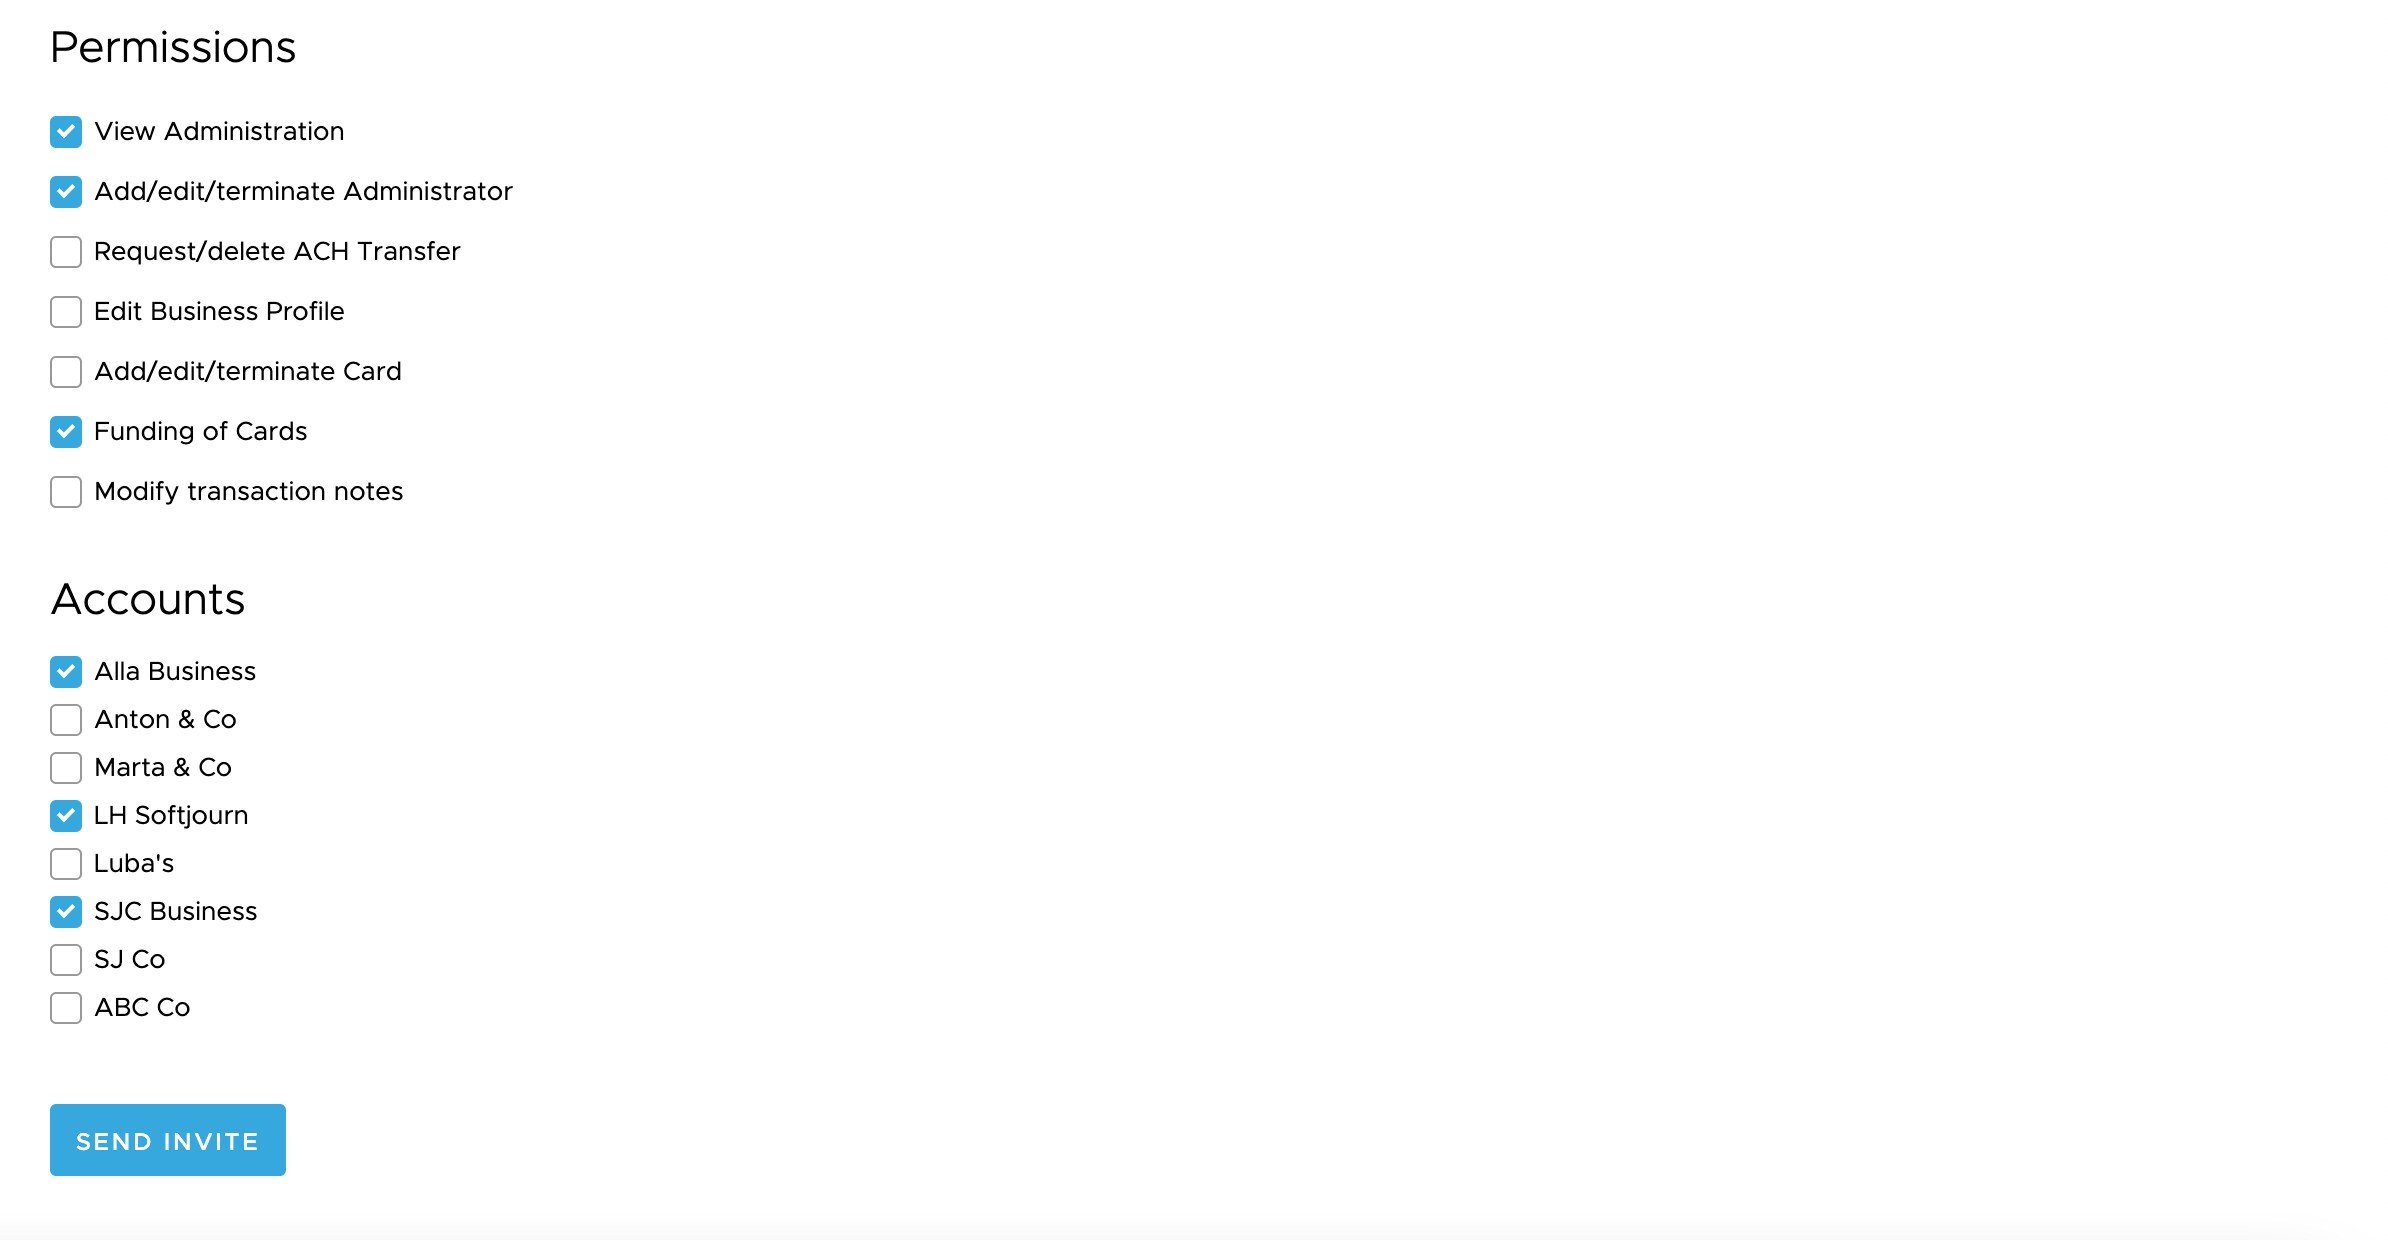
    Fill out the required fields to send an invite. 

    <Frame>
      <img src="https://mintcdn.com/pextest/JcSYjWowEW0UYuqG/images/administrator-guide/image-92.png?fit=max&auto=format&n=JcSYjWowEW0UYuqG&q=85&s=2aefe6f81303fd514f896de75848e580" alt="" width="2392" height="978" data-path="images/administrator-guide/image-92.png" />
    </Frame>

    <Frame>
      <img src="https://mintcdn.com/pextest/JcSYjWowEW0UYuqG/images/administrator-guide/image-93.png?fit=max&auto=format&n=JcSYjWowEW0UYuqG&q=85&s=4b82c0841782a01ff385b315fbf37198" alt="" width="2396" height="1192" data-path="images/administrator-guide/image-93.png" />
    </Frame>

    <Frame>
      <img src="https://mintcdn.com/pextest/JcSYjWowEW0UYuqG/images/administrator-guide/image-94.png?fit=max&auto=format&n=JcSYjWowEW0UYuqG&q=85&s=863fce247bd9ff65f69ed83d88476d58" alt="" width="2388" height="1240" data-path="images/administrator-guide/image-94.png" />
    </Frame>
  </Step>
</Steps>

## Enabling additional administrators to access linked accounts

<Steps>
  <Step>
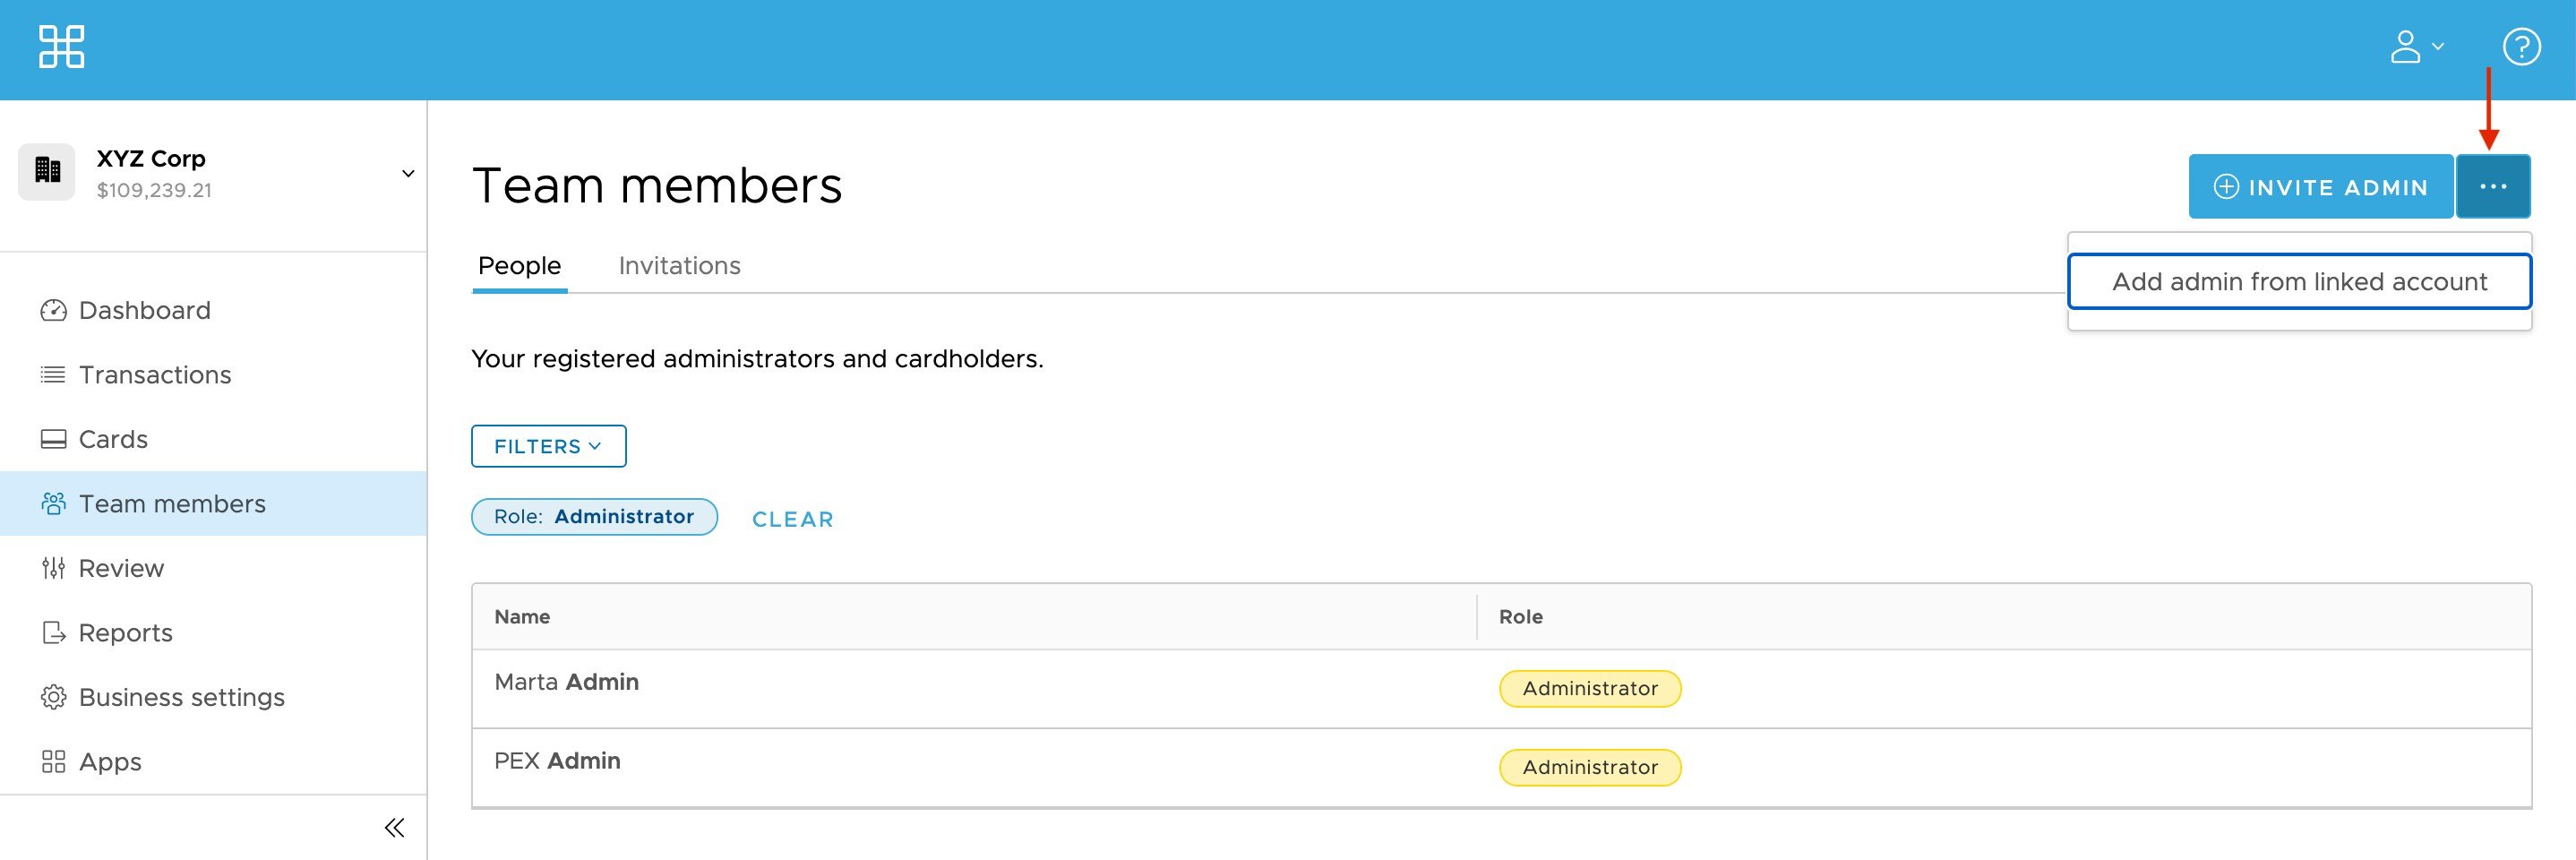
    Click the icon next to ‘Invite Admin’ and select ‘Add admin from linked account.’

    <Frame>
      <img src="https://mintcdn.com/pextest/JcSYjWowEW0UYuqG/images/administrator-guide/image-95.png?fit=max&auto=format&n=JcSYjWowEW0UYuqG&q=85&s=5150f11c3529b0f0309c38322bb45a59" alt="" width="2876" height="960" data-path="images/administrator-guide/image-95.png" />
    </Frame>
  </Step>

  <Step>
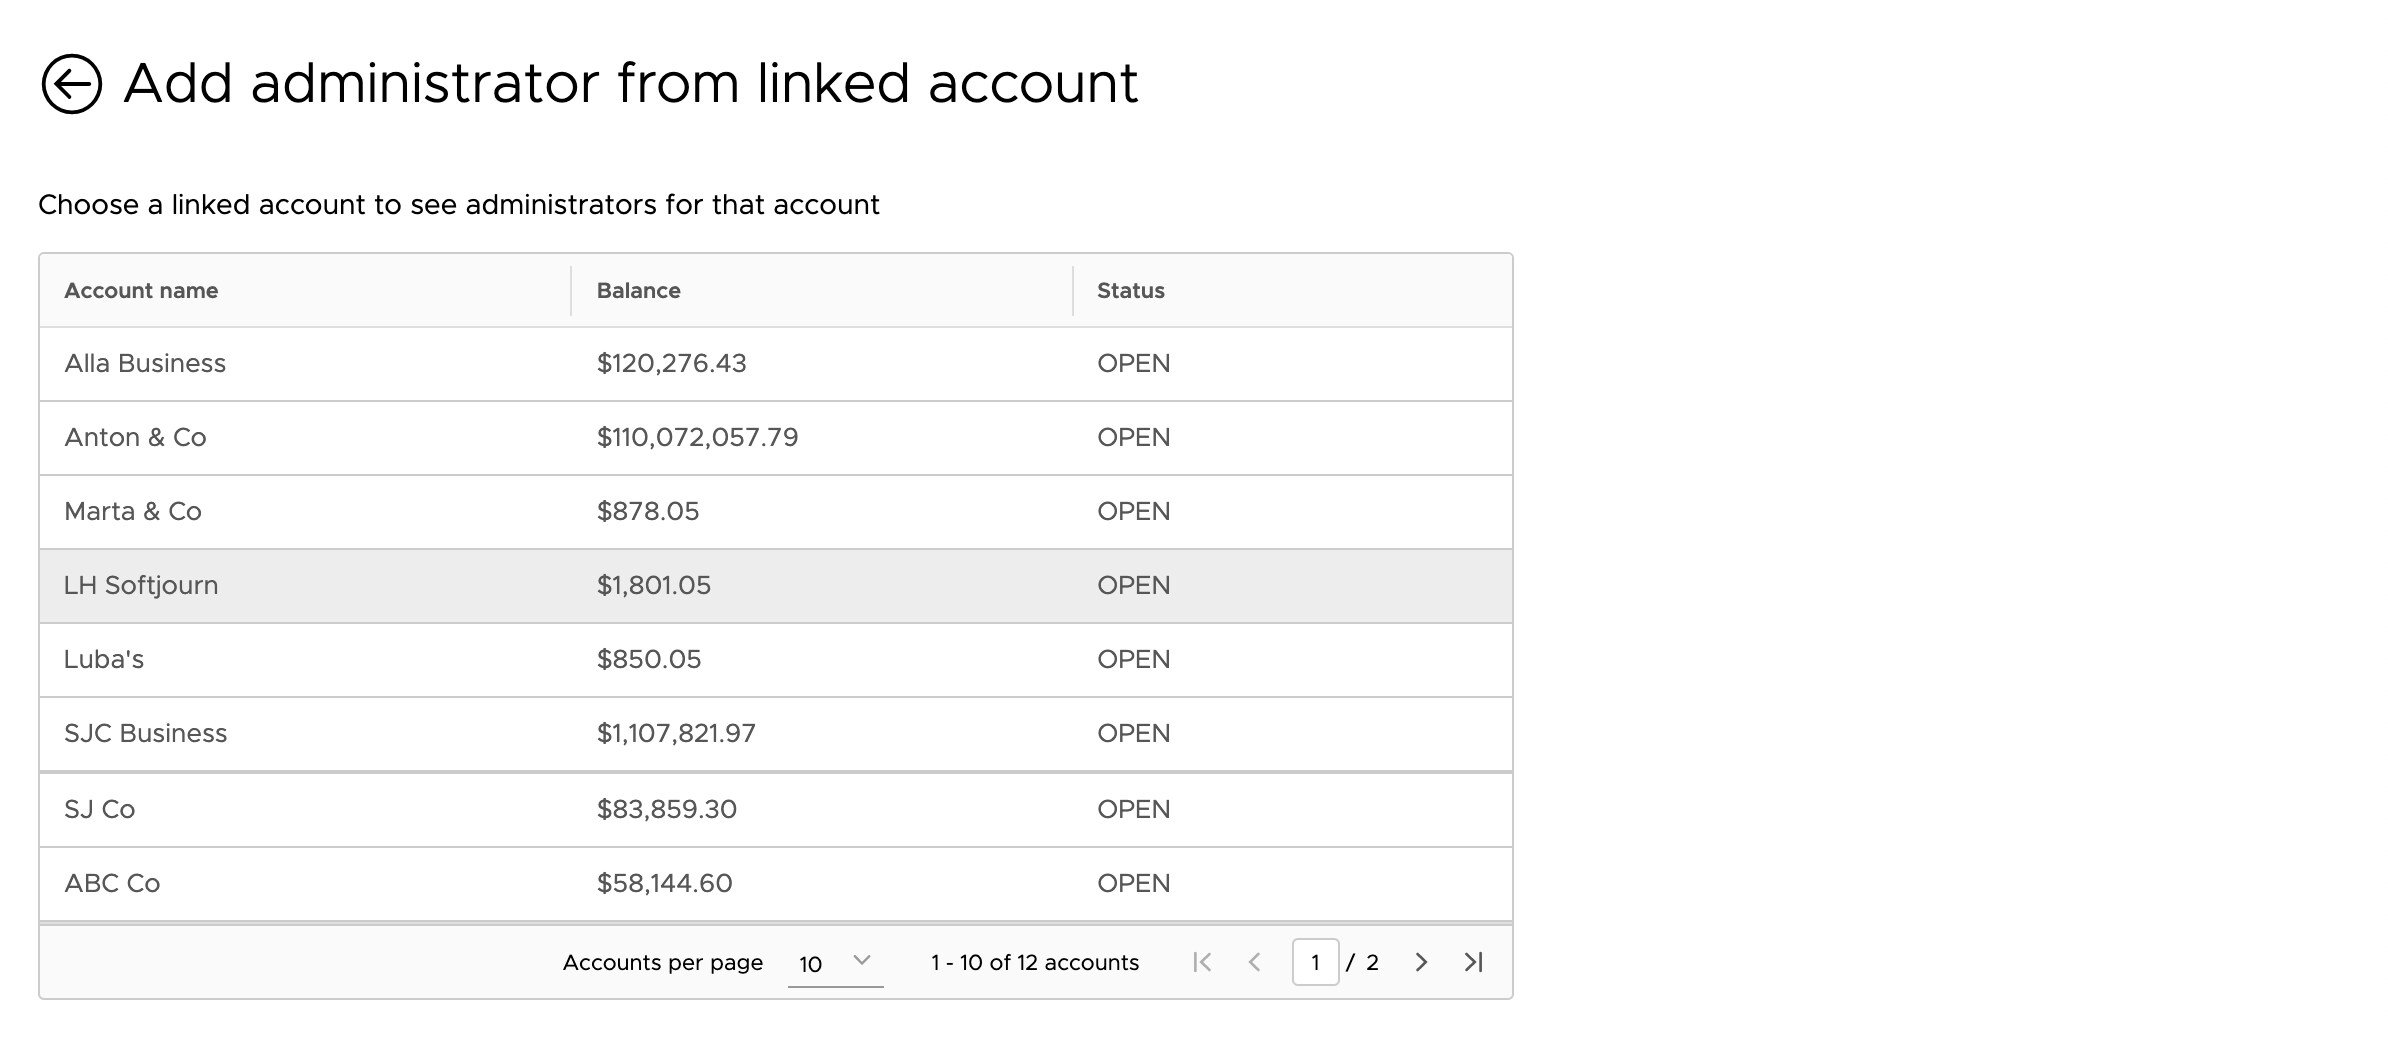
    Select the account from which you are adding the admin. 

    <Frame>
      <img src="https://mintcdn.com/pextest/JcSYjWowEW0UYuqG/images/administrator-guide/image-96.png?fit=max&auto=format&n=JcSYjWowEW0UYuqG&q=85&s=49fcef65a6f0d3cb43b3cdc99c2c3df2" alt="" width="2388" height="1042" data-path="images/administrator-guide/image-96.png" />
    </Frame>
  </Step>

  <Step>
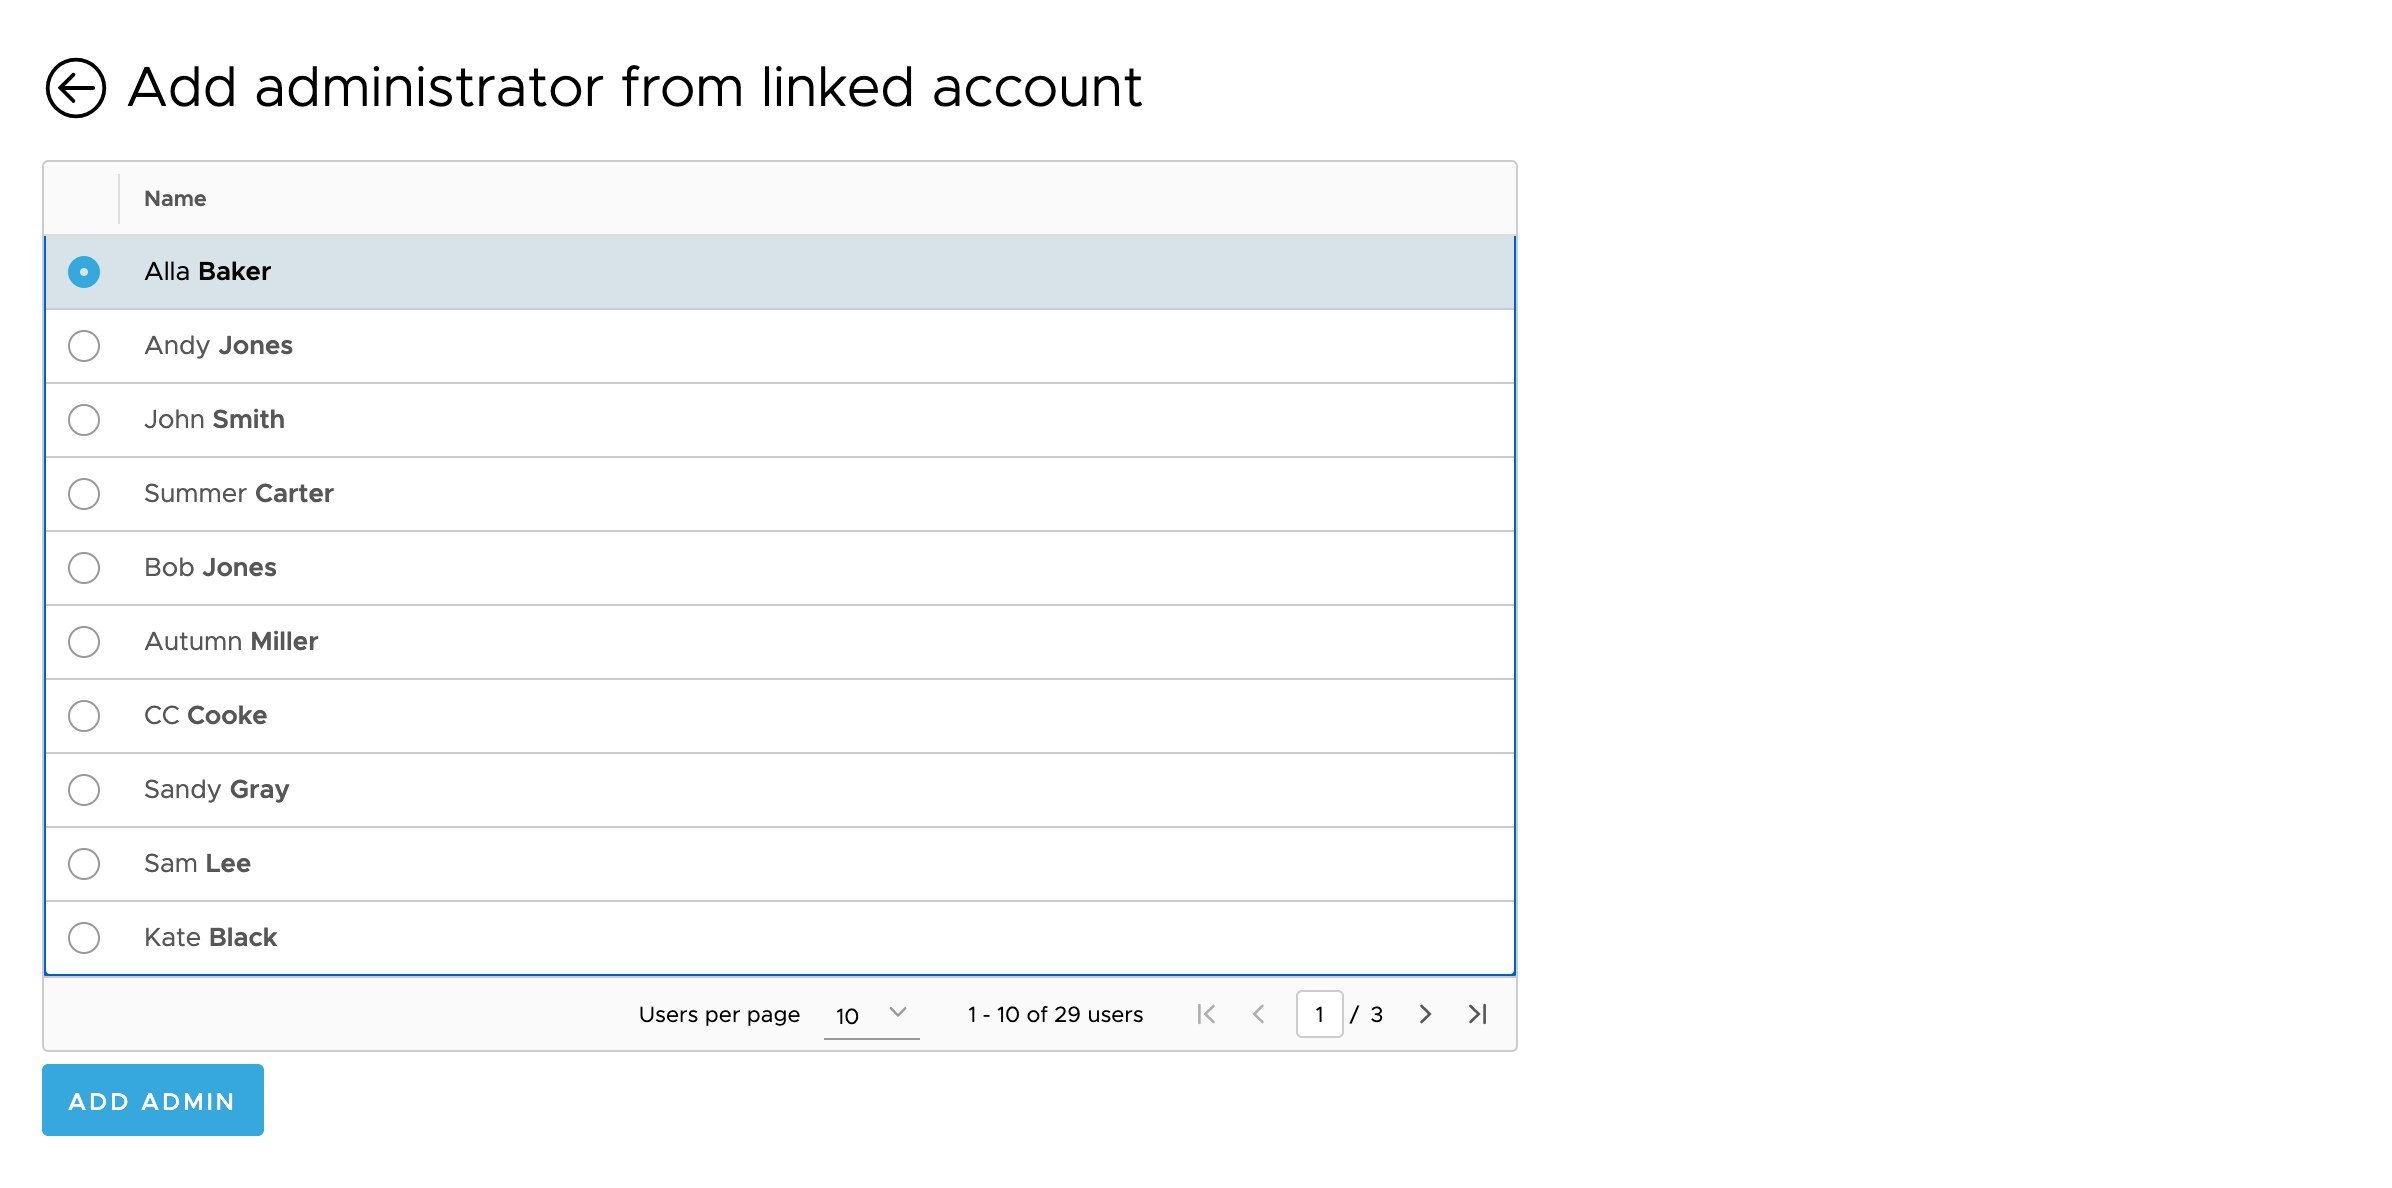
    Select the admin you wish to add.

    <Frame>
      <img src="https://mintcdn.com/pextest/JcSYjWowEW0UYuqG/images/administrator-guide/image-97.png?fit=max&auto=format&n=JcSYjWowEW0UYuqG&q=85&s=358249f5383b801e1aafdaee5e5d0ce3" alt="" width="2392" height="1188" data-path="images/administrator-guide/image-97.png" />
    </Frame>
  </Step>

  <Step>
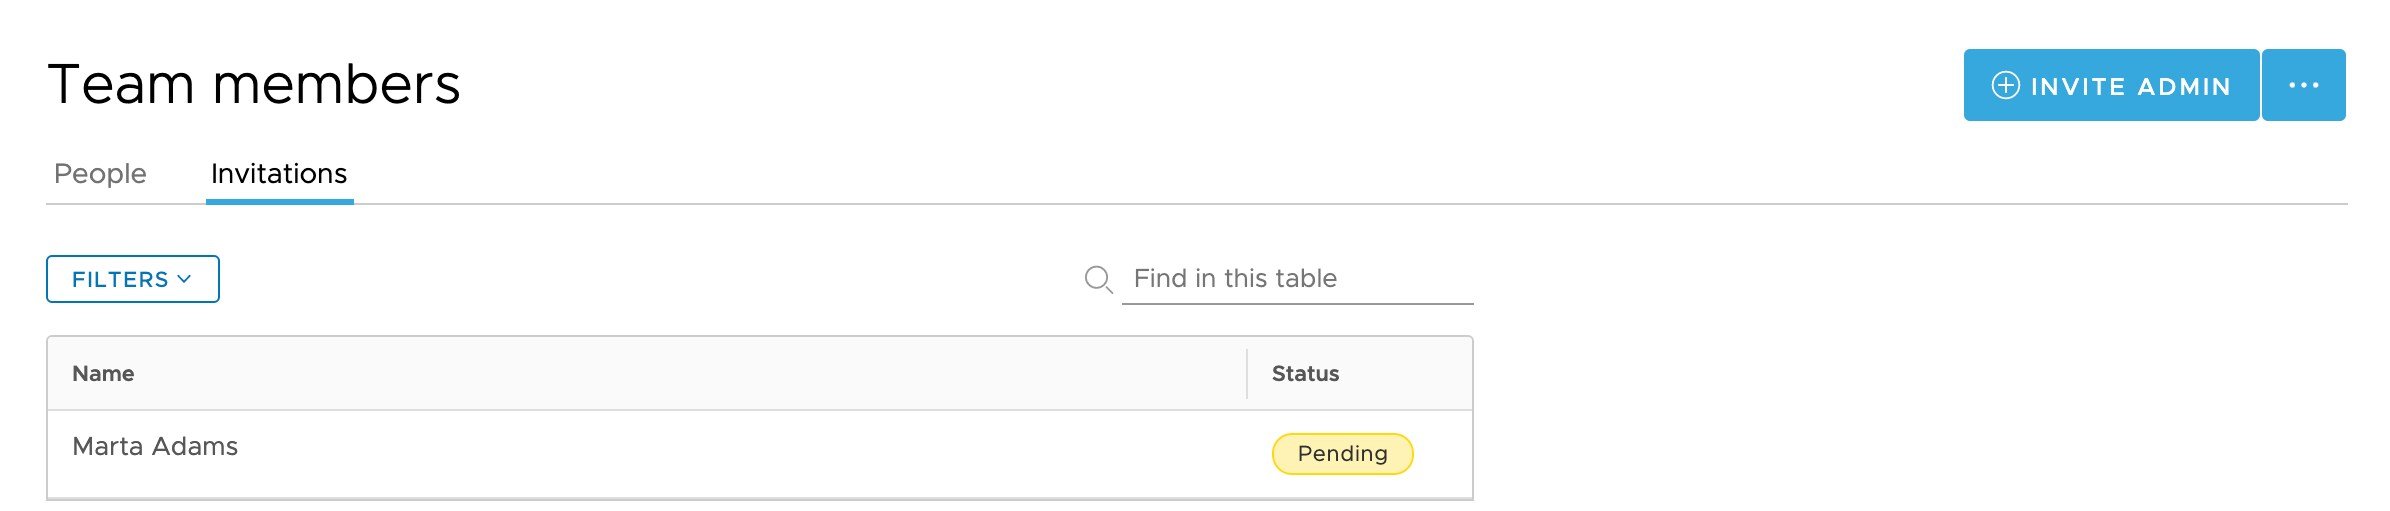
    The admin you added will now show under the ‘Invitations’ tab with a pending status until they accept their invitation. 

    <Frame>
      <img src="https://mintcdn.com/pextest/JcSYjWowEW0UYuqG/images/administrator-guide/image-98.png?fit=max&auto=format&n=JcSYjWowEW0UYuqG&q=85&s=633154630057c544a14a4979e645a5b4" alt="" width="2390" height="511" data-path="images/administrator-guide/image-98.png" />
    </Frame>
  </Step>
</Steps>

## How to See Closed Accounts


Option 1: Via Side Menu

<Steps>
  <Step>
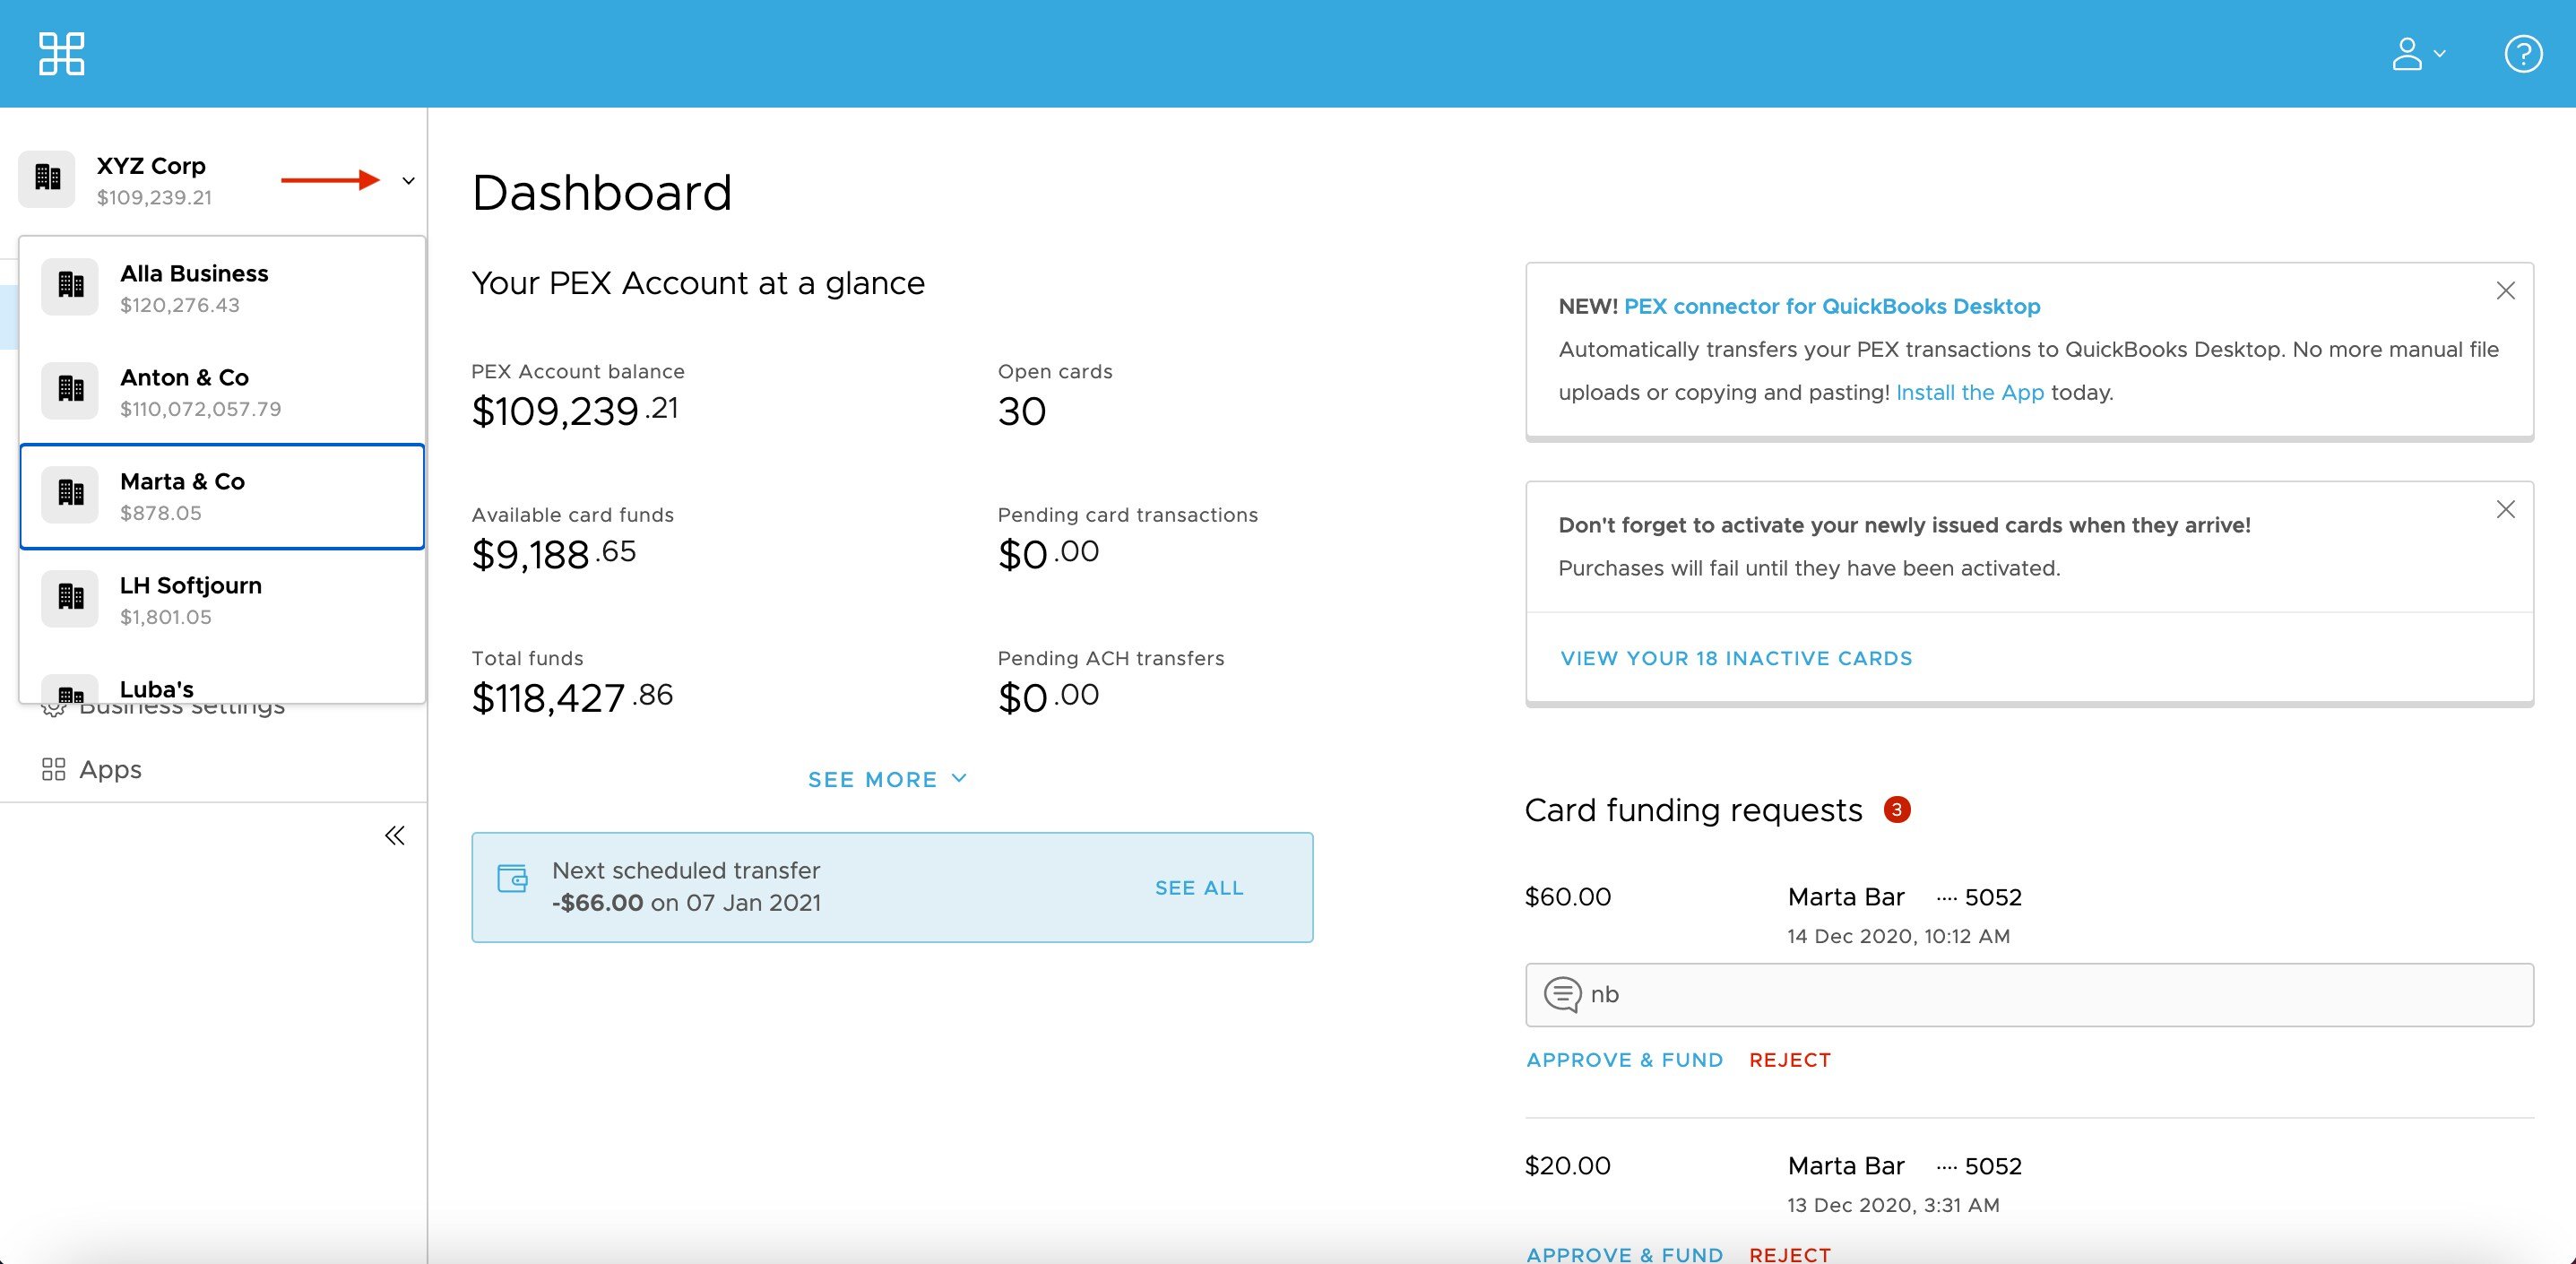
    Navigate to the sidebar dropdown under your company name. 

    <Frame>
      <img src="https://mintcdn.com/pextest/JcSYjWowEW0UYuqG/images/administrator-guide/image-99.png?fit=max&auto=format&n=JcSYjWowEW0UYuqG&q=85&s=9f2f57ec0f6e4d14875644b82406bcd1" alt="" width="2874" height="1410" data-path="images/administrator-guide/image-99.png" />
    </Frame>
  </Step>

  <Step>
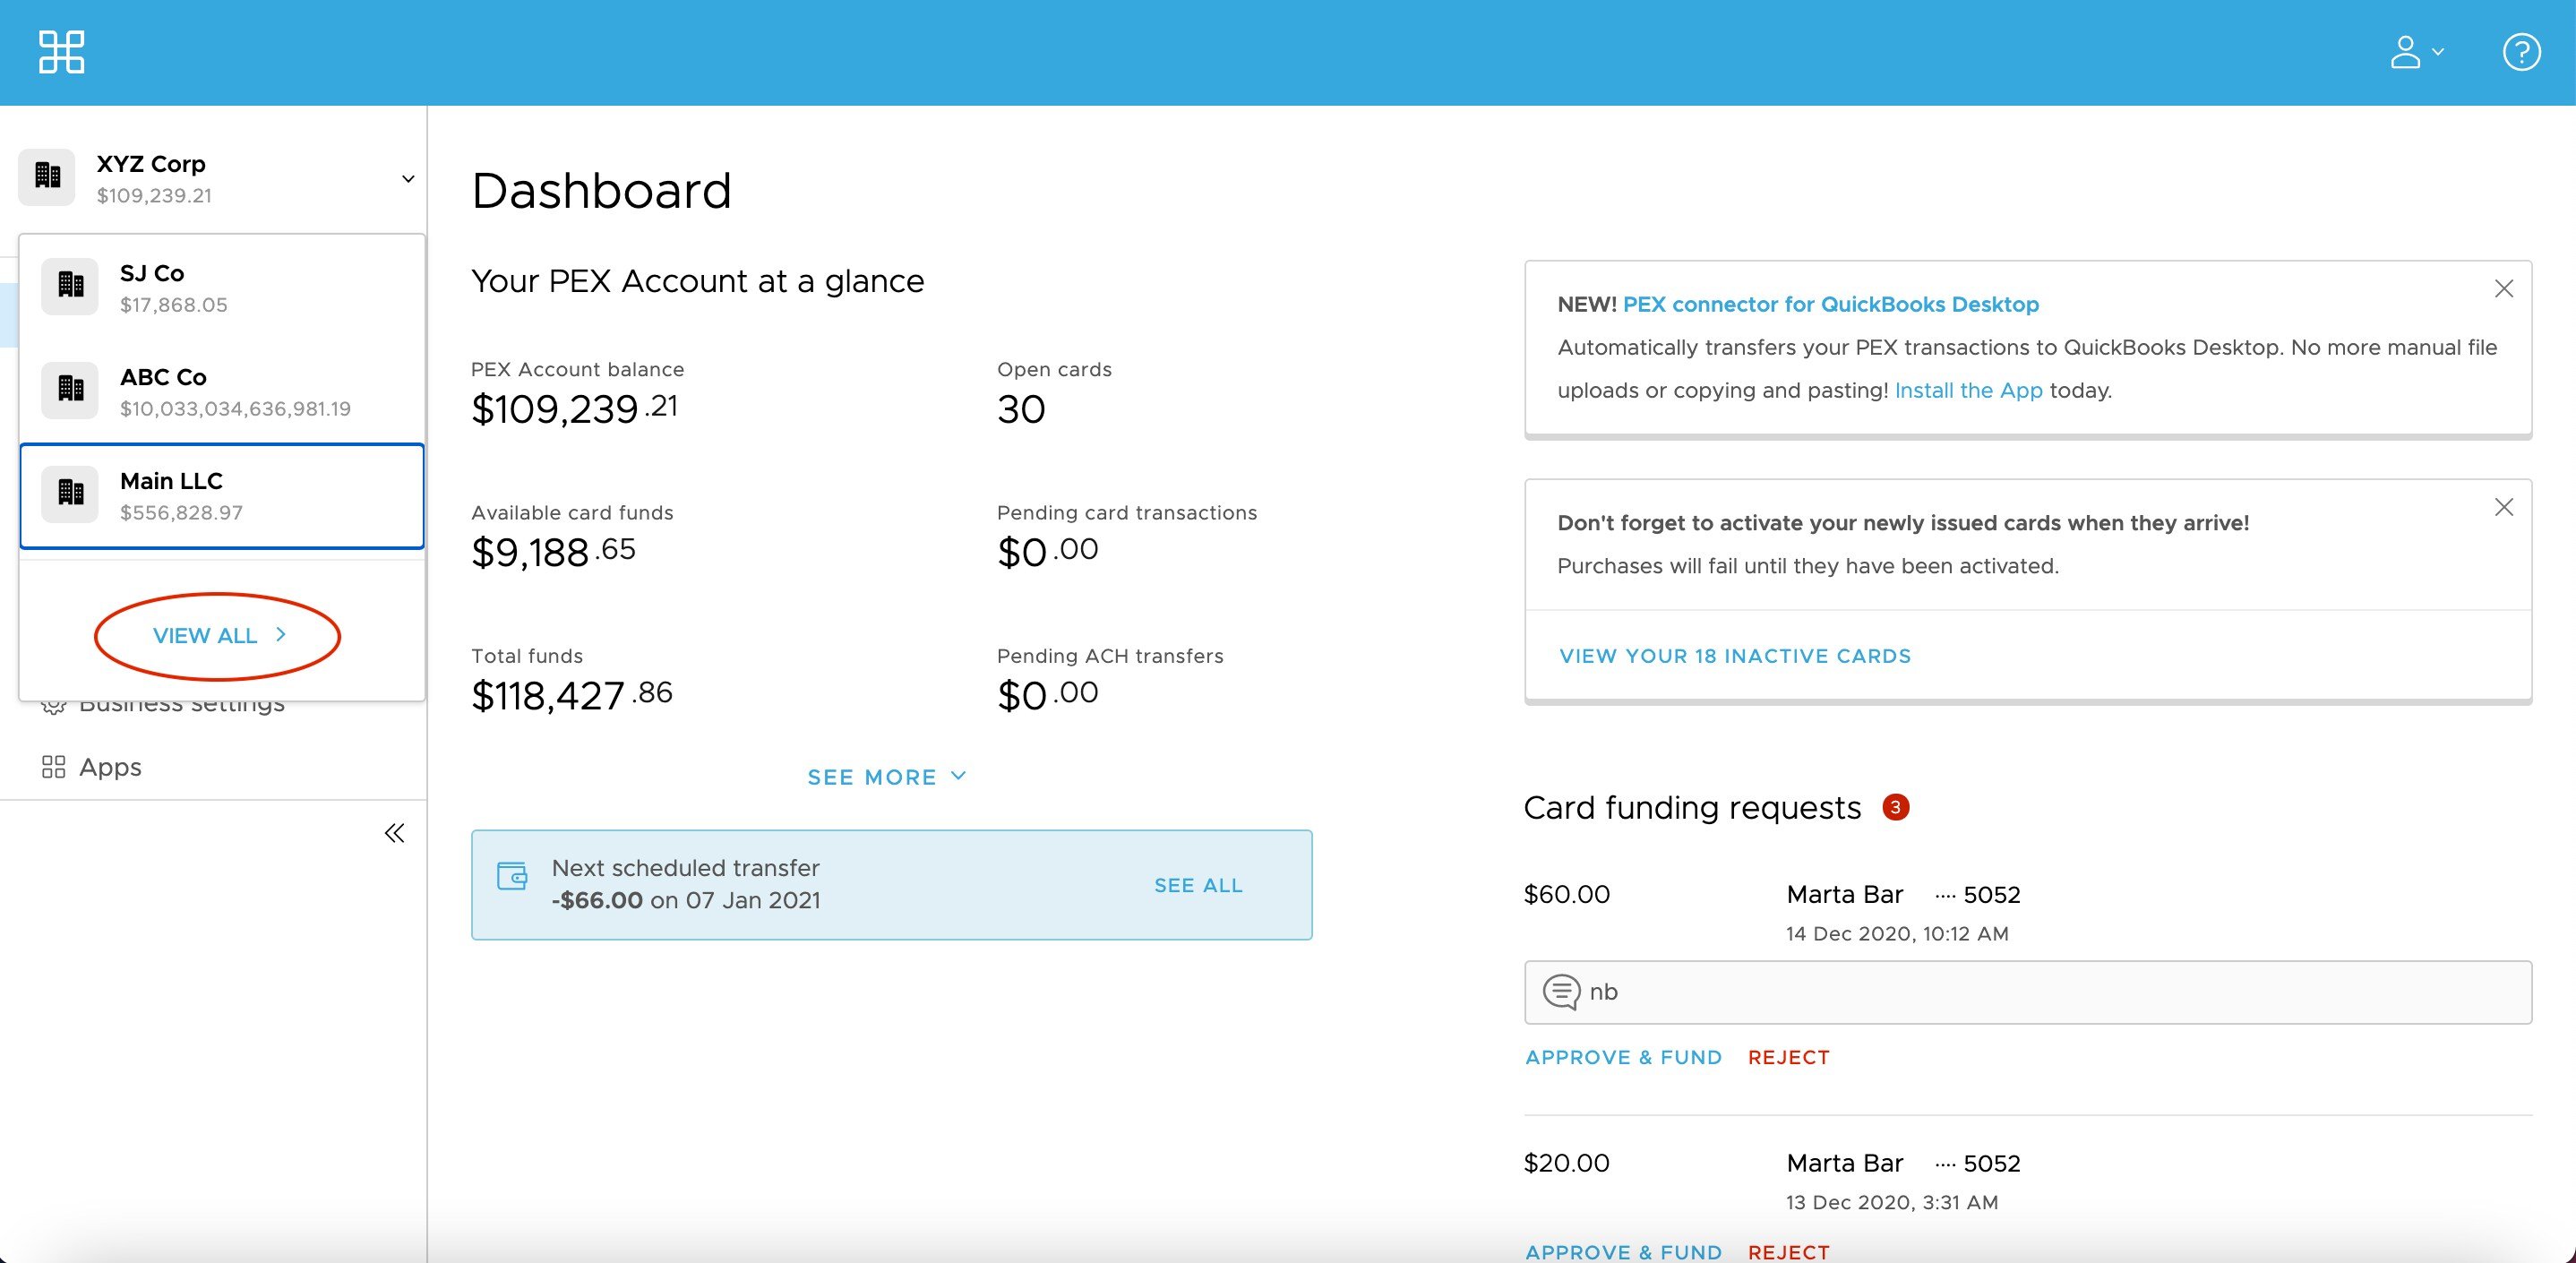
    Scroll to the bottom and select ‘View All.’ 

    <Frame>
      <img src="https://mintcdn.com/pextest/z-xo8Ba3fU4n84SS/images/administrator-guide/image-100.png?fit=max&auto=format&n=z-xo8Ba3fU4n84SS&q=85&s=2dc3fcf3ab8dc635b1834a33aee725be" alt="" width="2876" height="1410" data-path="images/administrator-guide/image-100.png" />
    </Frame>
  </Step>

  <Step>
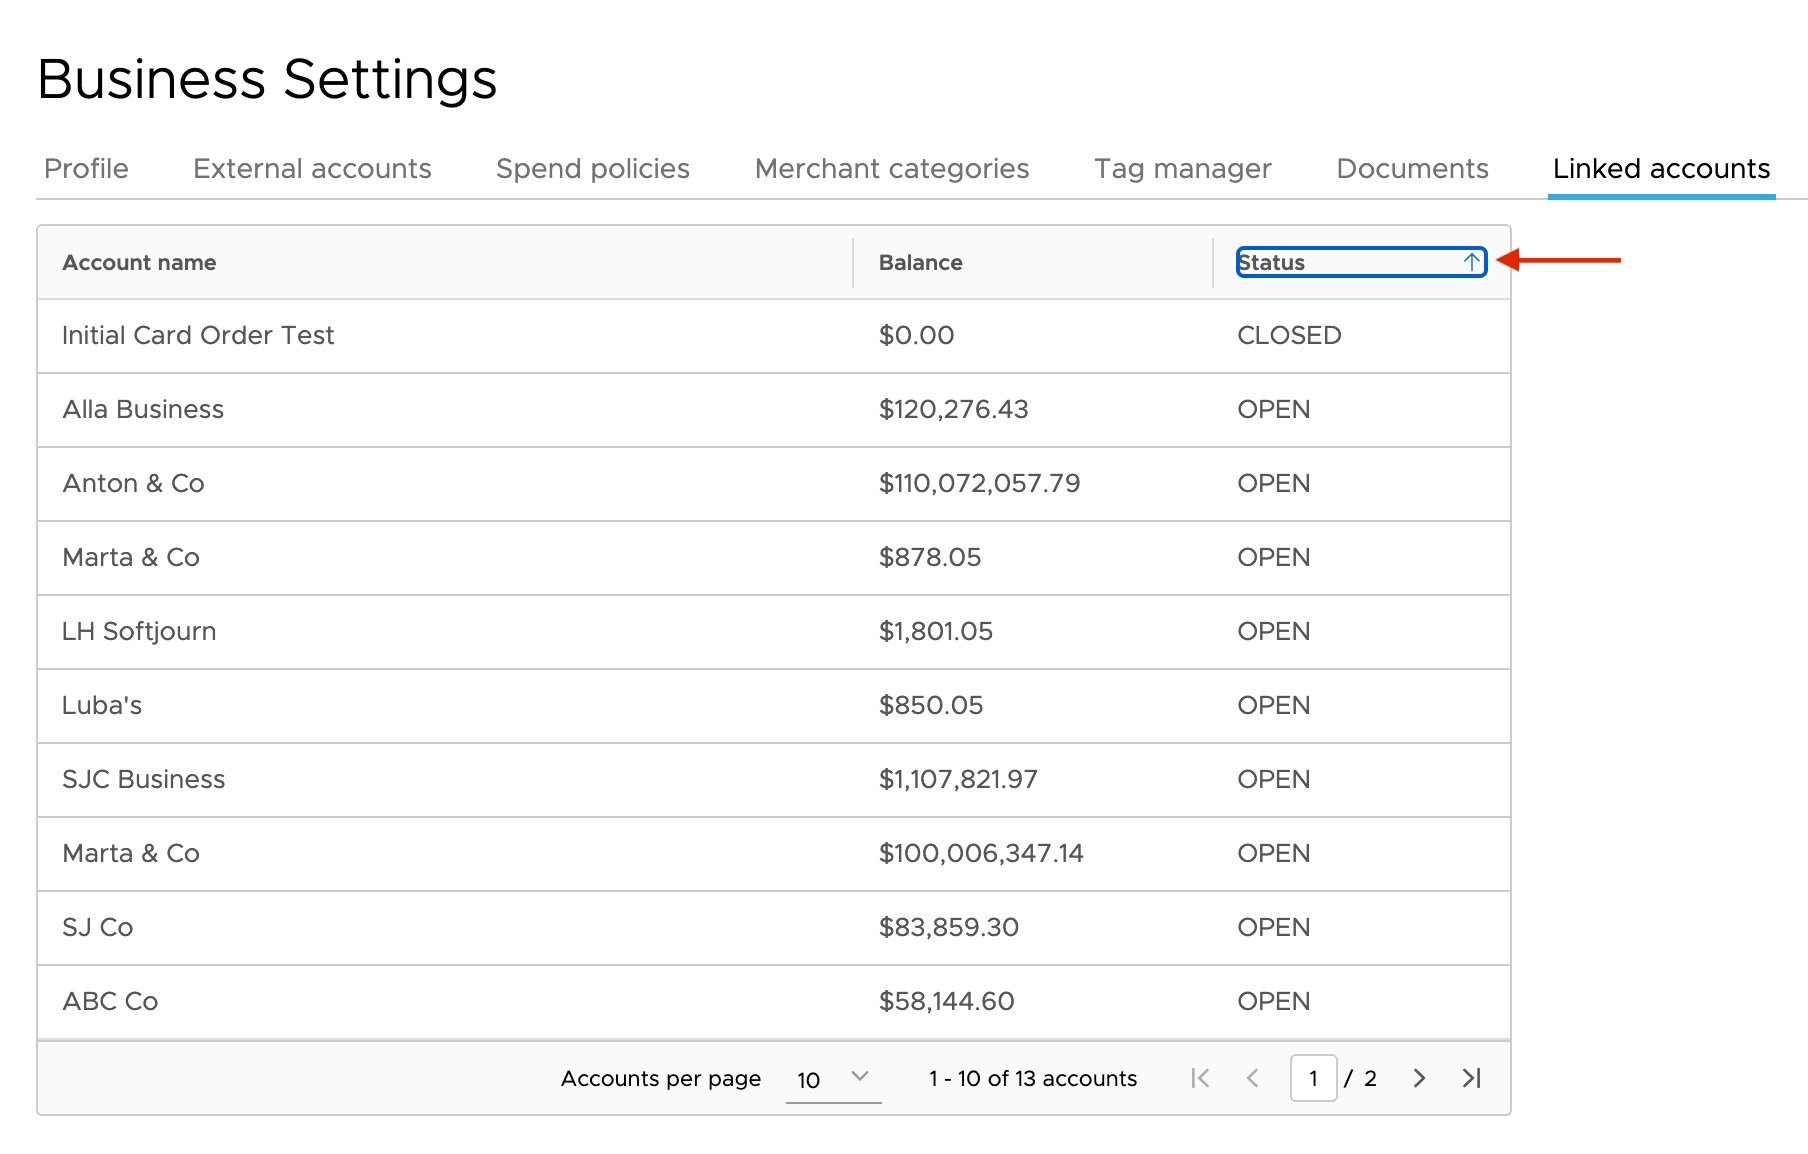
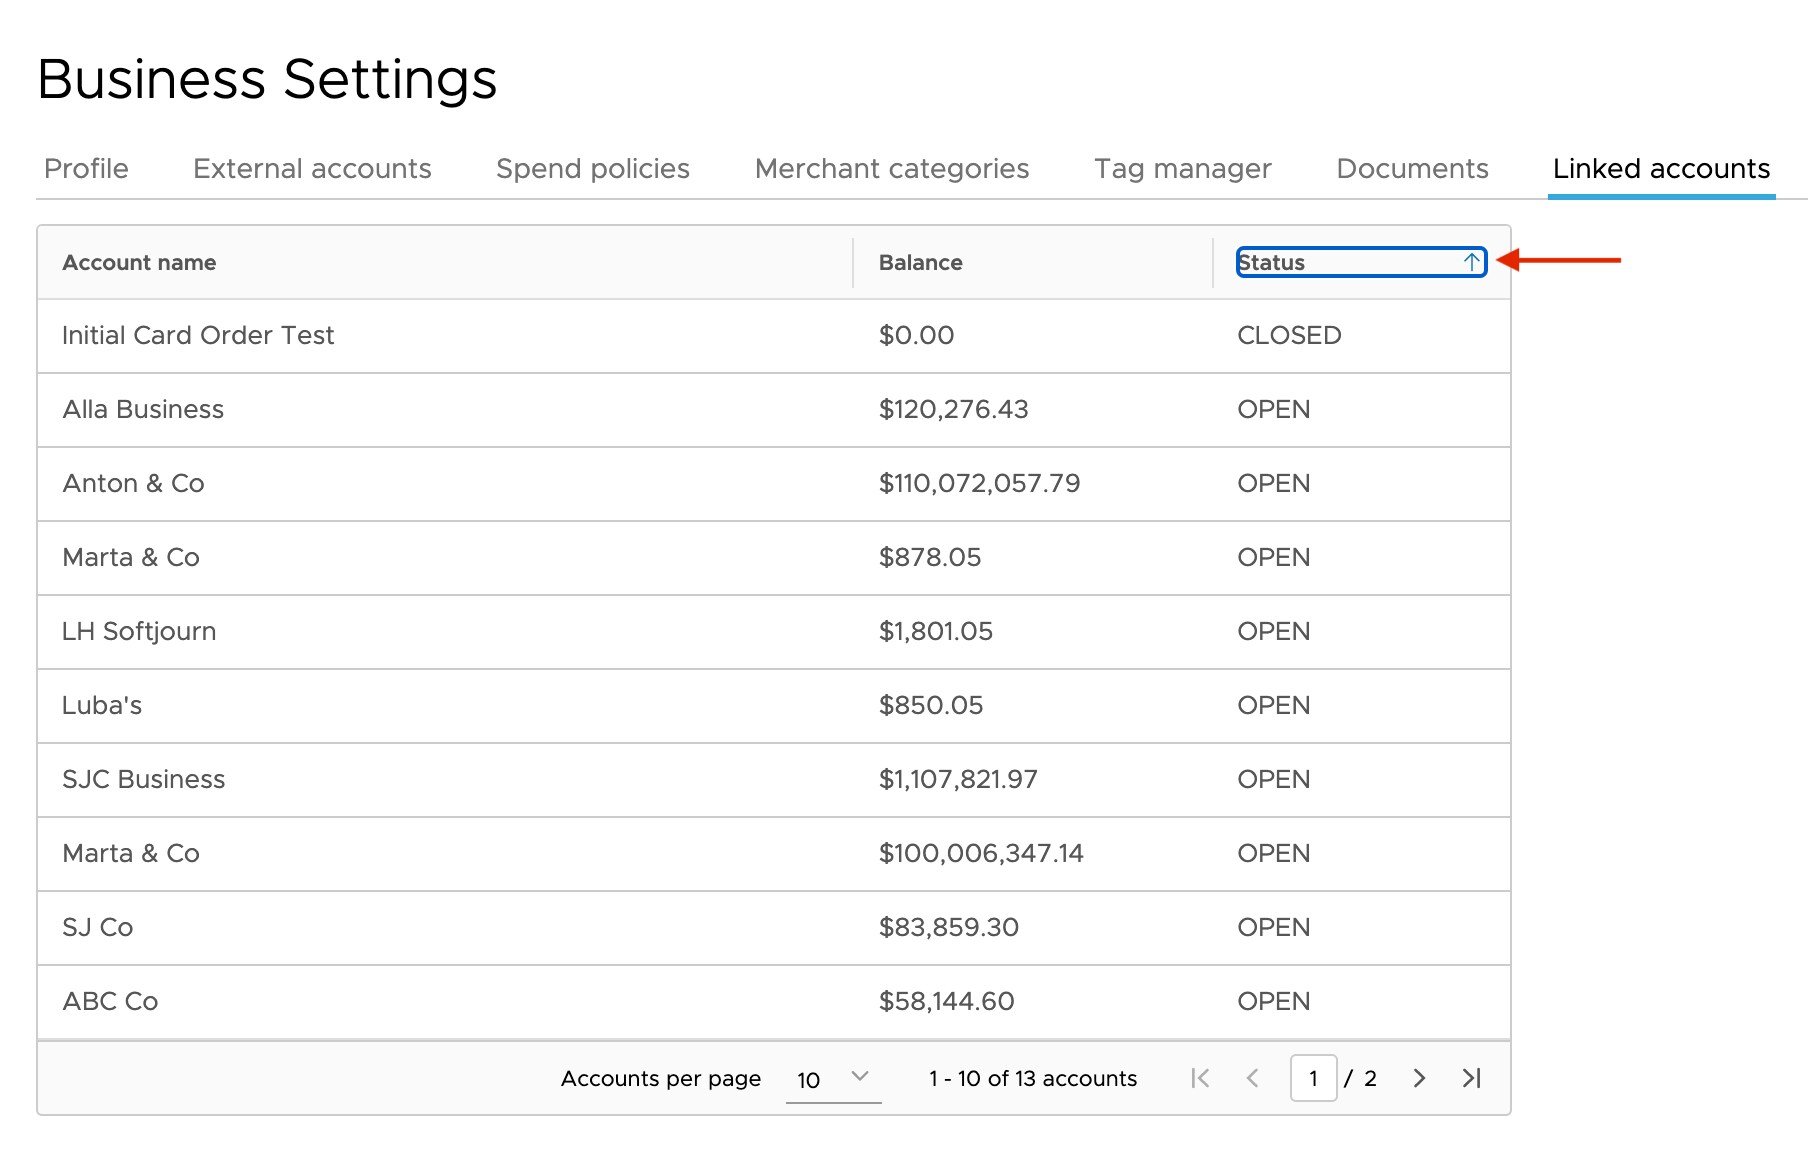
    Sort by ‘Status’ to view closed accounts. 
    <Frame>
      <img src="https://mintcdn.com/pextest/z-xo8Ba3fU4n84SS/images/administrator-guide/image-101.png?fit=max&auto=format&n=z-xo8Ba3fU4n84SS&q=85&s=9d4cffbe50cb3bba31ea7540c2248061" alt="" width="1808" height="1154" data-path="images/administrator-guide/image-101.png" />
    </Frame>
  </Step>
</Steps>

#### Option 2: Via ‘Business Settings’

<Steps>
  <Step>
    Select ‘Business Settings’ on the side menu.

    <Frame>
      <img src="https://mintcdn.com/pextest/z-xo8Ba3fU4n84SS/images/administrator-guide/image-102.png?fit=max&auto=format&n=z-xo8Ba3fU4n84SS&q=85&s=e03fac5328b16800d5a4ee4853fa4463" alt="" width="2878" height="1406" data-path="images/administrator-guide/image-102.png" />
    </Frame>
  </Step>

  <Step>
    Select the ‘Linked accounts’ tab. 

    <Frame>
      <img src="https://mintcdn.com/pextest/z-xo8Ba3fU4n84SS/images/administrator-guide/image-103.png?fit=max&auto=format&n=z-xo8Ba3fU4n84SS&q=85&s=5b07c73b171e3969ae9db7ff3190bfbc" alt="" width="1810" height="1144" data-path="images/administrator-guide/image-103.png" />
    </Frame>
  </Step>

  <Step>
    Sort by ‘Status’ to view closed accounts. 
    <Frame>
      <img src="https://mintcdn.com/pextest/z-xo8Ba3fU4n84SS/images/administrator-guide/image-104.png?fit=max&auto=format&n=z-xo8Ba3fU4n84SS&q=85&s=f11fb765515074e2b364044791fa726d" alt="" width="1808" height="1154" data-path="images/administrator-guide/image-104.png" />
    </Frame>
  </Step>
</Steps>