> ## Documentation Index
> Fetch the complete documentation index at: https://support.pexcard.com/llms.txt
> Use this file to discover all available pages before exploring further.
# PEX Connector for Aplos: Pre-configuration
> Create PEX tags and configure settings in Aplos to use the connector.
## Setting up Tags in PEX
PEX Tag manager is your one stop shop to sync Aplos fields with PEX tags. Each PEX tag corresponds to an Aplos field. Tags are essential to make the PEX Connector for Aplos functional.
PEX purchases must have an Account and Fund assigned in PEX before syncing into Aplos. The following explains how to add two required tags: Account and Fund.
## Account Tag
* Log in to [http://dashboard.pexcard.com/](http://dashboard.pexcard.com/?utm_source=support)
* Go to [Business Settings -> Tag manager](https://dashboard.pexcard.com/business-settings/tags?utm_source=support)
* Click **Add Tag**.
* Select **Dropdown** as the type.
* Enter a name: **Account**.
* Optionally, add a description like "Expense Accounts".
* Check **Enabled** to make this tag visible on transactions.
* Select the box to make this field required (Account is required).
* If the "Required" checkbox is checked, cardholders must tag a transaction with it.
* Click **Save tag** to finish.
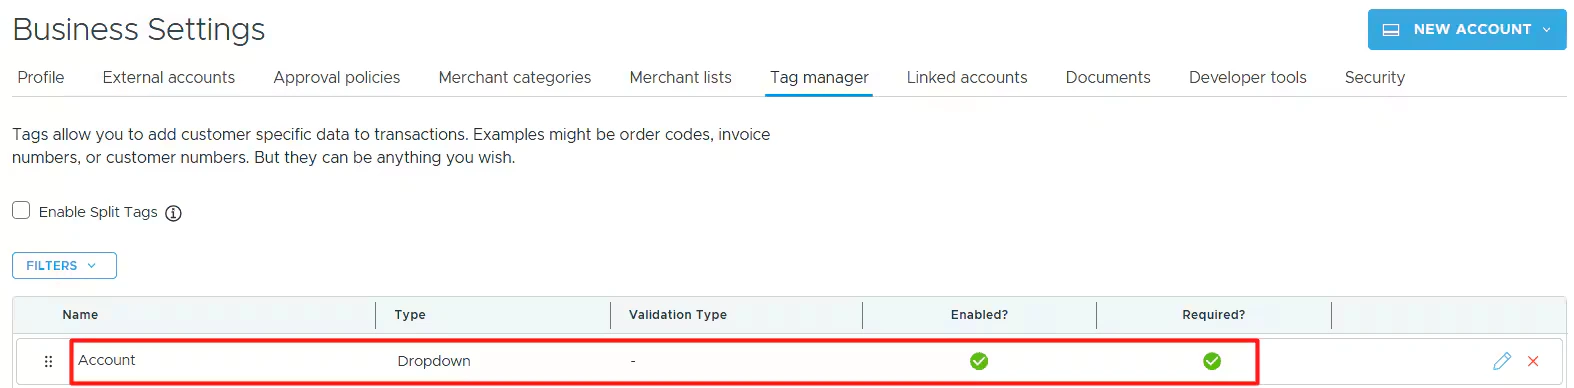
* The new tag will appear on the Tag Manager page.
## Fund Tag
* Log in to [http://dashboard.pexcard.com/](http://dashboard.pexcard.com/?utm_source=support)
* Go to [Business Settings -> Tag manager](https://dashboard.pexcard.com/business-settings/tags?utm_source=support)
* Click **Add Tag**.
* Select **Dropdown** as the type.
* Enter a name: **Fund**.
* Optionally, add a description like "Funds".
* Check **Enabled** to make this tag visible on transactions.
* Select the box to make this field required (Fund is required).
* If the "Required" checkbox is checked, cardholders must tag a transaction with it.
* Click **Save tag** to finish.
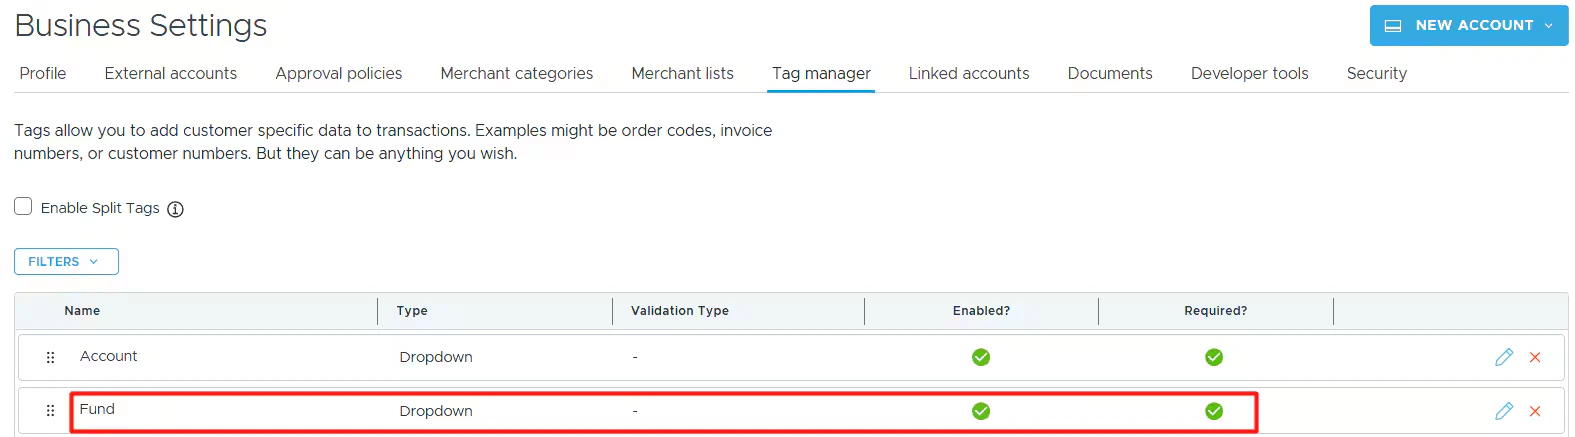
* The new tag will appear on the Tag Manager page.
## Other tags
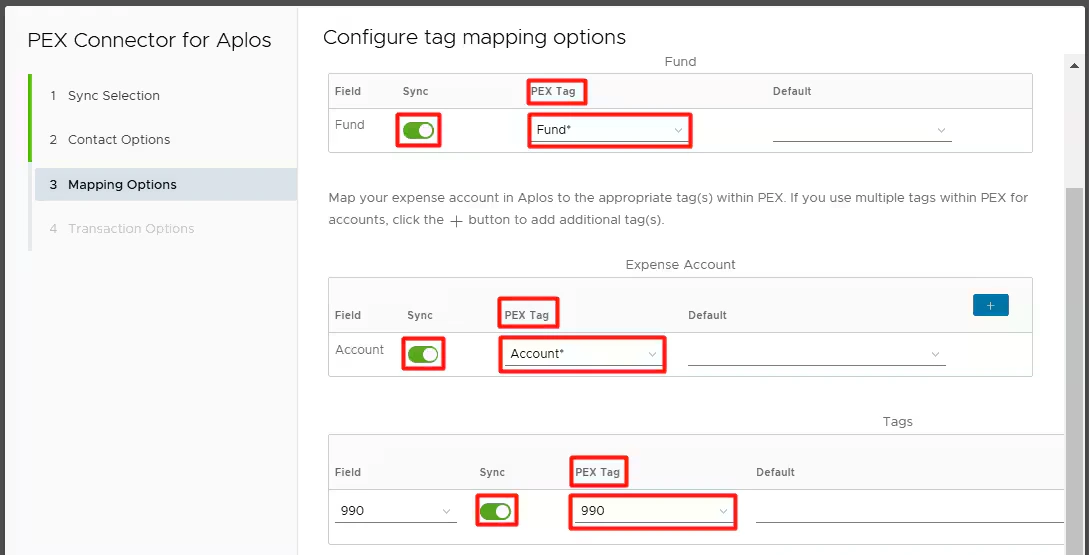
Optionally, you can also add other tags like 990 Tag following the same steps as described for the Account Tag and Fund Tag above.
Once the tags are set up, you will also see them:
* In the PEX Tag dropdown lists in connector setup steps.
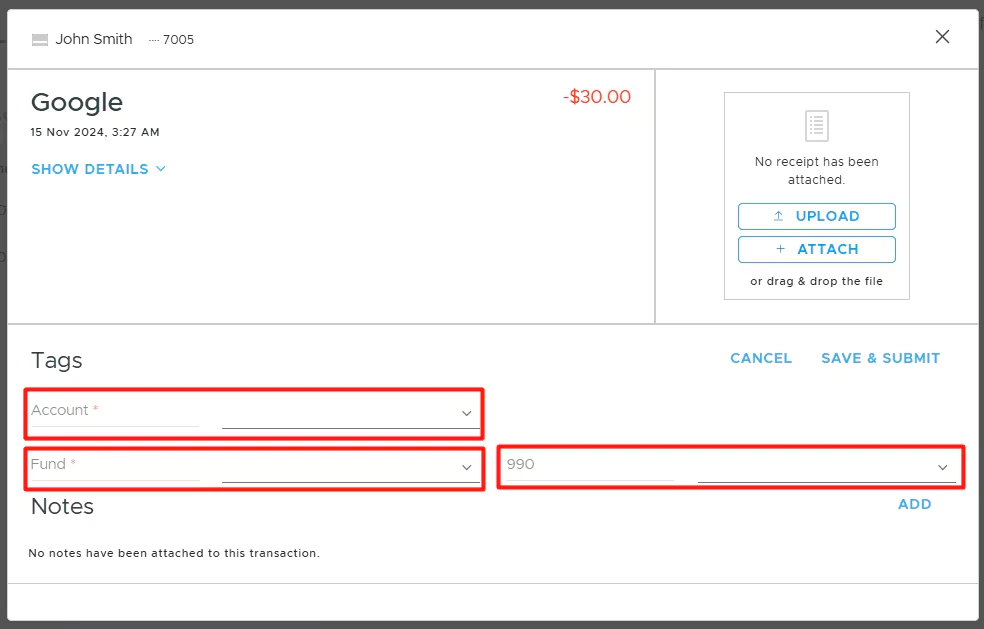
* On the PEX transaction details screen, so you and your Cardholders can tag transactions.
## Configuring the PEX Connector in Aplos
Log into your Aplos account to begin the set up.
## 1. Create PEX as a Contact
* Navigate to **People** > **Contact List**
* Press the green **(+)** on the top right
* Select "Company" as the **Contact Type** at the top of the list
* Enter "PEX" under the **Company** field
* Click **Save & Close**.
## 2. Create PEX as a Register
This will be the place where your PEX transactions are stored.
* Navigate to **Fund Accounting** > **Accounts** > Account List
* Scroll to find **Current Assets** and click the (+) button
* Enter a **Number** not currently in use
* Enter "PEX PREPAID CARDS" as the **Name**
* Ensure **Status** is enabled
* Select "Use as a register" for **Type**
* Keep **Activity** set to "Cash"
* Press **Save**.
## 3. Authorize PEX and Aplos to Communicate
This will allow your transactions to sync automatically once you set up the PEX Connector for Aplos on the PEX side.
* Navigate to **Fund Accounting** > **Prepaid Cards**
* Select **Log Into PEX**
* Enter your PEX email address (used during the PEX Application) and password
* Click **Login**
* Click **A\*\*\*\*llow**.
## Configuring PEX Connector for Aplos
For details on how to configure the PEX Connector for Aplos on the PEX side, please visit:
* [Connector-for-Aplos-Prepaid](/administrator-guide/pex-connector-for-aplos-prepaid) article if you are a prepaid business.
* [Connector-for-Aplos-Charge](/administrator-guide/pex-connector-for-aplos-charge) article if you are a credit business.
 ## Fund Tag
* Log in to [http://dashboard.pexcard.com/](http://dashboard.pexcard.com/?utm_source=support)
* Go to [Business Settings -> Tag manager](https://dashboard.pexcard.com/business-settings/tags?utm_source=support)
* Click **Add Tag**.
* Select **Dropdown** as the type.
* Enter a name: **Fund**.
* Optionally, add a description like "Funds".
* Check **Enabled** to make this tag visible on transactions.
* Select the box to make this field required (Fund is required).
* If the "Required" checkbox is checked, cardholders must tag a transaction with it.
* Click **Save tag** to finish.
* The new tag will appear on the Tag Manager page.
## Fund Tag
* Log in to [http://dashboard.pexcard.com/](http://dashboard.pexcard.com/?utm_source=support)
* Go to [Business Settings -> Tag manager](https://dashboard.pexcard.com/business-settings/tags?utm_source=support)
* Click **Add Tag**.
* Select **Dropdown** as the type.
* Enter a name: **Fund**.
* Optionally, add a description like "Funds".
* Check **Enabled** to make this tag visible on transactions.
* Select the box to make this field required (Fund is required).
* If the "Required" checkbox is checked, cardholders must tag a transaction with it.
* Click **Save tag** to finish.
* The new tag will appear on the Tag Manager page.
 ## Other tags
Optionally, you can also add other tags like 990 Tag following the same steps as described for the Account Tag and Fund Tag above.
Once the tags are set up, you will also see them:
* In the PEX Tag dropdown lists in connector setup steps.
## Other tags
Optionally, you can also add other tags like 990 Tag following the same steps as described for the Account Tag and Fund Tag above.
Once the tags are set up, you will also see them:
* In the PEX Tag dropdown lists in connector setup steps.
 * On the PEX transaction details screen, so you and your Cardholders can tag transactions.
 ## Configuring the PEX Connector in Aplos
Log into your Aplos account to begin the set up.
## 1. Create PEX as a Contact
* Navigate to **People** > **Contact List**
* Press the green **(+)** on the top right
* Select "Company" as the **Contact Type** at the top of the list
* Enter "PEX" under the **Company** field
* Click **Save & Close**.
## 2. Create PEX as a Register
This will be the place where your PEX transactions are stored.
* Navigate to **Fund Accounting** > **Accounts** > Account List
* Scroll to find **Current Assets** and click the (+) button
* Enter a **Number** not currently in use
* Enter "PEX PREPAID CARDS" as the **Name**
* Ensure **Status** is enabled
* Select "Use as a register" for **Type**
* Keep **Activity** set to "Cash"
* Press **Save**.
## 3. Authorize PEX and Aplos to Communicate
This will allow your transactions to sync automatically once you set up the PEX Connector for Aplos on the PEX side.
* Navigate to **Fund Accounting** > **Prepaid Cards**
* Select **Log Into PEX**
* Enter your PEX email address (used during the PEX Application) and password
* Click **Login**
* Click **A\*\*\*\*llow**.
## Configuring PEX Connector for Aplos
For details on how to configure the PEX Connector for Aplos on the PEX side, please visit:
* [Connector-for-Aplos-Prepaid](/administrator-guide/pex-connector-for-aplos-prepaid) article if you are a prepaid business.
* [Connector-for-Aplos-Charge](/administrator-guide/pex-connector-for-aplos-charge) article if you are a credit business.
## Configuring the PEX Connector in Aplos
Log into your Aplos account to begin the set up.
## 1. Create PEX as a Contact
* Navigate to **People** > **Contact List**
* Press the green **(+)** on the top right
* Select "Company" as the **Contact Type** at the top of the list
* Enter "PEX" under the **Company** field
* Click **Save & Close**.
## 2. Create PEX as a Register
This will be the place where your PEX transactions are stored.
* Navigate to **Fund Accounting** > **Accounts** > Account List
* Scroll to find **Current Assets** and click the (+) button
* Enter a **Number** not currently in use
* Enter "PEX PREPAID CARDS" as the **Name**
* Ensure **Status** is enabled
* Select "Use as a register" for **Type**
* Keep **Activity** set to "Cash"
* Press **Save**.
## 3. Authorize PEX and Aplos to Communicate
This will allow your transactions to sync automatically once you set up the PEX Connector for Aplos on the PEX side.
* Navigate to **Fund Accounting** > **Prepaid Cards**
* Select **Log Into PEX**
* Enter your PEX email address (used during the PEX Application) and password
* Click **Login**
* Click **A\*\*\*\*llow**.
## Configuring PEX Connector for Aplos
For details on how to configure the PEX Connector for Aplos on the PEX side, please visit:
* [Connector-for-Aplos-Prepaid](/administrator-guide/pex-connector-for-aplos-prepaid) article if you are a prepaid business.
* [Connector-for-Aplos-Charge](/administrator-guide/pex-connector-for-aplos-charge) article if you are a credit business.