> ## Documentation Index
> Fetch the complete documentation index at: https://support.pexcard.com/llms.txt
> Use this file to discover all available pages before exploring further.
# PEX Connector for Procore
> Sync PEX expense transactions, receipts, tags, and notes with Procore. Set up Tag Manager tags, connect your Procore service account, and choose what to sync.
[Procore](https://www.procore.com) is a popular suite of tools for construction management and accounting.
The PEX Connector for Procore lets you sync PEX expense transactions, receipts, tags or G/L codes, notes, and more with your Procore account. Besides posting PEX transactions to Procore, the connector can keep your PEX tags aligned with the latest projects, cost codes, and cost types in Procore so you avoid manual updates.
**Note:**
Auto-login for users in the Procore app is not available yet.
## Setting up tags within PEX
Tags are essential for the PEX Connector for Procore. Set up at least one tag with a temporary value before you configure the connector. You can set up to three tags: **Projects**, **Cost codes**, and **Cost types**.
### Projects tag
Go to **Business settings** > [**Tag Manager**](https://dashboard.pexcard.com/business-settings/tags?utm_source=support).
Click **Add Tag**.
Set **Name** to `Procore Projects`.
Add a **Description** such as "Project names".
(Optional) Select **Required** if cardholders must use this tag on every transaction.
Choose **Dropdown** as the **Type**.
Click **Add a new option** and enter `Test` for both **Display as** and **Option value**.
**Note:**
After the connector is configured, Procore will supply real project values. Tag Manager still needs at least one option to save the tag—use **Test** as a placeholder for now.
Ensure **Enabled** is selected.
Click **Save tag**.
### Cost codes tag
Go to **Business settings** > [**Tag Manager**](https://dashboard.pexcard.com/business-settings/tags?utm_source=support).
Click **Add Tag**.
Set **Name** to `Procore Cost Codes`.
(Optional) Add a **Description** such as "Cost codes".
Select **Required** — cost codes are required for this integration.
Choose **Dropdown** as the **Type**.
Click **Add a new option** and enter `Test` for both **Display as** and **Option value**.
**Note:**
After the connector is configured, Procore will sync cost code options. You need a temporary option (e.g. **Test**) to save the tag initially.
Ensure **Enabled** is selected.
Click **Save tag**.
### Cost types tag
Go to **Business settings** > [**Tag Manager**](https://dashboard.pexcard.com/business-settings/tags?utm_source=support).
Click **Add Tag**.
Set **Name** to `Procore Cost Types`.
(Optional) Add a **Description** such as "Cost types".
Select **Required** — cost types are required for this integration.
Choose **Dropdown** as the **Type**.
Click **Add a new option** and enter `Test` for both **Display as** and **Option value**.
**Note:**
After the connector is configured, Procore will sync cost type options. You need a temporary option (e.g. **Test**) to save the tag initially.
Ensure **Enabled** is selected.
Click **Save tag**.
After tags are set up, they appear on the PEX transaction details screen. Cardholders and administrators can use them to categorize each transaction.
**Note:**
Once the Procore connector is configured, **Display as** and **Option value** for these tags are populated automatically from Procore.
## Connect to your Procore account
After you log in to PEX and create your tags, follow these steps:
In PEX, open **Apps** in the left menu.
Select the **Available** tab.
Find **PEX Connector for Procore** and open the app tile.
Click **Install**, then **Launch**.
 **Note:**
To install the connector, enable the following permissions: *Edit business settings & apps*, *Manage cardholder*, *View card transactions*. Enable them in [My Profile -> Permissions](https://dashboard.pexcard.com/account/permissions?utm_source=support).
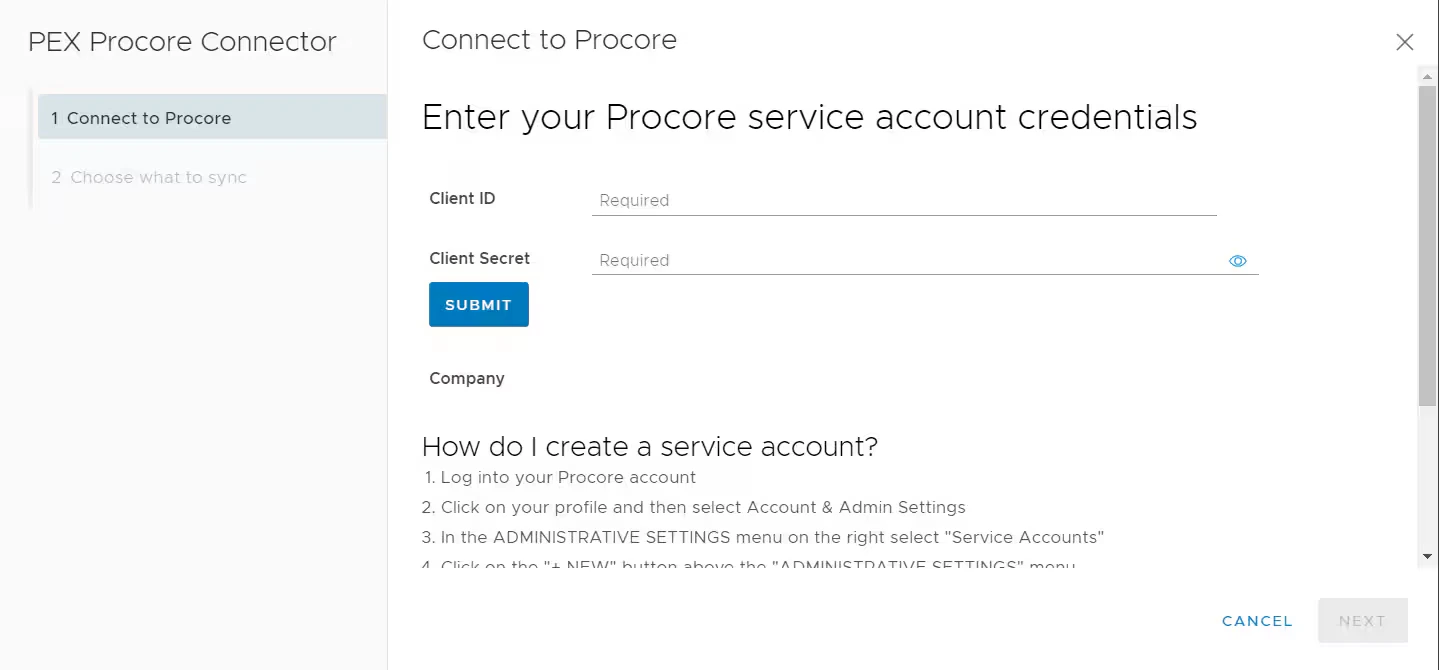
Enter your **Client ID** and **Client Secret** in the corresponding fields.
Click **Submit**.
* Your **Company ID** fills in automatically. If you have more than one company, select the one you want to sync transactions to.
Click **Next**.
### Create a Procore service account
If you do not have a **Client ID** and **Client Secret**, create a service account in Procore:
Log in to Procore.
Open your profile, then select **Account & Admin Settings**.
In **Company Settings** on the right, select **Service Accounts**.
**Note:**
To install the connector, enable the following permissions: *Edit business settings & apps*, *Manage cardholder*, *View card transactions*. Enable them in [My Profile -> Permissions](https://dashboard.pexcard.com/account/permissions?utm_source=support).
Enter your **Client ID** and **Client Secret** in the corresponding fields.
Click **Submit**.
* Your **Company ID** fills in automatically. If you have more than one company, select the one you want to sync transactions to.
Click **Next**.
### Create a Procore service account
If you do not have a **Client ID** and **Client Secret**, create a service account in Procore:
Log in to Procore.
Open your profile, then select **Account & Admin Settings**.
In **Company Settings** on the right, select **Service Accounts**.
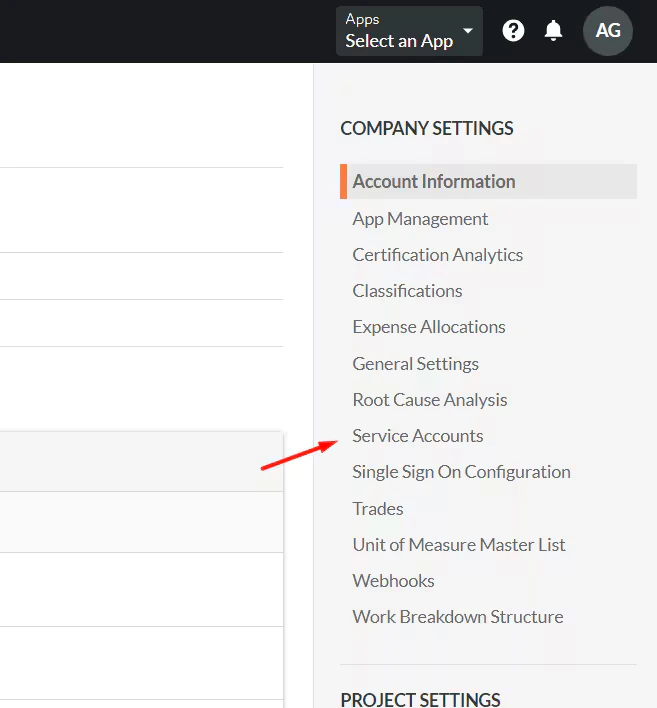 Click **+ New** above the Company Settings menu.
Set **App Type** to **Marketplace**.
Set **Marketplace App** to **PEX Connector**.
Name the service account (for example `PEX-Connector`) and click **Create**.
Copy the **Client ID** and **Client Secret** and paste them into the connector fields in PEX. Copy the secret before you close the page—you cannot view it again later.
### Directory (Admin) permissions
Your service account needs **Directory (Admin)** access so data can import into Procore.
Open your company **Directory** tool.
Click **+ New** above the Company Settings menu.
Set **App Type** to **Marketplace**.
Set **Marketplace App** to **PEX Connector**.
Name the service account (for example `PEX-Connector`) and click **Create**.
Copy the **Client ID** and **Client Secret** and paste them into the connector fields in PEX. Copy the secret before you close the page—you cannot view it again later.
### Directory (Admin) permissions
Your service account needs **Directory (Admin)** access so data can import into Procore.
Open your company **Directory** tool.
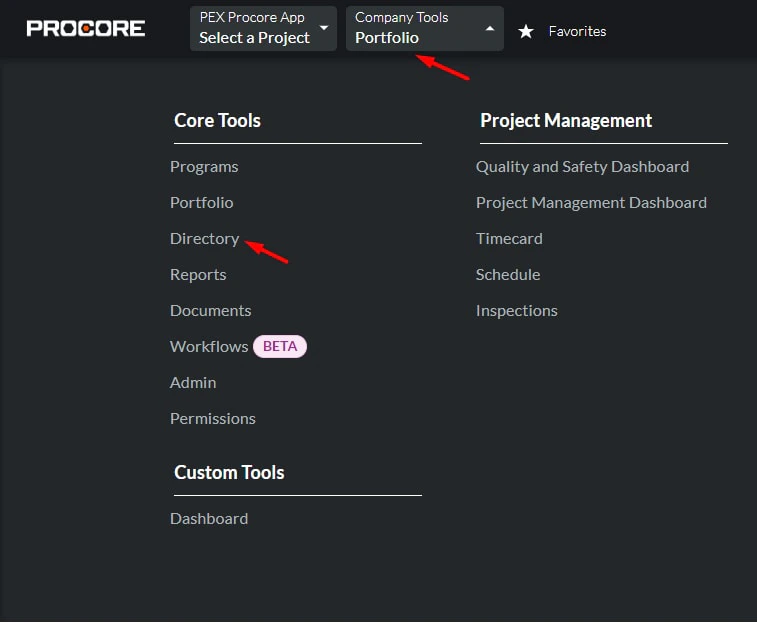 Find the service account and click **Edit**.
On the contact page, scroll to the permissions matrix. Configure access by selecting **Admin** for each tool in the matrix.
Find the service account and click **Edit**.
On the contact page, scroll to the permissions matrix. Configure access by selecting **Admin** for each tool in the matrix.
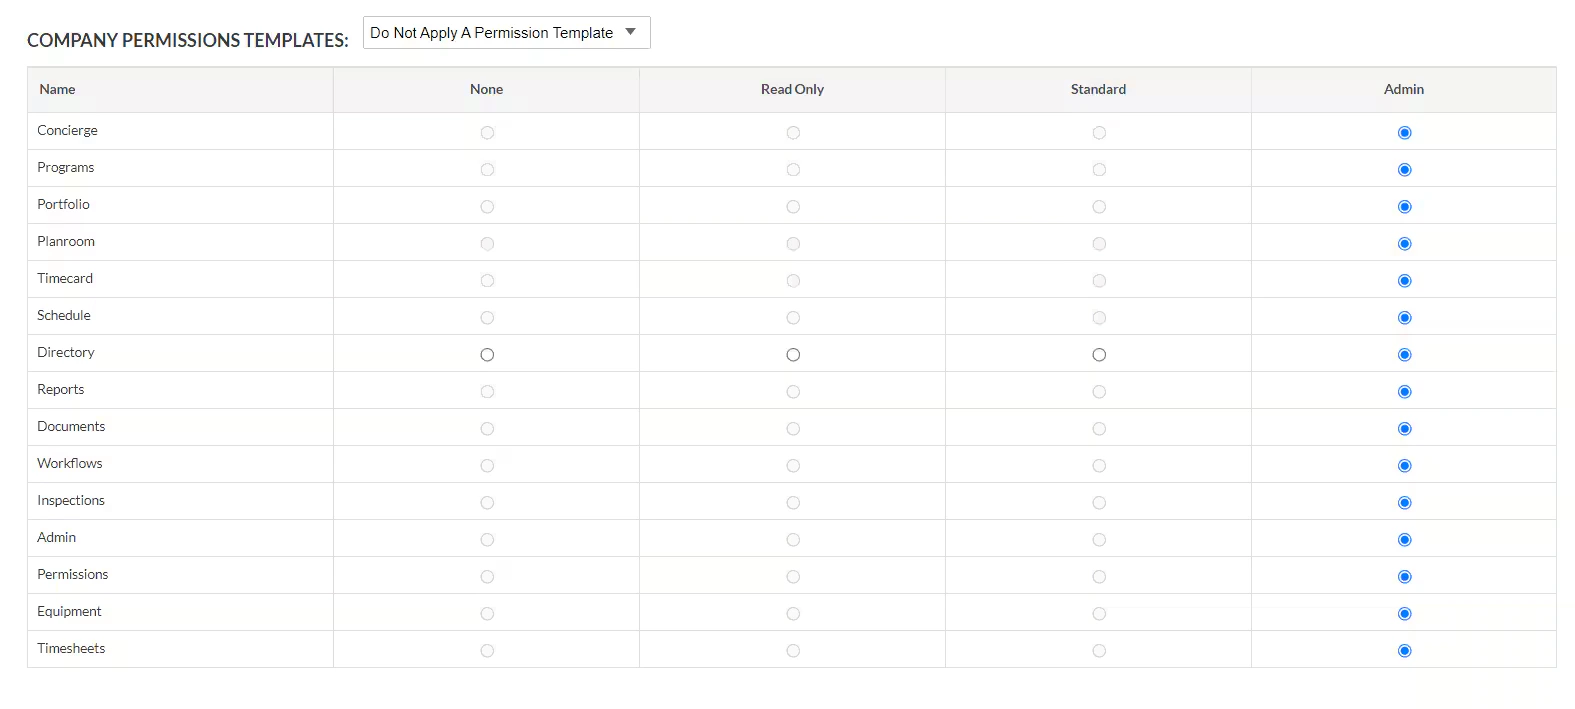 Click **Save**.
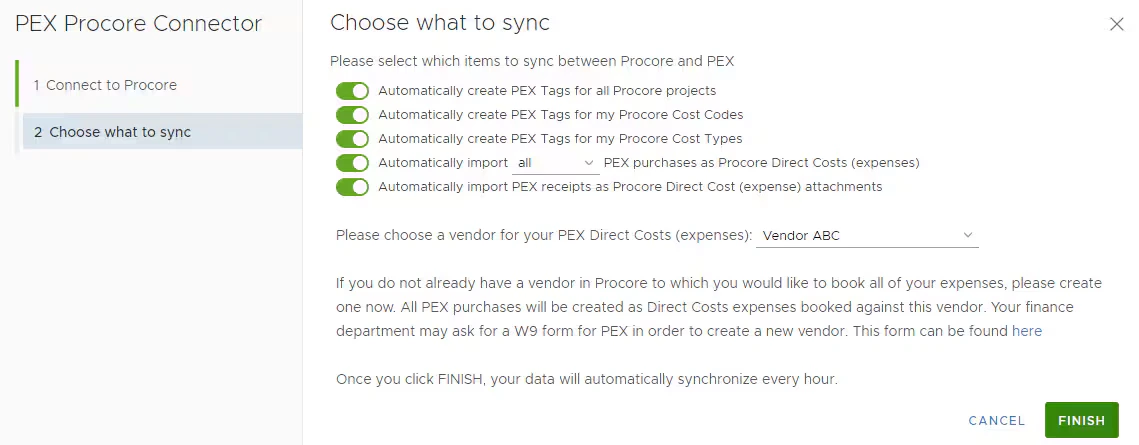
## Choose what to sync
* Enable the **first** option to import all Procore projects into PEX as a tag.
* Enable the **second** option to import all Procore cost codes into PEX as a tag.
* Enable the **third** option to import all Procore cost types into PEX as a tag.
* Enable the **fourth** option to import PEX purchases as expenses in Procore. You can sync **all** transactions or **approved only**.
* For transaction review, see [How to review transactions with receipts, tags, and user notes](/administrator-guide/how-to-review-transactions-with-receipts-tags-and-user-notes).
* Enable the **fifth** option to attach PEX receipts to expenses in Procore.
* Choose a **vendor** from the list. PEX transactions post under this vendor in Procore. Create a vendor in Procore first if you need one.
Click **Save**.
## Choose what to sync
* Enable the **first** option to import all Procore projects into PEX as a tag.
* Enable the **second** option to import all Procore cost codes into PEX as a tag.
* Enable the **third** option to import all Procore cost types into PEX as a tag.
* Enable the **fourth** option to import PEX purchases as expenses in Procore. You can sync **all** transactions or **approved only**.
* For transaction review, see [How to review transactions with receipts, tags, and user notes](/administrator-guide/how-to-review-transactions-with-receipts-tags-and-user-notes).
* Enable the **fifth** option to attach PEX receipts to expenses in Procore.
* Choose a **vendor** from the list. PEX transactions post under this vendor in Procore. Create a vendor in Procore first if you need one.
 ### Limit which projects sync
If you do not want every Procore project as a tag, turn **OFF** the first option (auto-create Procore projects as PEX tags). The connector then lets you pick specific projects.
### Limit which projects sync
If you do not want every Procore project as a tag, turn **OFF** the first option (auto-create Procore projects as PEX tags). The connector then lets you pick specific projects.
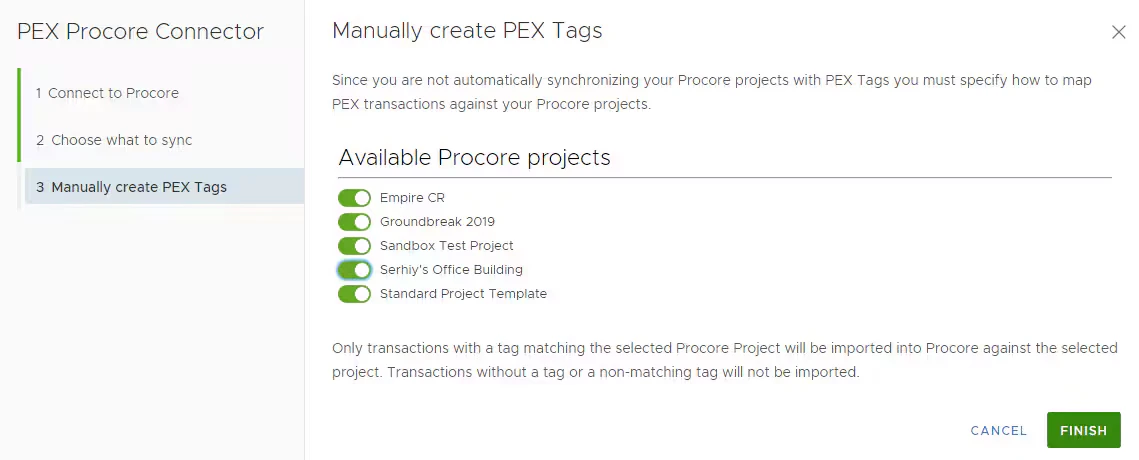
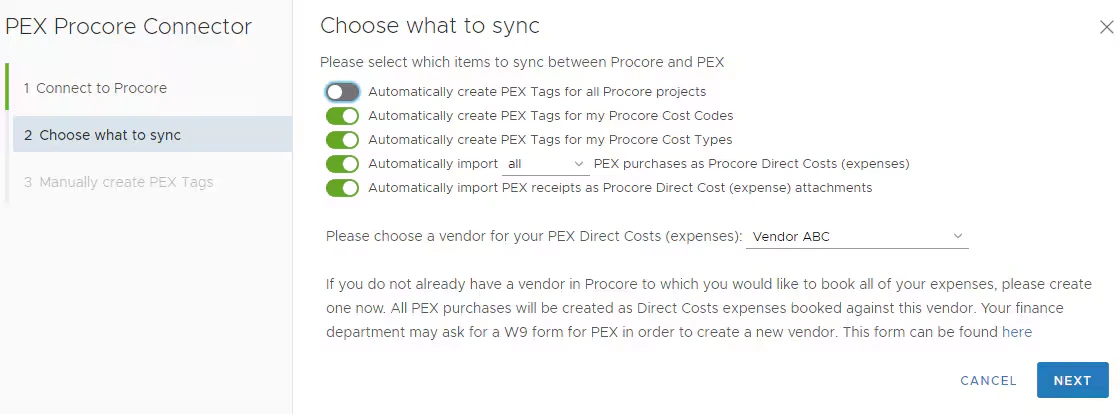 Select projects on this screen. They appear only as **option values** under your Procore Projects tag.
 ## Managing the connector
On the connector dashboard you can:
* View or edit configuration **settings**
* Turn project sync on or off
* View sync **history**
* Run a sync **manually**
* **Disconnect** from Procore
## Support & Inquiries
See [Accounting Software Connector Troubleshooting](/administrator-guide/accounting-software-connector-troubleshooting) for more help.
For connector questions, email [appsupport+procore@pexcard.com](mailto:appsupport+procore@pexcard.com).
## Managing the connector
On the connector dashboard you can:
* View or edit configuration **settings**
* Turn project sync on or off
* View sync **history**
* Run a sync **manually**
* **Disconnect** from Procore
## Support & Inquiries
See [Accounting Software Connector Troubleshooting](/administrator-guide/accounting-software-connector-troubleshooting) for more help.
For connector questions, email [appsupport+procore@pexcard.com](mailto:appsupport+procore@pexcard.com).