> ## Documentation Index
> Fetch the complete documentation index at: https://support.pexcard.com/llms.txt
> Use this file to discover all available pages before exploring further.
# PEX Connector for QuickBooks Desktop
> Sync PEX transactions directly to your QuickBooks Desktop company file.
**Supported versions:**
QuickBooks Pro, Premier, Accountant, and Enterprise Solutions (2018 or later), U.S. editions only. Not supported on macOS.
## Prerequisites
* QuickBooks Desktop credit card account to track PEX card spending. You can create a new one specifically for PEX (e.g., "PEX Credit Card Account") or use an existing one. See [How To Add PEX to Your QuickBooks Desktop Account](/administrator-guide/adding-pex-to-your-quickbooks-desktop-account) for instructions.
* *(Optional)* PEX tags created and ready. To ensure purchases sync to the correct accounts or items right away, create tags beforehand. See [Create tags for QuickBooks Desktop](/administrator-guide/create-pex-tags-for-quickbooks-desktop) for instructions.
## Setup
### 1. Install the Connector
Follow the steps:
* Log in to [dashboard.pexcard.com](http://dashboard.pexcard.com/?utm_source=support) and go to **Apps** → **Available**.
* Find **PEX Connector for QuickBooks Desktop** and click **Install**, then **Launch**.
**Note:**
Requires the following permissions: Edit business settings & apps, Manage cardholder, View card transactions. Enable them under [My Profile -> Permissions](https://dashboard.pexcard.com/account/permissions?utm_source=support).
### 2. Configure Sync Options
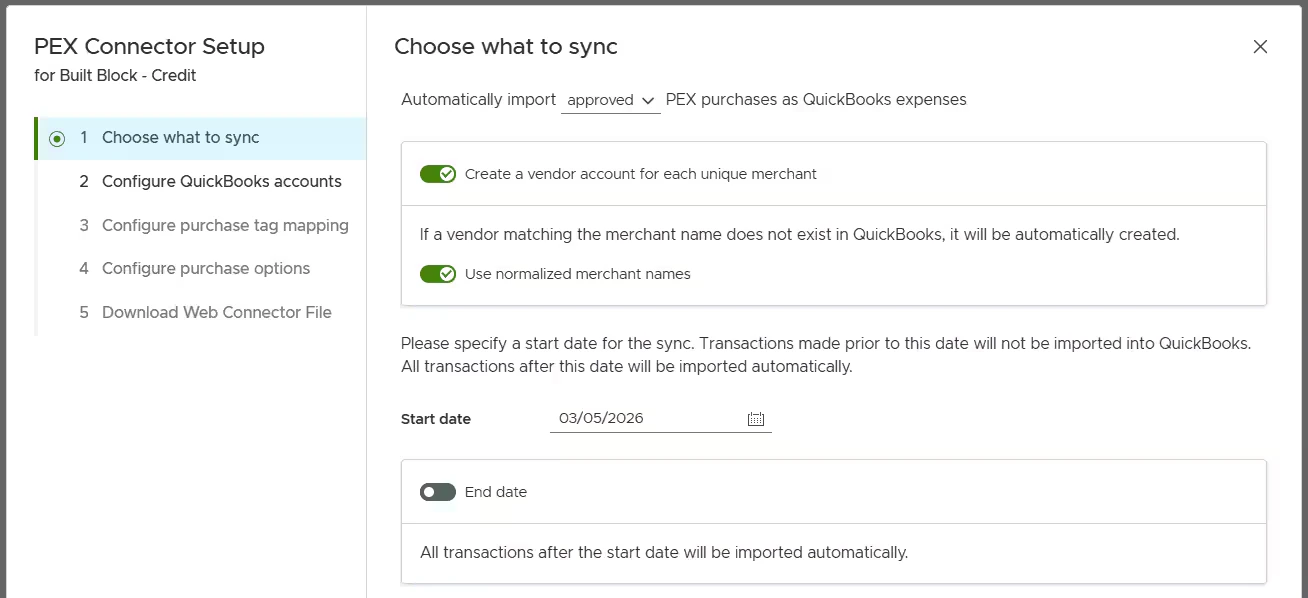
* **Purchases to sync** — choose all PEX purchases (regardless of approval status) or approved only. For details on transaction review, see [How to Review Transactions](/administrator-guide/how-to-review-transactions-with-receipts-tags-and-user-notes).
* **Vendor** — enable **Create a vendor account for each unique merchant** to match PEX transaction merchants to existing vendors in your QuickBooks company file. If no matching vendor is found, one will be automatically created.
* Optionally, enable **Use normalized merchant names** to standardize merchant names — for example, "Walmart23455" and "Walmart-brooklyn223" will both be recorded as "Walmart" in QuickBooks.
* If **Create a vendor account for each unique merchant** is disabled, enter a default vendor name in the **Vendor name** field — all PEX transactions will be booked against that vendor. Consider creating a vendor called "PEX" in QuickBooks for this purpose.
* **Start date** — transactions after this date will be synced. Cannot be more than one year in the past. For automatic ongoing sync, set a start date only and leave the end date blank.
* **End date** — optionally set an end date to sync a specific period. Ideal for a one-time manual sync.
### 3. Configure QuickBooks Accounts
Enter the credit card account to track PEX card spending that you created in the [Prerequisites section](#prerequisites).
* Purchases in PEX will be charged to this account.
* Fees in PEX will be charged to this account.
* Bill payments to PEX will reduce the amount owed on this account.
Enter the credit card account name exactly as it appears in your QuickBooks company file. For sub-accounts, use the full hierarchy separated by colons (e.g., `PEX Main:PEX Credit Card Account`).
Then enter the bank account used to pay down your PEX balance. The name entered must match exactly the bank account name in your QuickBooks company file.
### 4. Map PEX tags
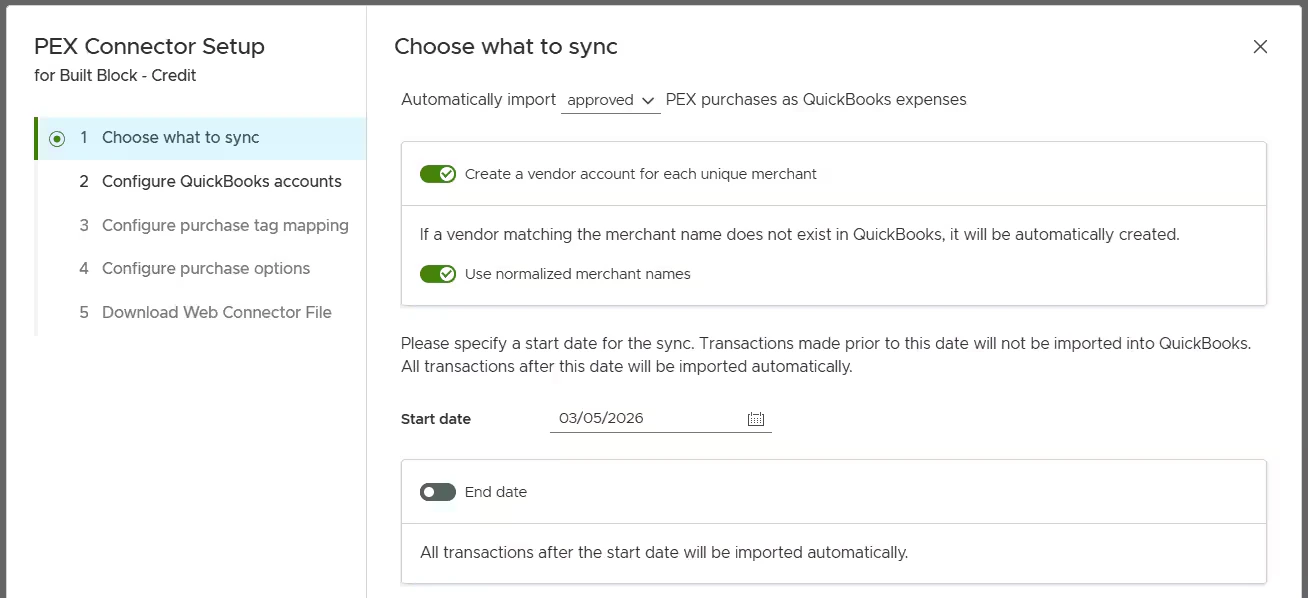
Map up to four QuickBooks fields to PEX tags. Tags must be created beforehand — see [Create tags for QuickBooks Desktop](/administrator-guide/create-pex-tags-for-quickbooks-desktop).
* **Expense Account**
* **Item**
* **Class**
* **Customer:Job**
For each field, you can set a **default value** (used when a transaction isn't tagged) and enable **auto-sync**. Make sure to turn auto-sync on — it pulls field options directly from QuickBooks into PEX as tag values, so you never need to add them manually. New options added in QuickBooks are synced to PEX automatically.
At minimum, set a default for either **Expense Account** (to sync as expenses) or **Item** (to sync as items) — or both. Without at least one default, untagged transactions will fail to sync.
### 5. Configure Purchase Options
Optionally configure how purchase notes are mapped in QuickBooks:
* **Copy notes to expense** — copies the PEX transaction note to the expense memo in QuickBooks.
* **Copy notes to expense lines** — copies the PEX transaction note to individual expense lines in QuickBooks.
### 6. Download Web Connector File
Click **Download Connector File** and save it to your machine.
### 7. Web Connector Setup (*one time only*)
**Note:**
Full Admin permissions in QuickBooks Desktop are required to complete the following setup.
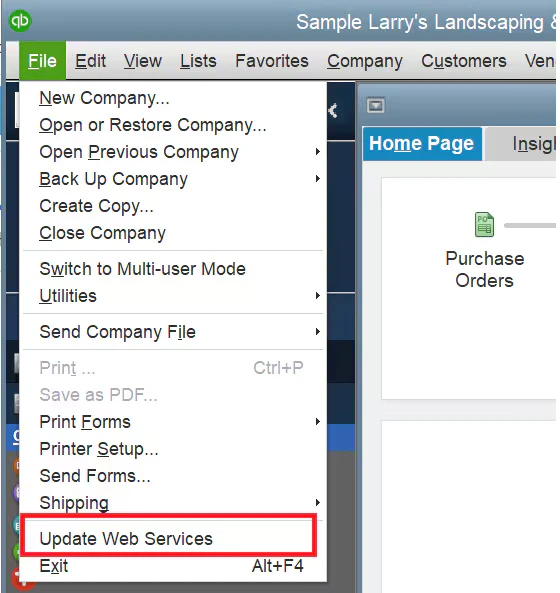
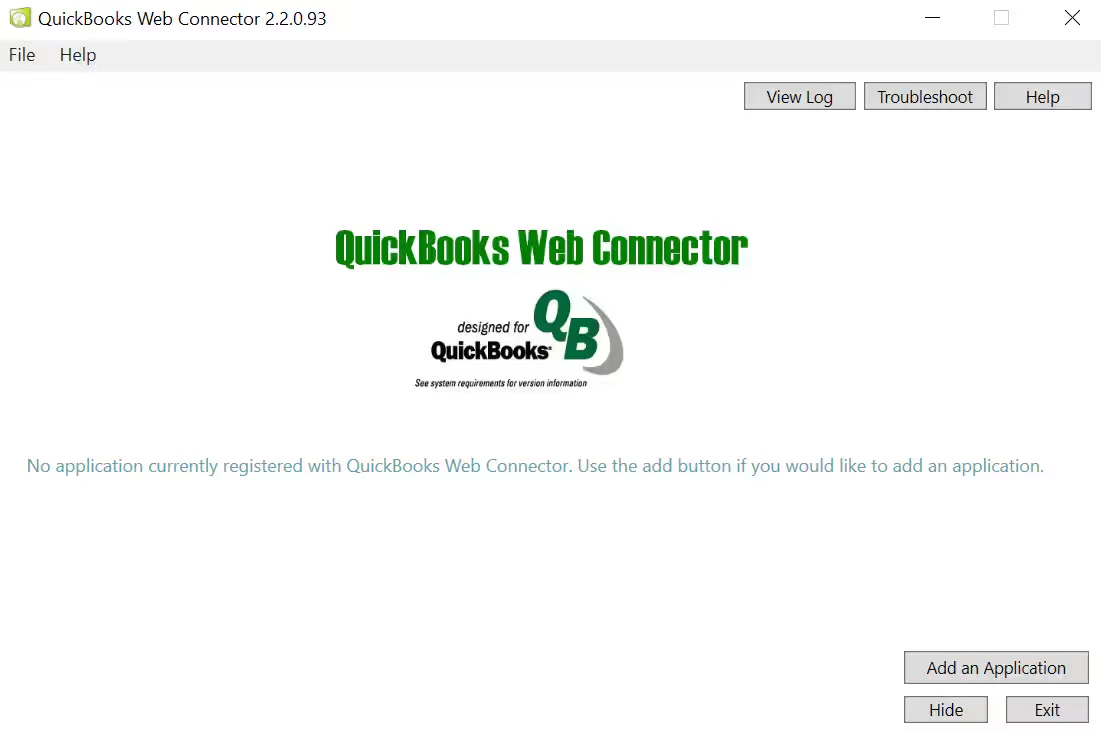
Open **QuickBooks Web Connector** (or via QuickBooks → File → Update Web Services).
Click **Add an application** and select the downloaded `.qwc` file.
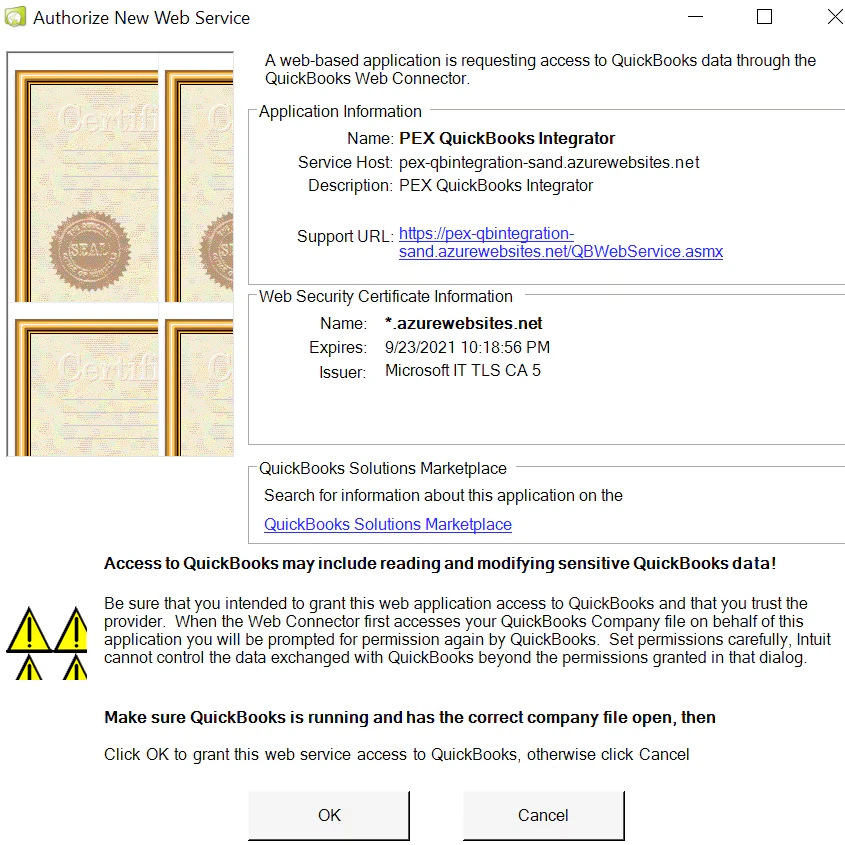
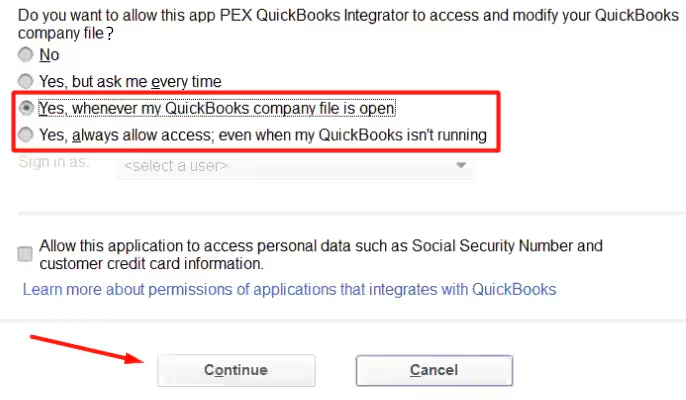
Authorize the application.
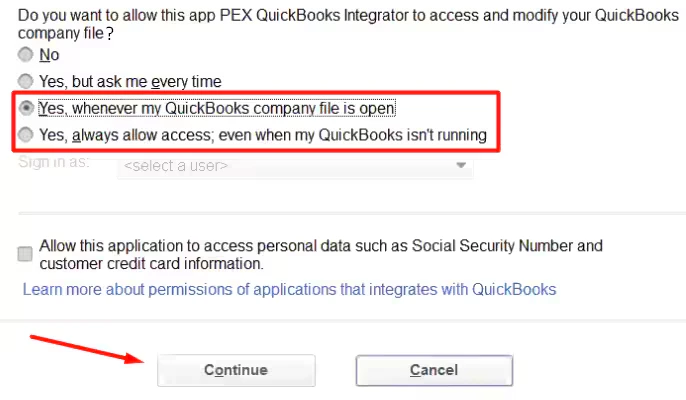
Select your preferred access level.
Enter your PEX Admin password in the Password field.
## How to Sync Transactions
**Manual Sync**
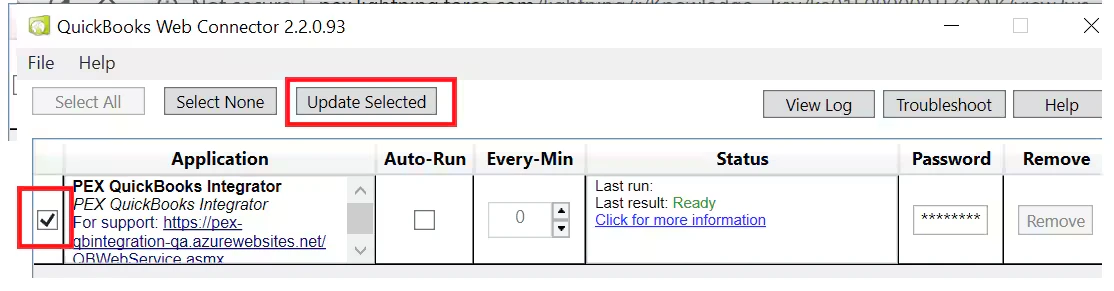
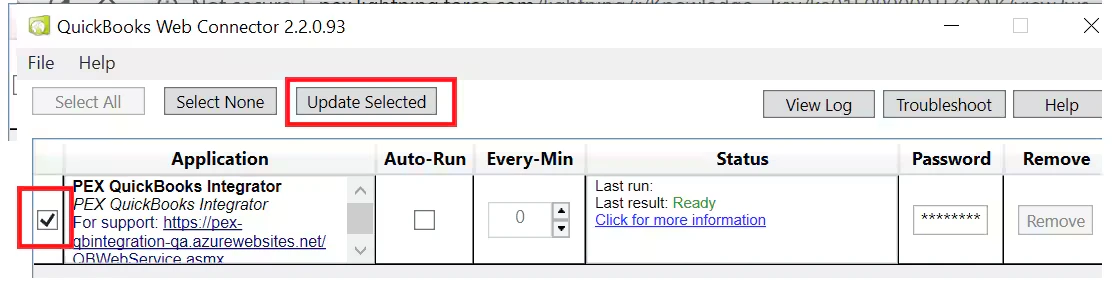
To manually sync, place a check in the box on the left and click **Update Selected** at the top of the Web Connector.
***
**Auto Sync**
To auto-sync, check **Auto-Run** and set an interval in minutes. Note that auto-sync will only run if the **machine is turned on** and the **Web Connector window is open**.
## How Transactions Are Recorded in QuickBooks
When syncing to QuickBooks, each transaction is recorded as either an Item or an Expense. If an **Item** value is set — either via a tag or a default — it will **always win over the Expense Account**.
Since fees and transfers cannot be tagged in PEX, they rely entirely on your default settings. Make sure at least one default (Item or Expense Account) is configured to prevent sync failures.
**Purchases**
| Tagged with Item? | Default Item configured? | Tagged with Expense Account? | Default Expense Account configured? | Recorded as |
| :---------------- | :----------------------- | :--------------------------- | :---------------------------------- | :------------ |
| Yes | No | Yes | No | Item |
| Yes | No | No | Yes | Item |
| Yes | No | No | No | Item |
| No | Yes | Yes | No | Item |
| No | Yes | No | Yes | Item |
| No | Yes | No | No | Item |
| No | No | Yes | No | Expense |
| No | No | No | Yes | Expense |
| No | No | No | No | ⚠️ Sync fails |
**Transfers, Cardholder Fees, Business Fees** *(never tagged in PEX — same logic for all three)*
| Default Item configured? | Default Expense Account configured? | Recorded as |
| :----------------------- | :---------------------------------- | :------------ |
| Yes | Yes/No | Item |
| No | Yes | Expense |
| No | No | ⚠️ Sync fails |
## Tips & Limitations
* QuickBooks Desktop Sync does not use the QuickBooks Bank Feed — transactions post directly to your company file. To review transactions prior to posting, use the PEX transaction review process.
* For the first sync, always use a date range to ensure transactions appear as you expect.
* Once started, sync cannot be stopped or cancelled.
* Syncs the following transaction types: card transactions, fees (e.g., monthly account maintenance fee, shipping fees, ISA fees), bill payments, and merchant credits.
* Transaction notes are synced to QuickBooks.
* Receipt images are not synced.
* If you prefer not to manually tag each transaction, [PEX Auto Tagger](/administrator-guide/pex-auto-tagger) allows you to create dynamic rules that tag transactions automatically.
## FAQ
No.
Yes — use [PEX Auto Tagger](/administrator-guide/pex-auto-tagger) to create rules that tag transactions automatically.
Purchases, bill payments, cardholder fees, business fees.
No — only settled transactions sync.
Transaction settlement date is used for syncing.
No — changes apply automatically.
* Verify account names match exactly between PEX and QuickBooks (Lists → Chart of Accounts).
* Make sure the password entered in the Password field matches your PEX Admin Account password.
* Make sure the machine is turned on and the Web Connector window is open.
* If you're getting a 504 Gateway Timeout, reduce your date range and run a manual sync.
* If using VPN, download the connector file within your VPN instance.
See [How to Export Transactions via a File Download to QuickBooks Desktop or QuickBooks Online](/administrator-guide/how-to-export-transactions-via-a-file-download-to-quickbooks-desktop-or-quickbooks-online).
See our [Accounting Software Connector Troubleshooting](/administrator-guide/accounting-software-connector-troubleshooting) article.
We recommend using only one active Web Connector setup per organization. While you can physically install it on different machines, they must all connect to the *same* shared QuickBooks company file. Do not run the sync on multiple computers simultaneously, as this will lead to duplicate transaction entries.
For any questions related to your connector, please email [appsupport+quickbooksdesktop@pexcard.com](mailto:appsupport+quickbooksdesktop@pexcard.com)
 ### 3. Configure QuickBooks Accounts
Enter the credit card account to track PEX card spending that you created in the [Prerequisites section](#prerequisites).
* Purchases in PEX will be charged to this account.
* Fees in PEX will be charged to this account.
* Bill payments to PEX will reduce the amount owed on this account.
Enter the credit card account name exactly as it appears in your QuickBooks company file. For sub-accounts, use the full hierarchy separated by colons (e.g., `PEX Main:PEX Credit Card Account`).
Then enter the bank account used to pay down your PEX balance. The name entered must match exactly the bank account name in your QuickBooks company file.
### 3. Configure QuickBooks Accounts
Enter the credit card account to track PEX card spending that you created in the [Prerequisites section](#prerequisites).
* Purchases in PEX will be charged to this account.
* Fees in PEX will be charged to this account.
* Bill payments to PEX will reduce the amount owed on this account.
Enter the credit card account name exactly as it appears in your QuickBooks company file. For sub-accounts, use the full hierarchy separated by colons (e.g., `PEX Main:PEX Credit Card Account`).
Then enter the bank account used to pay down your PEX balance. The name entered must match exactly the bank account name in your QuickBooks company file.
 ### 4. Map PEX tags
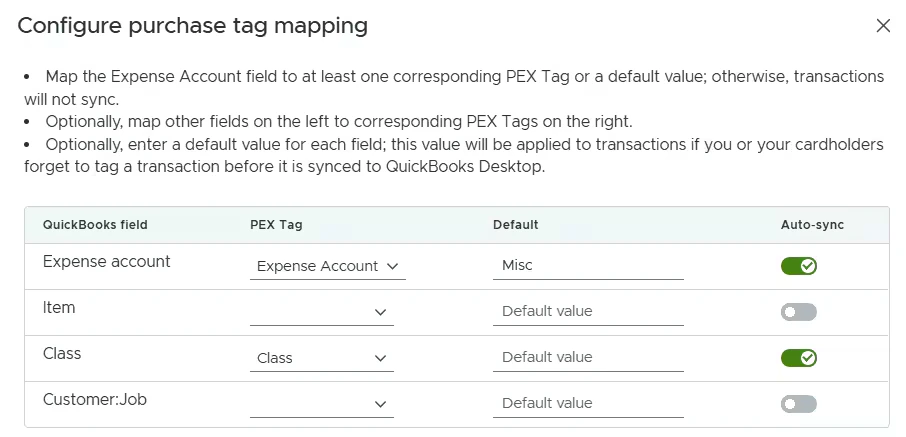
Map up to four QuickBooks fields to PEX tags. Tags must be created beforehand — see [Create tags for QuickBooks Desktop](/administrator-guide/create-pex-tags-for-quickbooks-desktop).
* **Expense Account**
* **Item**
* **Class**
* **Customer:Job**
For each field, you can set a **default value** (used when a transaction isn't tagged) and enable **auto-sync**. Make sure to turn auto-sync on — it pulls field options directly from QuickBooks into PEX as tag values, so you never need to add them manually. New options added in QuickBooks are synced to PEX automatically.
At minimum, set a default for either **Expense Account** (to sync as expenses) or **Item** (to sync as items) — or both. Without at least one default, untagged transactions will fail to sync.
### 4. Map PEX tags
Map up to four QuickBooks fields to PEX tags. Tags must be created beforehand — see [Create tags for QuickBooks Desktop](/administrator-guide/create-pex-tags-for-quickbooks-desktop).
* **Expense Account**
* **Item**
* **Class**
* **Customer:Job**
For each field, you can set a **default value** (used when a transaction isn't tagged) and enable **auto-sync**. Make sure to turn auto-sync on — it pulls field options directly from QuickBooks into PEX as tag values, so you never need to add them manually. New options added in QuickBooks are synced to PEX automatically.
At minimum, set a default for either **Expense Account** (to sync as expenses) or **Item** (to sync as items) — or both. Without at least one default, untagged transactions will fail to sync.
 ### 5. Configure Purchase Options
Optionally configure how purchase notes are mapped in QuickBooks:
* **Copy notes to expense** — copies the PEX transaction note to the expense memo in QuickBooks.
* **Copy notes to expense lines** — copies the PEX transaction note to individual expense lines in QuickBooks.
### 6. Download Web Connector File
Click **Download Connector File** and save it to your machine.
### 5. Configure Purchase Options
Optionally configure how purchase notes are mapped in QuickBooks:
* **Copy notes to expense** — copies the PEX transaction note to the expense memo in QuickBooks.
* **Copy notes to expense lines** — copies the PEX transaction note to individual expense lines in QuickBooks.
### 6. Download Web Connector File
Click **Download Connector File** and save it to your machine.
 ### 7. Web Connector Setup (*one time only*)
 ***
**Auto Sync**
To auto-sync, check **Auto-Run** and set an interval in minutes. Note that auto-sync will only run if the **machine is turned on** and the **Web Connector window is open**.
***
**Auto Sync**
To auto-sync, check **Auto-Run** and set an interval in minutes. Note that auto-sync will only run if the **machine is turned on** and the **Web Connector window is open**.
 ## How Transactions Are Recorded in QuickBooks
When syncing to QuickBooks, each transaction is recorded as either an Item or an Expense. If an **Item** value is set — either via a tag or a default — it will **always win over the Expense Account**.
Since fees and transfers cannot be tagged in PEX, they rely entirely on your default settings. Make sure at least one default (Item or Expense Account) is configured to prevent sync failures.
**Purchases**
| Tagged with Item? | Default Item configured? | Tagged with Expense Account? | Default Expense Account configured? | Recorded as |
| :---------------- | :----------------------- | :--------------------------- | :---------------------------------- | :------------ |
| Yes | No | Yes | No | Item |
| Yes | No | No | Yes | Item |
| Yes | No | No | No | Item |
| No | Yes | Yes | No | Item |
| No | Yes | No | Yes | Item |
| No | Yes | No | No | Item |
| No | No | Yes | No | Expense |
| No | No | No | Yes | Expense |
| No | No | No | No | ⚠️ Sync fails |
**Transfers, Cardholder Fees, Business Fees** *(never tagged in PEX — same logic for all three)*
| Default Item configured? | Default Expense Account configured? | Recorded as |
| :----------------------- | :---------------------------------- | :------------ |
| Yes | Yes/No | Item |
| No | Yes | Expense |
| No | No | ⚠️ Sync fails |
## Tips & Limitations
* QuickBooks Desktop Sync does not use the QuickBooks Bank Feed — transactions post directly to your company file. To review transactions prior to posting, use the PEX transaction review process.
* For the first sync, always use a date range to ensure transactions appear as you expect.
* Once started, sync cannot be stopped or cancelled.
* Syncs the following transaction types: card transactions, fees (e.g., monthly account maintenance fee, shipping fees, ISA fees), bill payments, and merchant credits.
* Transaction notes are synced to QuickBooks.
* Receipt images are not synced.
* If you prefer not to manually tag each transaction, [PEX Auto Tagger](/administrator-guide/pex-auto-tagger) allows you to create dynamic rules that tag transactions automatically.
## FAQ
## How Transactions Are Recorded in QuickBooks
When syncing to QuickBooks, each transaction is recorded as either an Item or an Expense. If an **Item** value is set — either via a tag or a default — it will **always win over the Expense Account**.
Since fees and transfers cannot be tagged in PEX, they rely entirely on your default settings. Make sure at least one default (Item or Expense Account) is configured to prevent sync failures.
**Purchases**
| Tagged with Item? | Default Item configured? | Tagged with Expense Account? | Default Expense Account configured? | Recorded as |
| :---------------- | :----------------------- | :--------------------------- | :---------------------------------- | :------------ |
| Yes | No | Yes | No | Item |
| Yes | No | No | Yes | Item |
| Yes | No | No | No | Item |
| No | Yes | Yes | No | Item |
| No | Yes | No | Yes | Item |
| No | Yes | No | No | Item |
| No | No | Yes | No | Expense |
| No | No | No | Yes | Expense |
| No | No | No | No | ⚠️ Sync fails |
**Transfers, Cardholder Fees, Business Fees** *(never tagged in PEX — same logic for all three)*
| Default Item configured? | Default Expense Account configured? | Recorded as |
| :----------------------- | :---------------------------------- | :------------ |
| Yes | Yes/No | Item |
| No | Yes | Expense |
| No | No | ⚠️ Sync fails |
## Tips & Limitations
* QuickBooks Desktop Sync does not use the QuickBooks Bank Feed — transactions post directly to your company file. To review transactions prior to posting, use the PEX transaction review process.
* For the first sync, always use a date range to ensure transactions appear as you expect.
* Once started, sync cannot be stopped or cancelled.
* Syncs the following transaction types: card transactions, fees (e.g., monthly account maintenance fee, shipping fees, ISA fees), bill payments, and merchant credits.
* Transaction notes are synced to QuickBooks.
* Receipt images are not synced.
* If you prefer not to manually tag each transaction, [PEX Auto Tagger](/administrator-guide/pex-auto-tagger) allows you to create dynamic rules that tag transactions automatically.
## FAQ

 * If using VPN, download the connector file within your VPN instance.