> ## Documentation Index
> Fetch the complete documentation index at: https://support.pexcard.com/llms.txt
> Use this file to discover all available pages before exploring further.
# PEX Connector for Sage Intacct (Charge)
> Connect PEX to Sage Intacct (Charge): sync purchases, bill payments, fees, rebates, and receipts as GL journal entries or credit card transactions. Map Intacct fields to PEX tags and optionally auto-create vendor cards.
Don't have a PEX account yet? [Sign up](https://apply.pexcard.com/personal-info).
Auto-sync purchases, bill payments, fees, rebates, and receipt images from PEX into Sage Intacct, keeping your data accurate, organized, and up-to-date. Map Sage Intacct fields such as Expense Account, Class, Customer, Project, and more to PEX tags.
You can also pull your existing vendor list from Sage Intacct into PEX to auto-create vendor cards. See the [Sage Intacct vendor card creation](/administrator-guide/sage-intacct-vendor-card-creation) article for details.
To configure this integration, you don't need to wait for your account manager. You can get started with your Sage Intacct and PEX credentials.
**Note:**
Sage Intacct must be accessed through the production environment. To obtain production access, contact Sage Intacct.
## Pre-configuration
Prior to using this guide, please ensure you have completed all set-up components:
1. [Enable Sage Intacct settings for PEX sync: document numbering, sender ID, web services user, and general ledger](/administrator-guide/enable-sage-intacct-settings-for-pex-sync)
2. [Create PEX tags](/administrator-guide/create-pex-tags-for-sage-intacct)
## Link PEX and Sage Intacct
Log in to your PEX account to finalize the setup.
Log in to [http://dashboard.pexcard.com/](http://dashboard.pexcard.com/?utm_source=support)
Navigate to [Apps > Available](https://dashboard.pexcard.com/apps/available?utm_source=support)
Scroll to locate **PEX Connector for Sage Intacct**.
Click **More info** > **Install** > **Launch**.
**Note:**
To install the connector, you need to enable the following permissions: *Edit business settings & apps*, *Manage cardholder*, *View card transactions*. You can enable them in [My Profile → Permissions](https://dashboard.pexcard.com/account/permissions?utm_source=support).
Enter your Company ID, Web Services User ID, and Web Services User Password.
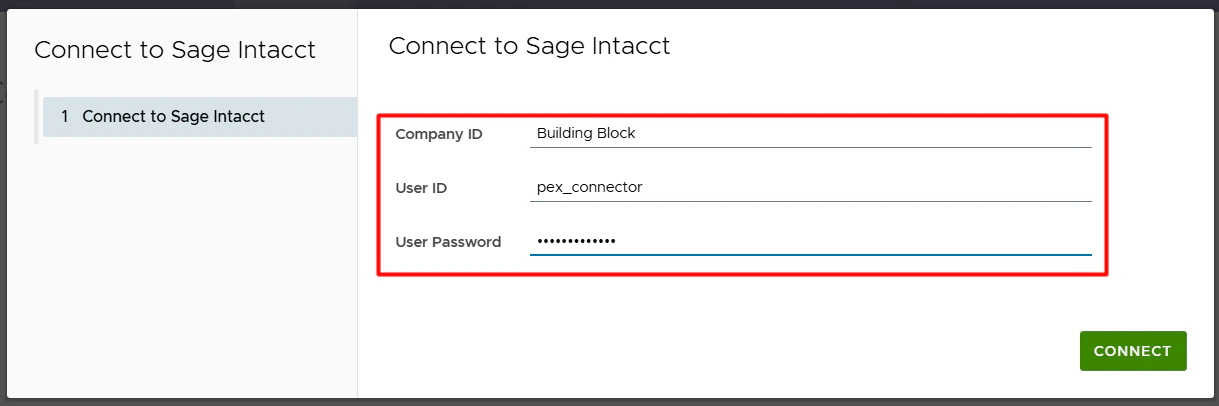
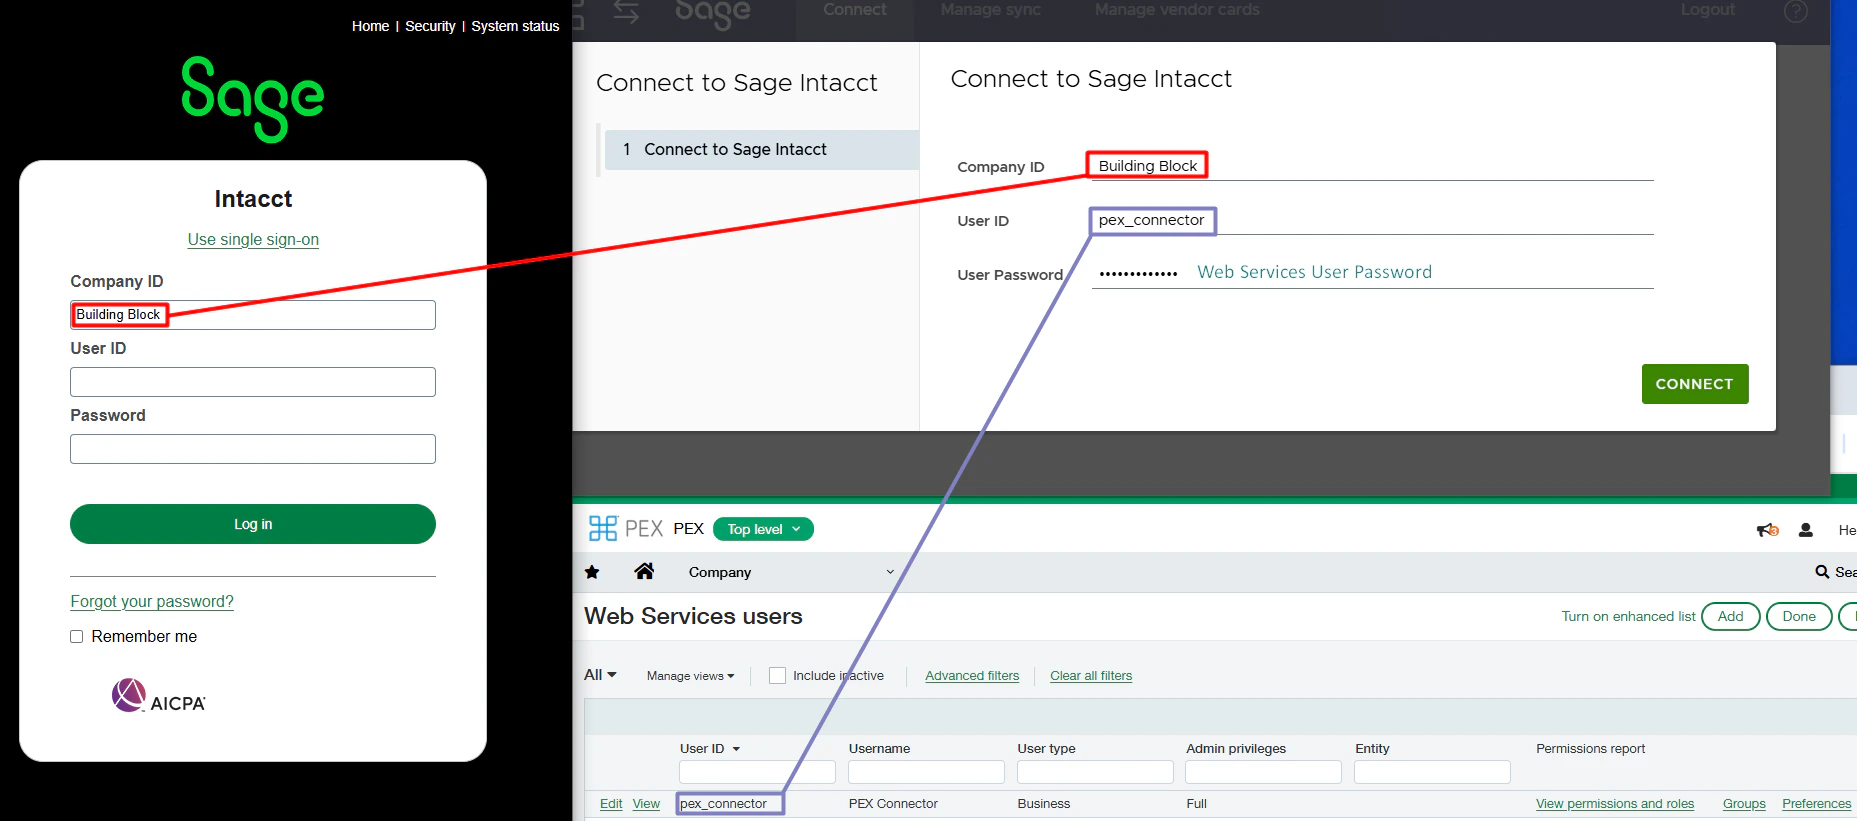 Click **Connect**.
You are redirected to the connector screen. You are now connected to Sage Intacct. Please wait while the configuration wizard finishes your setup.
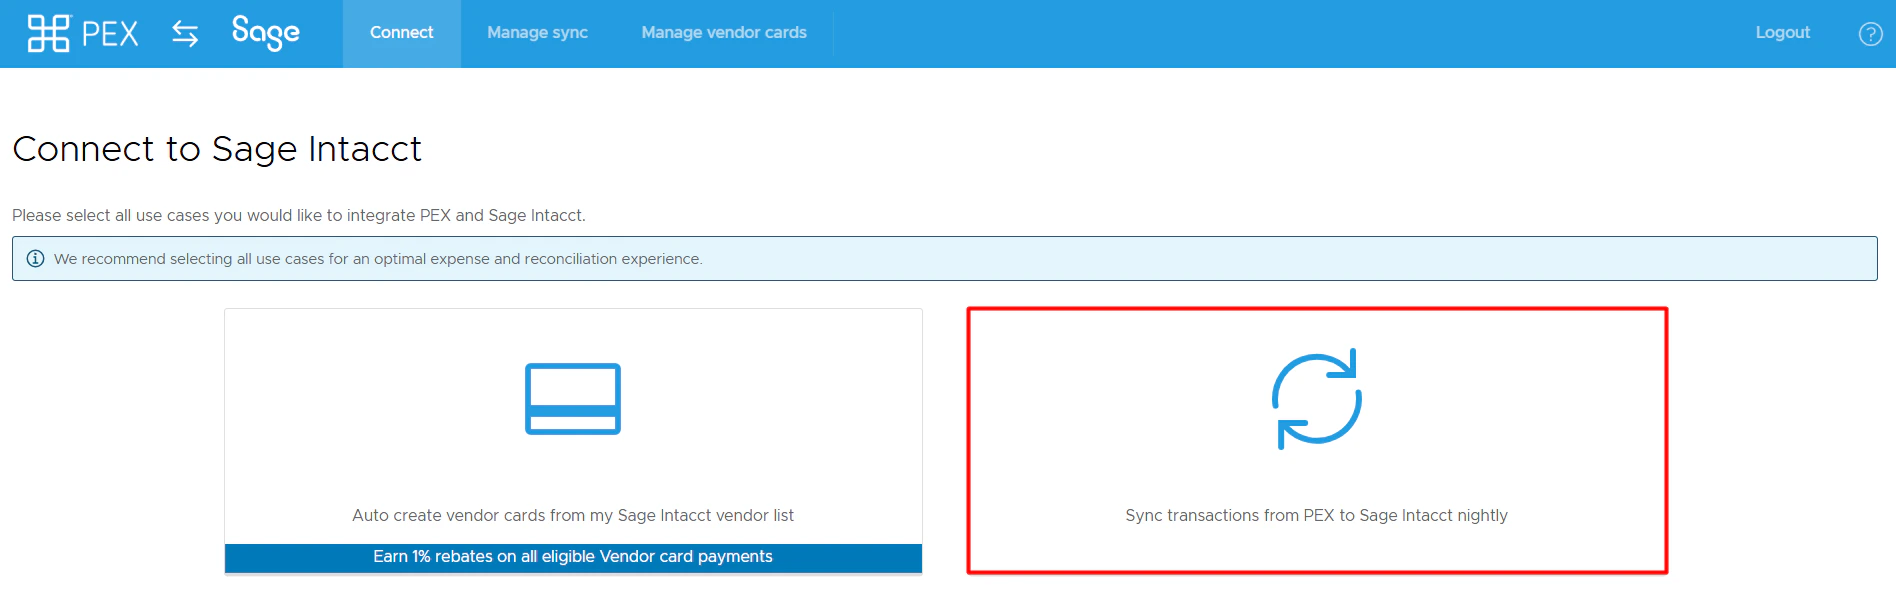
Select your use case(s).
There are two ways you can connect PEX with Sage Intacct. Choose as many as you need to make your reconciliation experience seamless.
1. [Auto create vendor cards from my Sage Intacct vendor list](/administrator-guide/sage-intacct-vendor-card-creation).
2. Sync transactions from PEX to Sage Intacct nightly.
Click **Sync transactions from PEX to Sage Intacct nightly** to configure transaction sync.
Click **Connect**.
You are redirected to the connector screen. You are now connected to Sage Intacct. Please wait while the configuration wizard finishes your setup.
Select your use case(s).
There are two ways you can connect PEX with Sage Intacct. Choose as many as you need to make your reconciliation experience seamless.
1. [Auto create vendor cards from my Sage Intacct vendor list](/administrator-guide/sage-intacct-vendor-card-creation).
2. Sync transactions from PEX to Sage Intacct nightly.
Click **Sync transactions from PEX to Sage Intacct nightly** to configure transaction sync.
 ## Choose what to sync
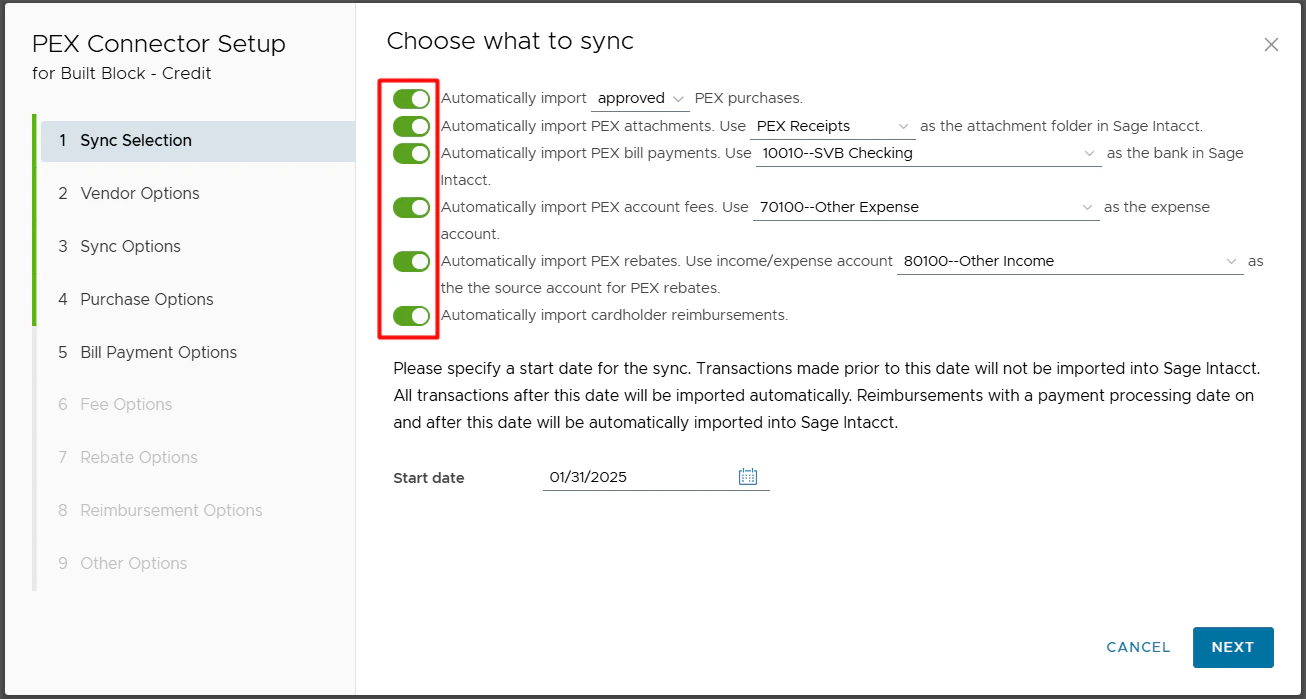 You can:
* **Automatically import PEX purchases**
* Enable this option to import PEX purchases as expenses in Intacct.
* You can choose to sync all PEX transactions (regardless of approval status) or just approved (recommended).
* PEX purchases must have an Expense Account tag in order to sync. For details on transaction review, please see our article [How to Review Transactions](/administrator-guide/how-to-review-transactions-with-receipts-tags-and-user-notes).
* **Automatically import PEX attachments**
* Enable this option to import PEX receipts as expense attachments in Intacct.
* This option is available only if the "Automatically import PEX purchases" toggle is **enabled**.
* **Automatically import PEX bill payments**
* Enable this option to import PEX bill payments.
* An example of a bill payment would be an ACH transfer from your business checking account to your PEX business account.
* From the drop down list, please select the bank account in Intacct corresponding to your business checking account.
* This account will be credited when syncing bill payments to Intacct.
* **Automatically import PEX account fees**
* Enable this option to import PEX account fees.
* Examples of a PEX Fee include an ISA fee for international use or priority shipping fees.
* From the drop down list, please select the expense account to debit when syncing fees to Intacct.
* **Automatically import PEX rebates**
* Enable this option to import PEX account rebates.
* From the drop down list, please select the income or expense account to credit when syncing rebates to Intacct.
* This option is available only if the "Automatically import PEX purchases" toggle is **enabled**.
* **Automatically import cardholder reimbursements**
* Enable this option to import PEX cardholder reimbursements.
* **Specify a start date for the sync**
* Transactions on and after this date will sync.
* Reimbursements with a payment processing date on and after this date will sync.
* The start date must be less than 1 year in the past.
Click **Next**.
## Configure vendor sync options
Select one of the following:
* **Choose a vendor for your purchases**.
* With this option, all PEX purchases will be booked against a single vendor selected from the drop down list.
* Tip: Consider creating a new vendor in Intacct called "PEX" if you would like to book all of your PEX purchases against a single vendor.
You can:
* **Automatically import PEX purchases**
* Enable this option to import PEX purchases as expenses in Intacct.
* You can choose to sync all PEX transactions (regardless of approval status) or just approved (recommended).
* PEX purchases must have an Expense Account tag in order to sync. For details on transaction review, please see our article [How to Review Transactions](/administrator-guide/how-to-review-transactions-with-receipts-tags-and-user-notes).
* **Automatically import PEX attachments**
* Enable this option to import PEX receipts as expense attachments in Intacct.
* This option is available only if the "Automatically import PEX purchases" toggle is **enabled**.
* **Automatically import PEX bill payments**
* Enable this option to import PEX bill payments.
* An example of a bill payment would be an ACH transfer from your business checking account to your PEX business account.
* From the drop down list, please select the bank account in Intacct corresponding to your business checking account.
* This account will be credited when syncing bill payments to Intacct.
* **Automatically import PEX account fees**
* Enable this option to import PEX account fees.
* Examples of a PEX Fee include an ISA fee for international use or priority shipping fees.
* From the drop down list, please select the expense account to debit when syncing fees to Intacct.
* **Automatically import PEX rebates**
* Enable this option to import PEX account rebates.
* From the drop down list, please select the income or expense account to credit when syncing rebates to Intacct.
* This option is available only if the "Automatically import PEX purchases" toggle is **enabled**.
* **Automatically import cardholder reimbursements**
* Enable this option to import PEX cardholder reimbursements.
* **Specify a start date for the sync**
* Transactions on and after this date will sync.
* Reimbursements with a payment processing date on and after this date will sync.
* The start date must be less than 1 year in the past.
Click **Next**.
## Configure vendor sync options
Select one of the following:
* **Choose a vendor for your purchases**.
* With this option, all PEX purchases will be booked against a single vendor selected from the drop down list.
* Tip: Consider creating a new vendor in Intacct called "PEX" if you would like to book all of your PEX purchases against a single vendor.
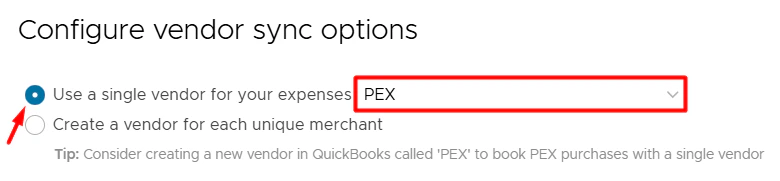 * **Create a vendor for each unique merchant**.
* With this option, PEX will book purchases against corresponding vendors that already exist in your Intacct account. If there is no corresponding vendor then PEX will auto create a new vendor in Intacct.
* Note that the connector will not create duplicate vendors, but "Walmart23455", "Walmart-brooklyn223" are two unique vendors from the connector's point of view. If you don't want to have "Walmart23455" and "Walmart-brooklyn223" then read below.
* **Create a vendor for each unique merchant**.
* With this option, PEX will book purchases against corresponding vendors that already exist in your Intacct account. If there is no corresponding vendor then PEX will auto create a new vendor in Intacct.
* Note that the connector will not create duplicate vendors, but "Walmart23455", "Walmart-brooklyn223" are two unique vendors from the connector's point of view. If you don't want to have "Walmart23455" and "Walmart-brooklyn223" then read below.
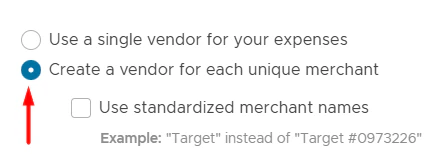 ## Standardized merchant names
With the "**Create a vendor for each unique merchant**" option, you can also sync your purchases with standardized merchant names if you check "Use standardized merchant names" checkbox.
## Standardized merchant names
With the "**Create a vendor for each unique merchant**" option, you can also sync your purchases with standardized merchant names if you check "Use standardized merchant names" checkbox.
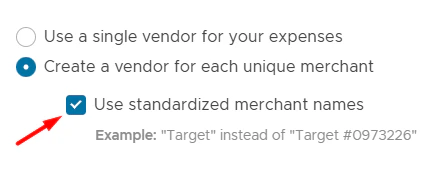 This means that a purchase "Walmart23455" and a purchase "Walmart-brooklyn223" will be recorded in Intacct with "Walmart" as a vendor instead of "Walmart23455" or "Walmart-brooklyn223".
Click **Next**.
## Configure sync options
PEX can sync purchases and fees (cardholder and business fees) to Intacct as **GL journal entries** or as **credit card transactions**.
This means that a purchase "Walmart23455" and a purchase "Walmart-brooklyn223" will be recorded in Intacct with "Walmart" as a vendor instead of "Walmart23455" or "Walmart-brooklyn223".
Click **Next**.
## Configure sync options
PEX can sync purchases and fees (cardholder and business fees) to Intacct as **GL journal entries** or as **credit card transactions**.
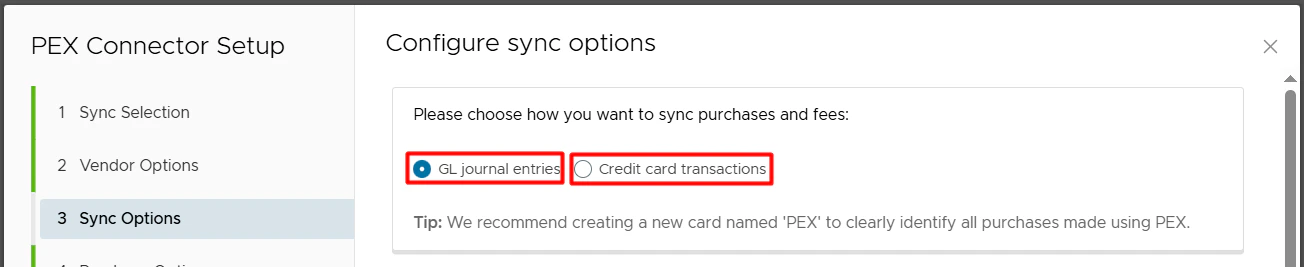 GL journal entries in Intacct:
 Credit card transactions in Intacct:
 ## GL journal entries
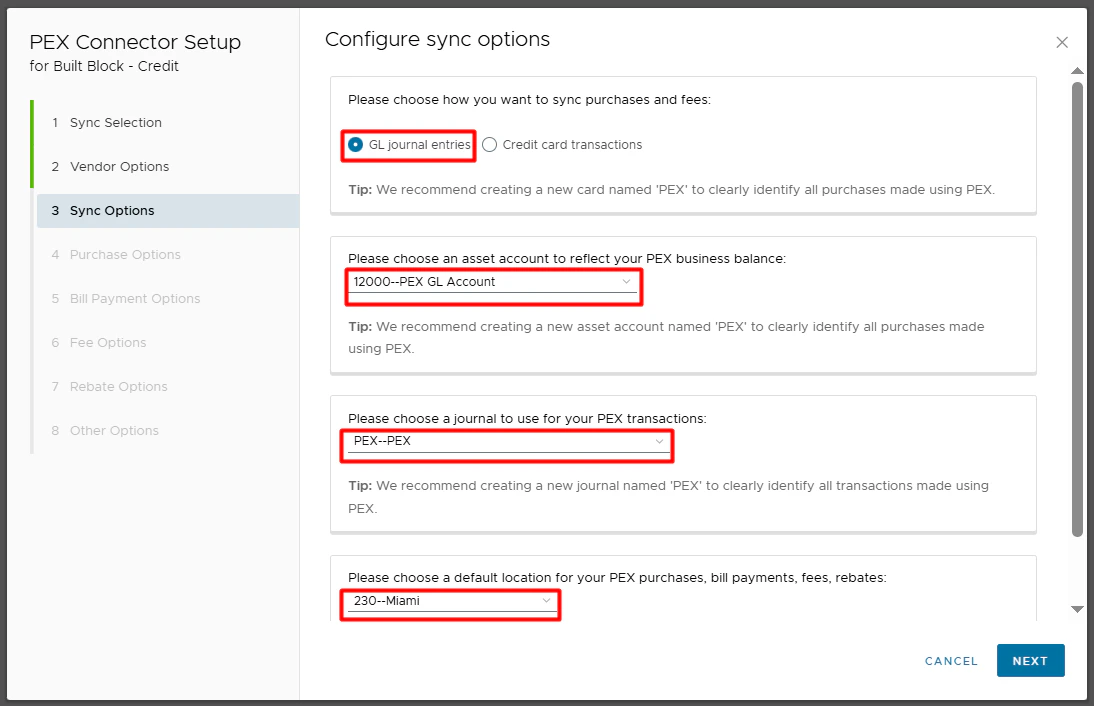 If you choose to sync purchases and fees (cardholder and business fees) to Intacct as GL journal entries, you need to configure your asset account, journal, and a default location.
* **Please choose an asset account to reflect your PEX business balance**.
* The account you select will represent your PEX balance.
* We recommend creating a new asset account named "PEX" to clearly identify all purchases made using PEX. To do this, go to **General Ledger** > **General Ledger accounts** (under the **All** tab) > **Add**.
If you choose to sync purchases and fees (cardholder and business fees) to Intacct as GL journal entries, you need to configure your asset account, journal, and a default location.
* **Please choose an asset account to reflect your PEX business balance**.
* The account you select will represent your PEX balance.
* We recommend creating a new asset account named "PEX" to clearly identify all purchases made using PEX. To do this, go to **General Ledger** > **General Ledger accounts** (under the **All** tab) > **Add**.
 * Purchases will credit this account.
* Bill payments will debit this account.
* Fees in PEX will credit this account.
* Rebates in PEX will debit this account.
* **Please choose a journal to use for your PEX transactions**.
* We recommend creating a new journal named "PEX" to clearly identify all transactions made using PEX. To do this, go to **General Ledger** > **Journals** (under the **Setup** tab) > **Add**.
* Purchases will credit this account.
* Bill payments will debit this account.
* Fees in PEX will credit this account.
* Rebates in PEX will debit this account.
* **Please choose a journal to use for your PEX transactions**.
* We recommend creating a new journal named "PEX" to clearly identify all transactions made using PEX. To do this, go to **General Ledger** > **Journals** (under the **Setup** tab) > **Add**.
 * **Please choose a default location for your PEX purchases, bill payments, fees, rebates**.
Click **Next**.
## Credit card transactions
* **Please choose a default location for your PEX purchases, bill payments, fees, rebates**.
Click **Next**.
## Credit card transactions
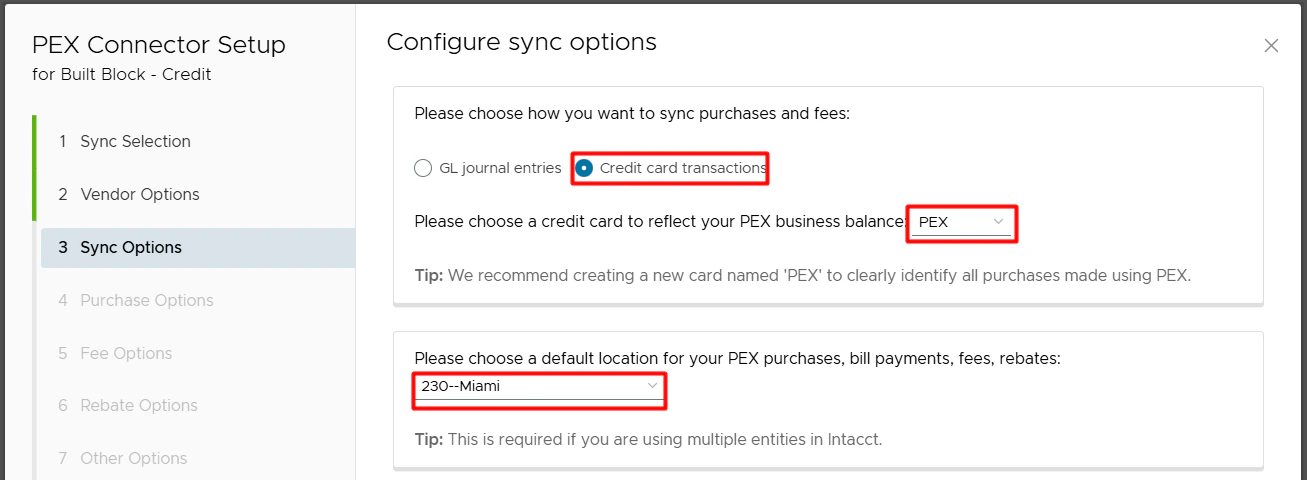 If you choose to sync purchases and fees (cardholder and business fees) to Intacct as credit card transactions, you need to configure your credit card and a default location.
* **Please choose a credit card to reflect your PEX business balance**.
* The credit card you select will represent your PEX balance.
* We recommend creating a new credit card named "PEX" to clearly identify all purchases made using PEX. To do this, go to **Cash Management** > **Credit Card** (under the **All** tab) > **Add**.
If you choose to sync purchases and fees (cardholder and business fees) to Intacct as credit card transactions, you need to configure your credit card and a default location.
* **Please choose a credit card to reflect your PEX business balance**.
* The credit card you select will represent your PEX balance.
* We recommend creating a new credit card named "PEX" to clearly identify all purchases made using PEX. To do this, go to **Cash Management** > **Credit Card** (under the **All** tab) > **Add**.
 * Purchases will credit this card.
* Fees in PEX will credit this card.
* Rebates in PEX will debit this card.
* Rebates will sync as journal entries (not as credit card transactions).
* Rebates will sync to the journal associated with the liability account that the selected credit card is linked to in Intacct.
* **Please choose a default location for your PEX purchases, fees, rebates**.
**Note:**
* Bill payments will not sync to Intacct if you sync transactions as credit card transactions. An example of a bill payment would be an ACH transfer from your business checking account to your PEX business account.
* The journal that PEX syncs transactions to will be the one associated with the liability account that the selected credit card is linked to in Intacct.
Click **Next**.
## Purchase field mappings
*Transaction tags are available with* [*selected plans*](https://www.pexcard.com/pricing?utm_source=support)*.*
* You can map an Intacct field "Expense Account" to a PEX tag. That tag must be created beforehand, following the logic described in the [Create PEX tags for Sage Intacct](/administrator-guide/create-pex-tags-for-sage-intacct) article.
* Purchases will credit this card.
* Fees in PEX will credit this card.
* Rebates in PEX will debit this card.
* Rebates will sync as journal entries (not as credit card transactions).
* Rebates will sync to the journal associated with the liability account that the selected credit card is linked to in Intacct.
* **Please choose a default location for your PEX purchases, fees, rebates**.
**Note:**
* Bill payments will not sync to Intacct if you sync transactions as credit card transactions. An example of a bill payment would be an ACH transfer from your business checking account to your PEX business account.
* The journal that PEX syncs transactions to will be the one associated with the liability account that the selected credit card is linked to in Intacct.
Click **Next**.
## Purchase field mappings
*Transaction tags are available with* [*selected plans*](https://www.pexcard.com/pricing?utm_source=support)*.*
* You can map an Intacct field "Expense Account" to a PEX tag. That tag must be created beforehand, following the logic described in the [Create PEX tags for Sage Intacct](/administrator-guide/create-pex-tags-for-sage-intacct) article.
 * Make sure to enable the **Sync** toggle. This will pull your expense accounts from Intacct into PEX as tag option values.
 The mapping and auto sync allows you and your cardholders to select a tag value for each purchase and reimbursement.
For that go to the "Transactions" menu -> locate a transaction -> click on it -> select a tag value ("Advertising" in our example below) of the "Expense Account" tag -> click "Save & Submit". Note that you and your cardholders can select one of the tag values for each purchase once you finish the Intacct connector setup and sync tag options from Intacct to PEX.
The mapping and auto sync allows you and your cardholders to select a tag value for each purchase and reimbursement.
For that go to the "Transactions" menu -> locate a transaction -> click on it -> select a tag value ("Advertising" in our example below) of the "Expense Account" tag -> click "Save & Submit". Note that you and your cardholders can select one of the tag values for each purchase once you finish the Intacct connector setup and sync tag options from Intacct to PEX.
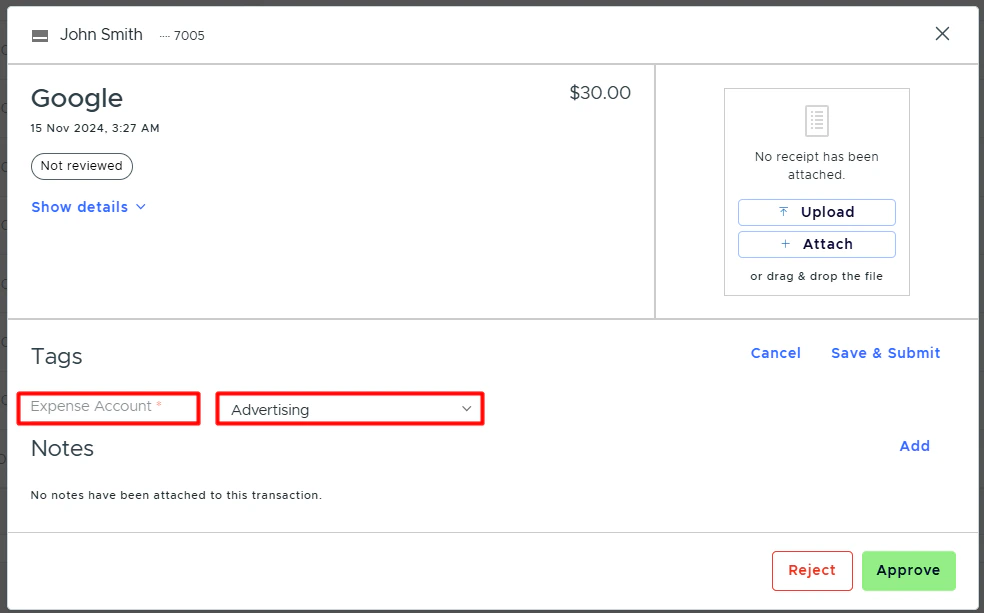 The purchase will debit the expense account that it is tagged with ("Advertising" in our example above).
If you are using split tag functionality on the PEX platform, the connector will support that while exporting the purchases and create the same split structure for purchases in Intacct.
* When mapping to a tag, you can also specify a default "Expense Account" value: for example, Uncategorized, as highlighted below.
The purchase will debit the expense account that it is tagged with ("Advertising" in our example above).
If you are using split tag functionality on the PEX platform, the connector will support that while exporting the purchases and create the same split structure for purchases in Intacct.
* When mapping to a tag, you can also specify a default "Expense Account" value: for example, Uncategorized, as highlighted below.
 Note that a purchase will not be tagged with this default value ("Uncategorized" in our example) on the purchase details. It means that if you or your cardholders forget to tag a purchase before it is synced to Intacct, the default value ("Uncategorized" in our example) will be applied to this purchase during the sync.
If you or your cardholders do tag a purchase with the tag option from the tag chosen in the highlighted field below,
Note that a purchase will not be tagged with this default value ("Uncategorized" in our example) on the purchase details. It means that if you or your cardholders forget to tag a purchase before it is synced to Intacct, the default value ("Uncategorized" in our example) will be applied to this purchase during the sync.
If you or your cardholders do tag a purchase with the tag option from the tag chosen in the highlighted field below,
 that specific purchase will be recorded against the expense account ("Accounting" in our example below) you tagged the purchase with. Tags take precedence over default values.
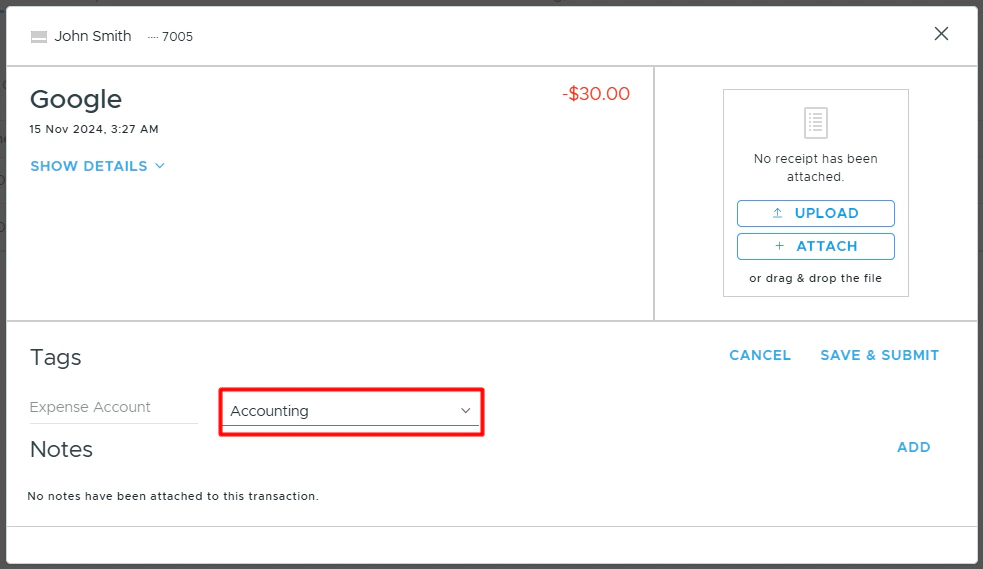 PEX tags can also be mapped to other Intacct fields for coding of purchases and reimbursements.
* If you use Class, Customer, Project, Location, Department, Employee, Item, Warehouse, Billable fields or User Defined Dimensions in Intacct, map them to PEX tags. Those PEX tags must be created beforehand, following the logic described in the [Create PEX tags for Sage Intacct](/administrator-guide/create-pex-tags-for-sage-intacct) article. Note:
* All of the above fields should be mapped to PEX tags with the type set to "Dropdown".
* Only **Billable** should be mapped to a PEX tag with the type set to "Yes / No".
PEX tags can also be mapped to other Intacct fields for coding of purchases and reimbursements.
* If you use Class, Customer, Project, Location, Department, Employee, Item, Warehouse, Billable fields or User Defined Dimensions in Intacct, map them to PEX tags. Those PEX tags must be created beforehand, following the logic described in the [Create PEX tags for Sage Intacct](/administrator-guide/create-pex-tags-for-sage-intacct) article. Note:
* All of the above fields should be mapped to PEX tags with the type set to "Dropdown".
* Only **Billable** should be mapped to a PEX tag with the type set to "Yes / No".
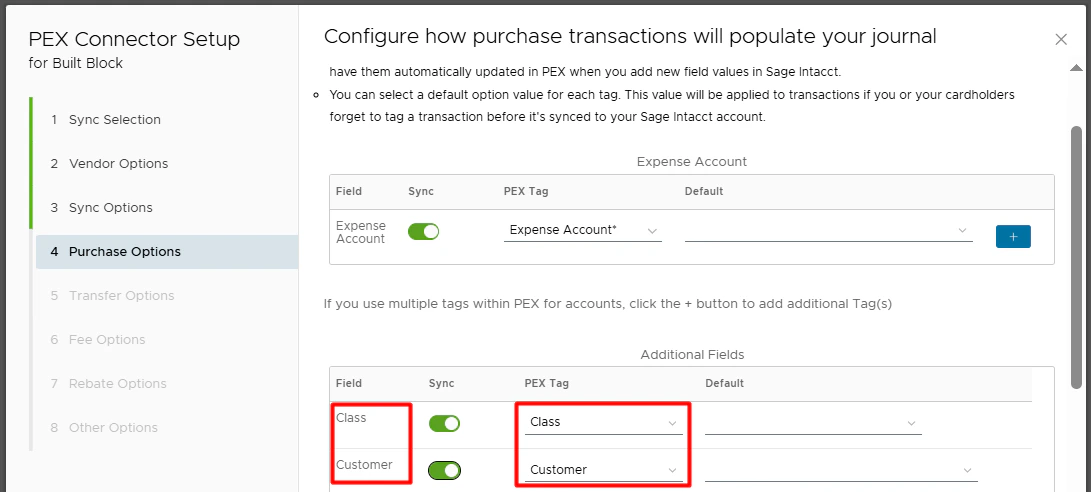 * Make sure to enable the **Sync** toggle. This will pull your classes, customers, and other fields from Intacct into PEX as tag option values.
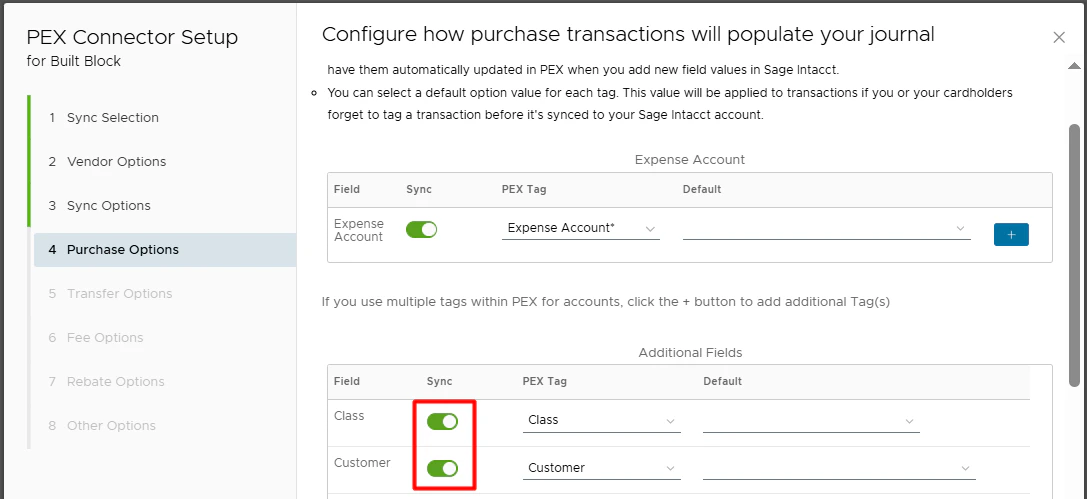 * You can select a default value for every tag.
* Note that a purchase will not be tagged with this default value. It means that if you or your cardholders forget to tag a purchase before it is synced to Intacct, the default value will be applied to this purchase during the sync.
* You can select a default value for every tag.
* Note that a purchase will not be tagged with this default value. It means that if you or your cardholders forget to tag a purchase before it is synced to Intacct, the default value will be applied to this purchase during the sync.
 Click **Next**.
## Bill payment field mappings
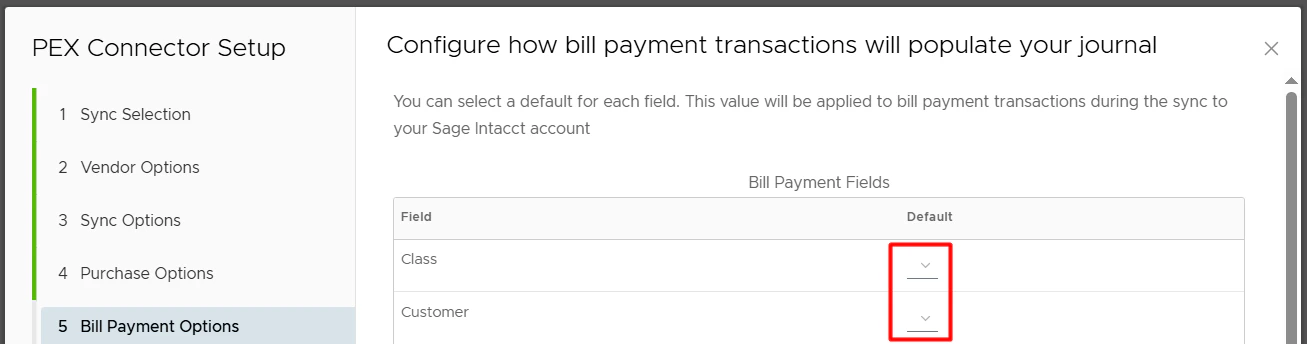
You can also set default fields for bill payments so the connector knows which values to use when syncing bill payments to Intacct. These values will be applied to bill payment transactions during the sync to Intacct.
Click **Next**.
## Bill payment field mappings
You can also set default fields for bill payments so the connector knows which values to use when syncing bill payments to Intacct. These values will be applied to bill payment transactions during the sync to Intacct.
 Click **Next**.
## Fee field mappings
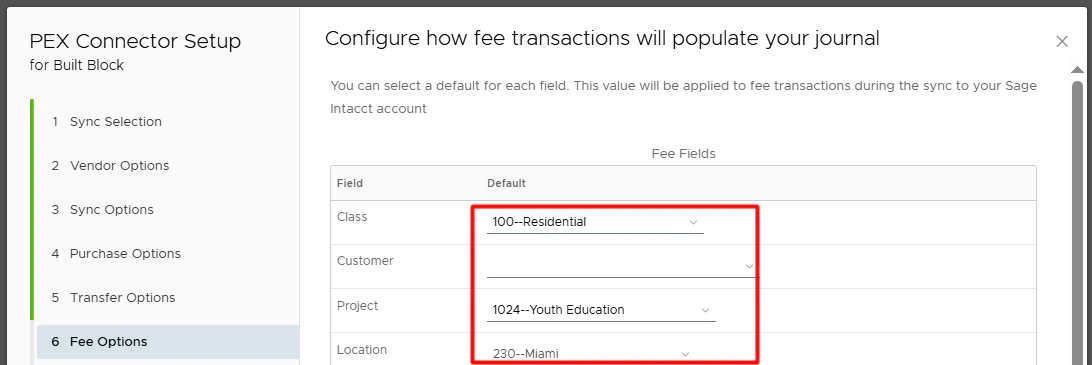
You can also set default fields for fees so the connector knows which values to use when syncing fees to Intacct. These values will be applied to fee transactions during the sync to Intacct.
Click **Next**.
## Fee field mappings
You can also set default fields for fees so the connector knows which values to use when syncing fees to Intacct. These values will be applied to fee transactions during the sync to Intacct.
 Click **Next**.
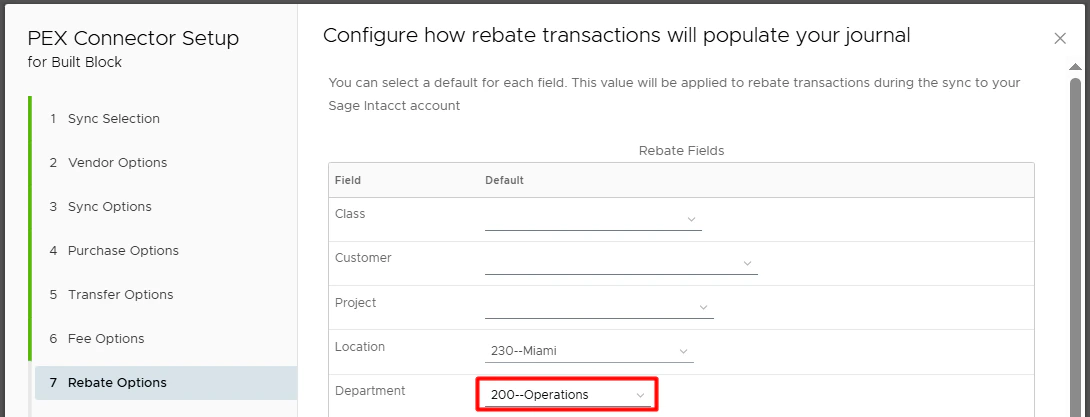
## Rebate field mappings
You can also set default fields for rebates so the connector knows which values to use when syncing rebates to Intacct. These values will be applied to rebate transactions during the sync to Intacct.
Click **Next**.
## Rebate field mappings
You can also set default fields for rebates so the connector knows which values to use when syncing rebates to Intacct. These values will be applied to rebate transactions during the sync to Intacct.
 Click **Next**.
## Configure reimbursement sync options
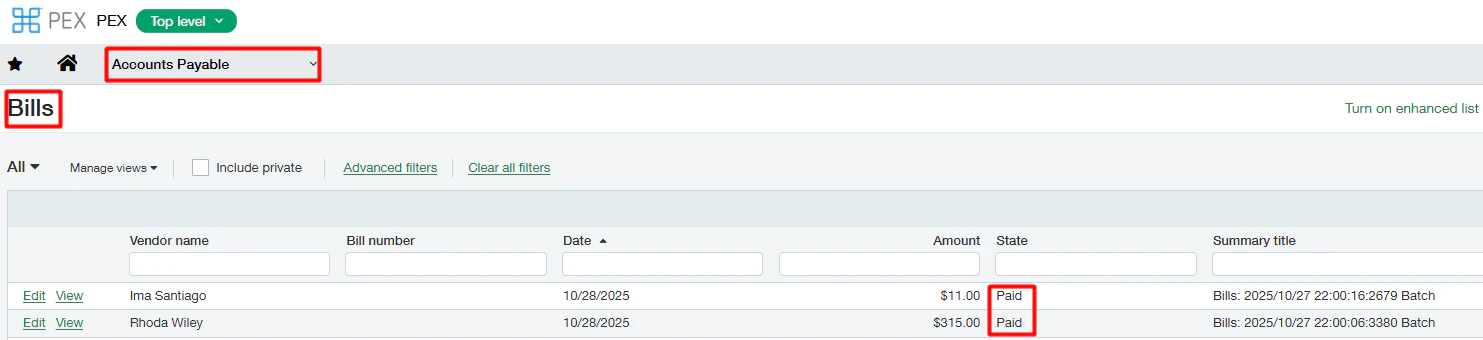
PEX can sync reimbursements to Intacct as **GL journal entries** or as **paid bills**.
Click **Next**.
## Configure reimbursement sync options
PEX can sync reimbursements to Intacct as **GL journal entries** or as **paid bills**.
 GL journal entries in Intacct:
 Paid bills in Intacct:
 To sync reimbursements to Intacct, you have to:
* **Select whether to sync reimbursements to Intacct as GL journal entries or as paid bills**.
* If you choose GL journal entries, select a bank account that reimbursements will credit in Intacct.
To sync reimbursements to Intacct, you have to:
* **Select whether to sync reimbursements to Intacct as GL journal entries or as paid bills**.
* If you choose GL journal entries, select a bank account that reimbursements will credit in Intacct.
 * If you choose paid bills, select a bank account that reimbursements will use to pay bills in Intacct.
 * **Configure vendor sync options**. Select one of the following:
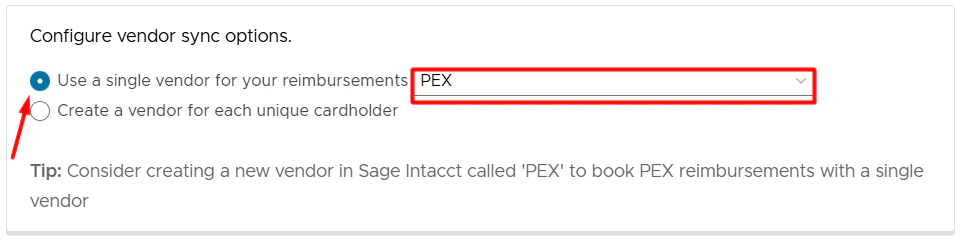
* **Use a single vendor for your reimbursements**.
* With this option, all PEX reimbursements will be booked against a single vendor selected from the drop down list.
* Tip: Consider creating a new vendor in Intacct called "PEX" if you would like to book all of your PEX reimbursements against a single vendor.
* **Configure vendor sync options**. Select one of the following:
* **Use a single vendor for your reimbursements**.
* With this option, all PEX reimbursements will be booked against a single vendor selected from the drop down list.
* Tip: Consider creating a new vendor in Intacct called "PEX" if you would like to book all of your PEX reimbursements against a single vendor.
 * **Create a vendor for each unique cardholder**.
* With this option, PEX will book reimbursements against corresponding cardholders (saved as vendors) that already exist in your Intacct account. If there is no corresponding cardholder-vendor then PEX will auto create a new cardholder-vendor in Intacct.
* **Optionally set a default expense account**.
* Only reimbursements without an expense account tag will default to the account selected here. They will debit the selected default account.
* It’s recommended to tag reimbursements before syncing to Intacct. Tagged reimbursements will debit the expense account that they are tagged with ("Office Supplies" in the example below).
* **Create a vendor for each unique cardholder**.
* With this option, PEX will book reimbursements against corresponding cardholders (saved as vendors) that already exist in your Intacct account. If there is no corresponding cardholder-vendor then PEX will auto create a new cardholder-vendor in Intacct.
* **Optionally set a default expense account**.
* Only reimbursements without an expense account tag will default to the account selected here. They will debit the selected default account.
* It’s recommended to tag reimbursements before syncing to Intacct. Tagged reimbursements will debit the expense account that they are tagged with ("Office Supplies" in the example below).
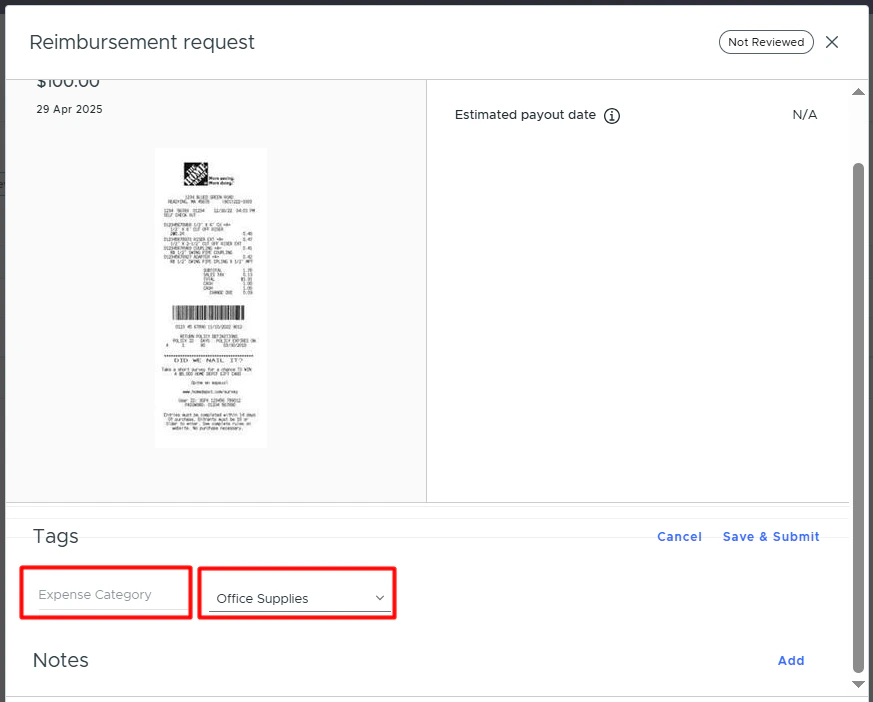 * Reimbursements use the same tag mappings, tags, and tag options as purchase transactions. In other words, the mappings set in the [Purchase field mappings](#purchase-field-mappings) step apply to both purchase transactions and reimbursements.
* If there is no tag and no default expense account, the reimbursement will not sync.
* **Automatically import reimbursement attachments as expense attachments into Sage Intacct**.
* Enable this option to import reimbursement attachments to Intacct.
Click **Next**.
## Other options
On this step, you can map a vendor within your Sage Intacct account.
**Memo field in Intacct.** Switch **on** the toggle "Copy a vendor to the Sage Intacct memo field" if you want to sync the vendor name to the memo field. If the toggle is **on**, the connector will copy a vendor name to the memo field for:
* Purchase/reimbursement recorded as a GL journal entry.
* Purchase recorded as a credit card transaction.
* Reimbursement recorded as a paid bill.
**Vendor field in Intacct.** The connector will automatically copy a vendor name to the vendor field if it is:
* Purchase/reimbursement recorded as a GL journal entry.
* Purchase recorded as a credit card transaction.
* Reimbursement recorded as a paid bill.
**Description field in Intacct.**
* The connector will automatically copy a cardholder name and PEX transaction notes to the description field if it is:
* Purchase/reimbursement recorded as a GL journal entry.
* Reimbursement recorded as a paid bill.
* The connector will automatically copy a cardholder name and a vendor name to the description field if it is a purchase recorded as a credit card transaction.
You can also decide if to sync ISA fees as business fees.
* Switch **on** the toggle to sync ISA fees as business fees. This means that ISA fees will debit the expense account selected on the first step.
* Reimbursements use the same tag mappings, tags, and tag options as purchase transactions. In other words, the mappings set in the [Purchase field mappings](#purchase-field-mappings) step apply to both purchase transactions and reimbursements.
* If there is no tag and no default expense account, the reimbursement will not sync.
* **Automatically import reimbursement attachments as expense attachments into Sage Intacct**.
* Enable this option to import reimbursement attachments to Intacct.
Click **Next**.
## Other options
On this step, you can map a vendor within your Sage Intacct account.
**Memo field in Intacct.** Switch **on** the toggle "Copy a vendor to the Sage Intacct memo field" if you want to sync the vendor name to the memo field. If the toggle is **on**, the connector will copy a vendor name to the memo field for:
* Purchase/reimbursement recorded as a GL journal entry.
* Purchase recorded as a credit card transaction.
* Reimbursement recorded as a paid bill.
**Vendor field in Intacct.** The connector will automatically copy a vendor name to the vendor field if it is:
* Purchase/reimbursement recorded as a GL journal entry.
* Purchase recorded as a credit card transaction.
* Reimbursement recorded as a paid bill.
**Description field in Intacct.**
* The connector will automatically copy a cardholder name and PEX transaction notes to the description field if it is:
* Purchase/reimbursement recorded as a GL journal entry.
* Reimbursement recorded as a paid bill.
* The connector will automatically copy a cardholder name and a vendor name to the description field if it is a purchase recorded as a credit card transaction.
You can also decide if to sync ISA fees as business fees.
* Switch **on** the toggle to sync ISA fees as business fees. This means that ISA fees will debit the expense account selected on the first step.
 * Switch **off** the toggle to sync ISA fees as purchases.
Click **Finish**.
## Auto Tagger
The Auto Tagger app is a great complement to Intacct. It allows you to create rules that auto-tag purchases. [Learn more about PEX Auto Tagger](/administrator-guide/pex-auto-tagger).
## Approve transactions in PEX
* Switch **off** the toggle to sync ISA fees as purchases.
Click **Finish**.
## Auto Tagger
The Auto Tagger app is a great complement to Intacct. It allows you to create rules that auto-tag purchases. [Learn more about PEX Auto Tagger](/administrator-guide/pex-auto-tagger).
## Approve transactions in PEX
 If you configured the connector to sync only approved purchases, then approving purchases in PEX is necessary before they can sync to Intacct. To approve a purchase:
Navigate to [Transactions > Card Transactions](https://dashboard.pexcard.com/transactions/card-transactions?utm_source=support)
Click **Not reviewed**.
* Click **Approved**.
If you configured the connector to sync only approved purchases, then approving purchases in PEX is necessary before they can sync to Intacct. To approve a purchase:
Navigate to [Transactions > Card Transactions](https://dashboard.pexcard.com/transactions/card-transactions?utm_source=support)
Click **Not reviewed**.
* Click **Approved**.
 ## Start syncing
Navigate to the Manage Sync tab and click on the green sync button to initiate the sync between PEX and Intacct.
## Start syncing
Navigate to the Manage Sync tab and click on the green sync button to initiate the sync between PEX and Intacct.
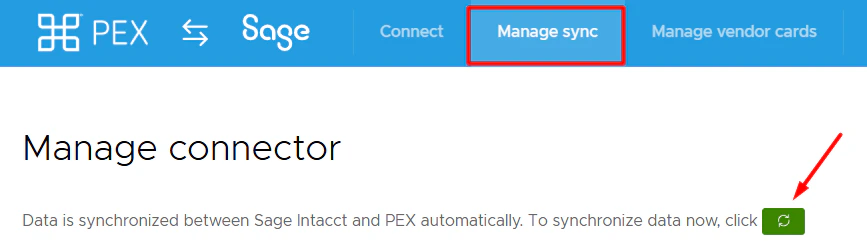 Manual sync will process transactions based on the start date specified on the **Sync Selection** step, with a limit of 1 year back from today. If there is no start date specified on the **Sync Selection** step then manual sync will process transactions only up to 2 months back from today.
 Each sync also imports tag option values from Intacct to PEX if the "Sync" toggle is enabled.

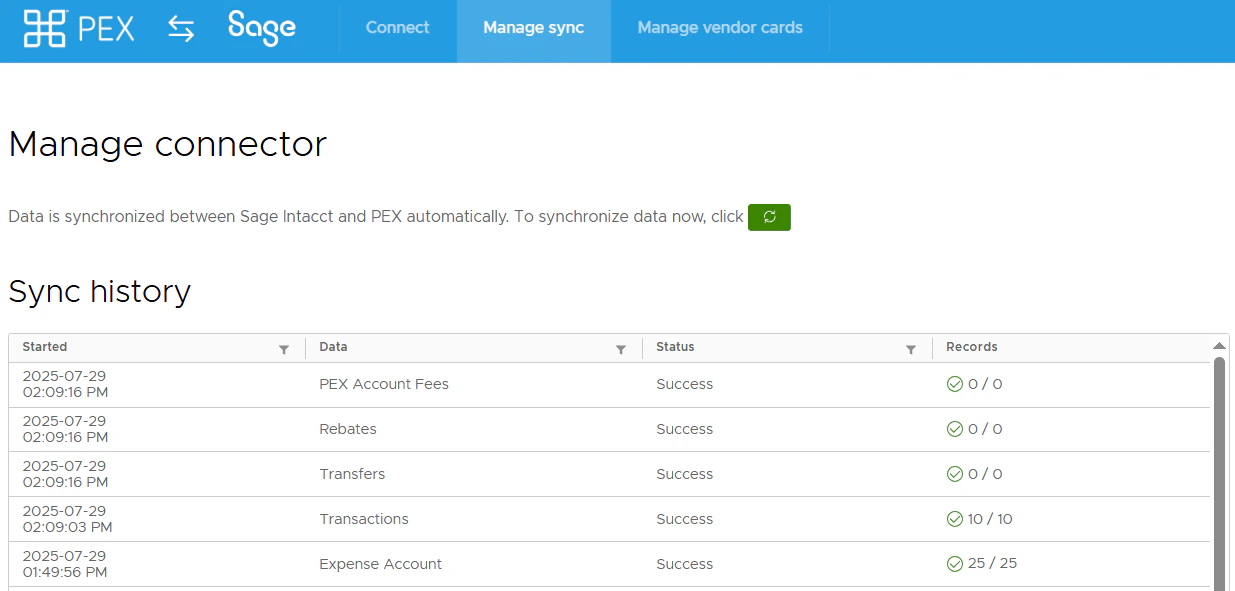
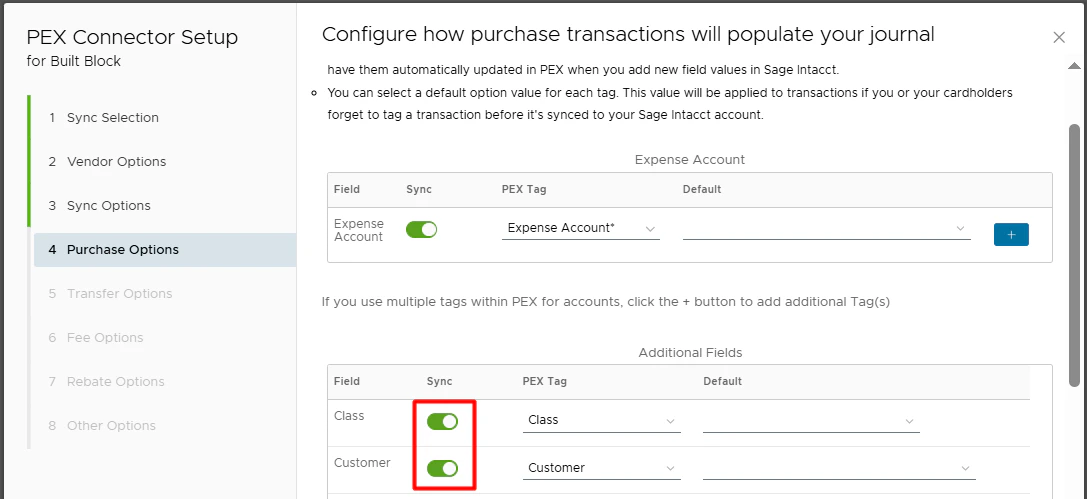 Once transactions are synced to Intacct, you can view their history in the Sync History table and view the synced transactions in your Intacct account.
 ## View transactions in Intacct
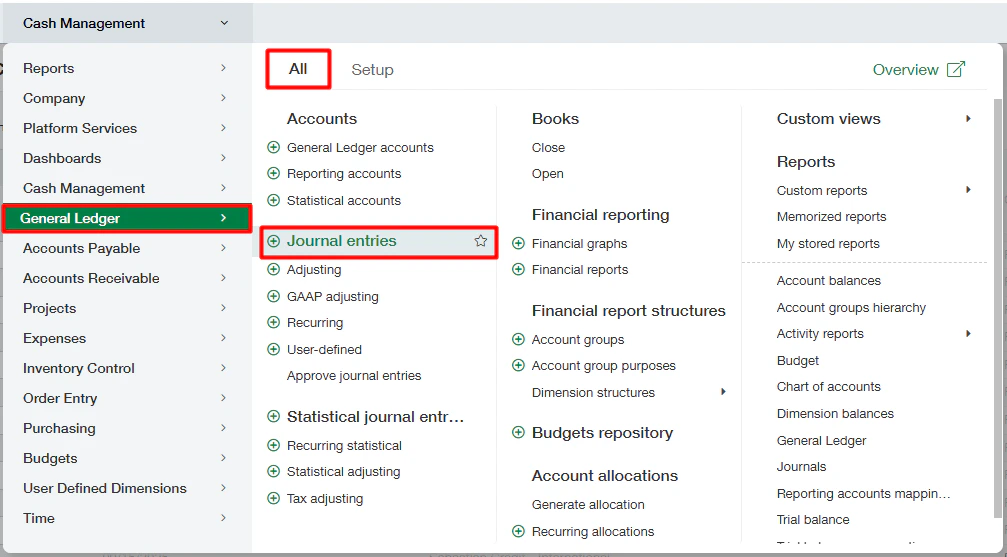
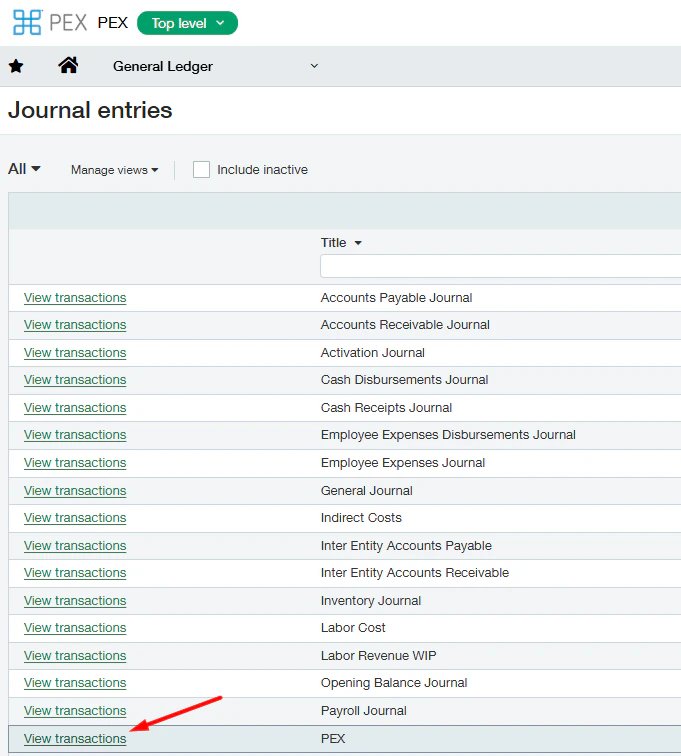
If you sync transactions as GL journal entries, log in to your Intacct account and navigate to **General Ledger** > **Journal Entries** (under the **All** tab). Click **View transactions** next to the journal you configured (on the **Configure sync options** step) to sync PEX transactions and view the synced transactions.
## View transactions in Intacct
If you sync transactions as GL journal entries, log in to your Intacct account and navigate to **General Ledger** > **Journal Entries** (under the **All** tab). Click **View transactions** next to the journal you configured (on the **Configure sync options** step) to sync PEX transactions and view the synced transactions.
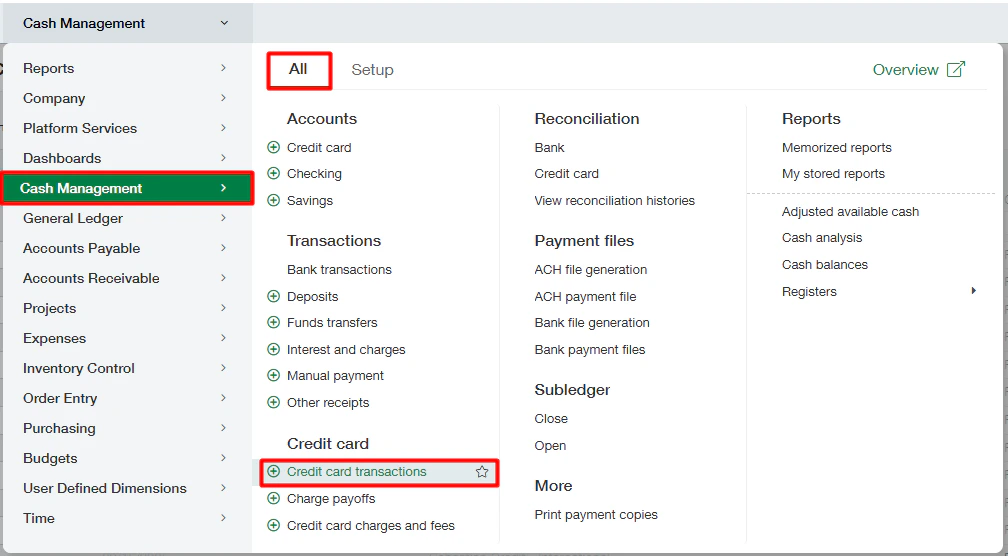
 If you sync transactions as credit card transactions, log in to your Intacct account and navigate to **Cash Management** > **Credit Card transactions** (under the **All** tab) to view the synced transactions.
 ## View reimbursements in Intacct
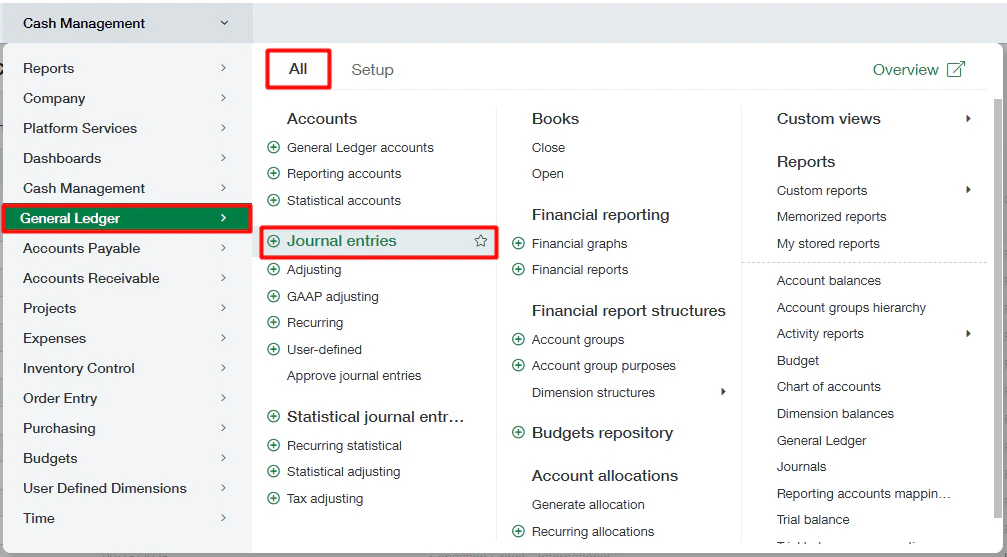
If you sync reimbursements as GL journal entries, log in to your Intacct account and navigate to **General Ledger** > **Journal Entries** (under the **All** tab).
## View reimbursements in Intacct
If you sync reimbursements as GL journal entries, log in to your Intacct account and navigate to **General Ledger** > **Journal Entries** (under the **All** tab).
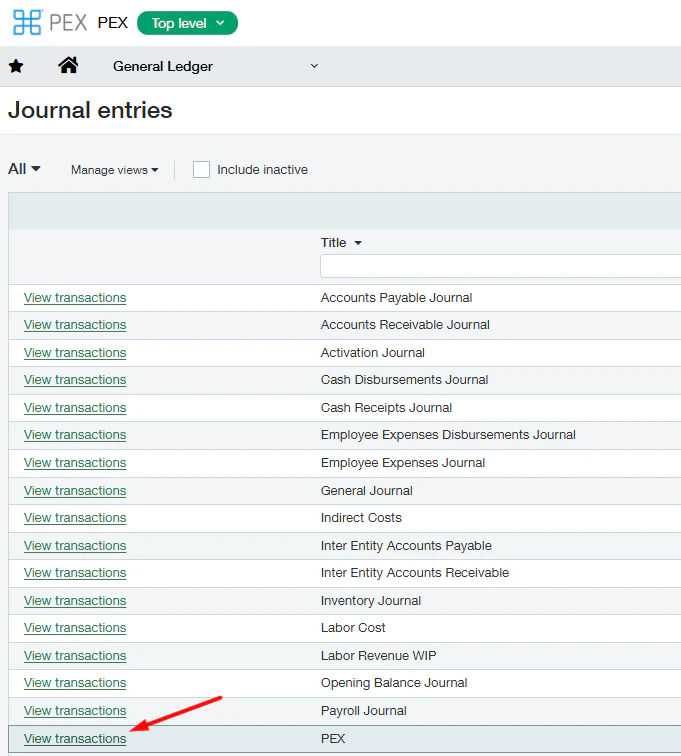
 Click **View transactions** next to the journal you configured (on the **Configure sync options** step) to sync PEX transactions and view the synced reimbursements.
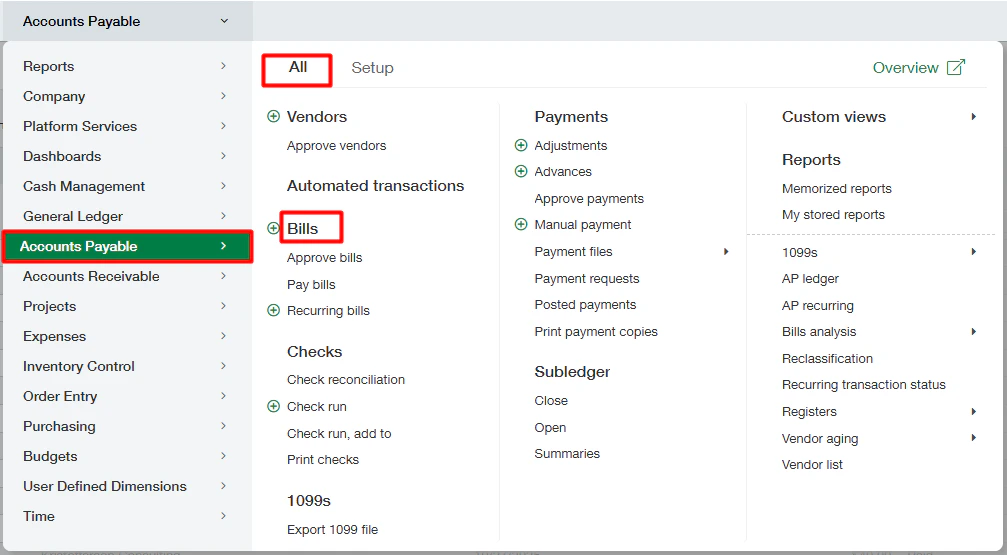
 If you sync reimbursements as paid bills, log in to your Intacct account and navigate to **Accounts Payable** > **Bills** (under the **All** tab) to view the synced reimbursements.
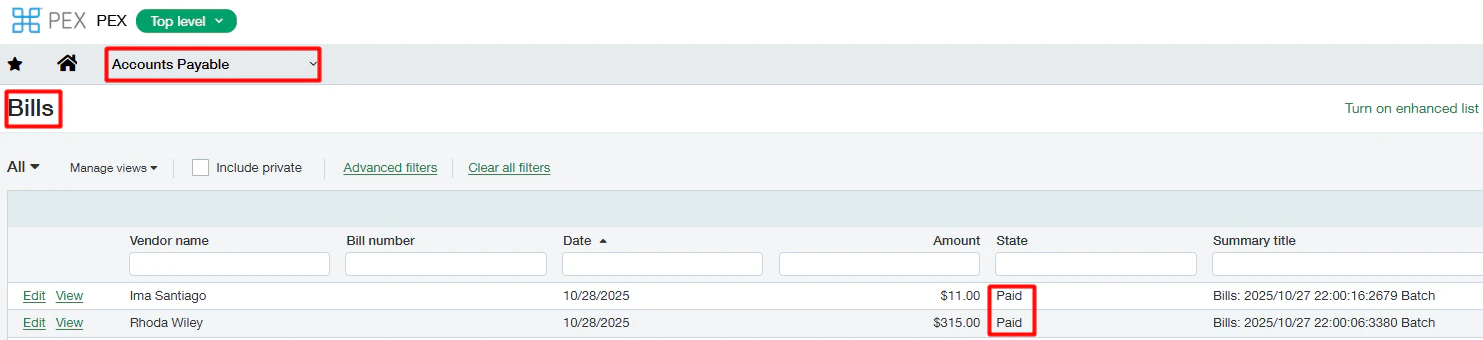 A single payment can include multiple reimbursements. If there is more than one, PEX creates a separate GL journal entry/paid bill in Intacct for each reimbursement.
## Manage sync
A single payment can include multiple reimbursements. If there is more than one, PEX creates a separate GL journal entry/paid bill in Intacct for each reimbursement.
## Manage sync
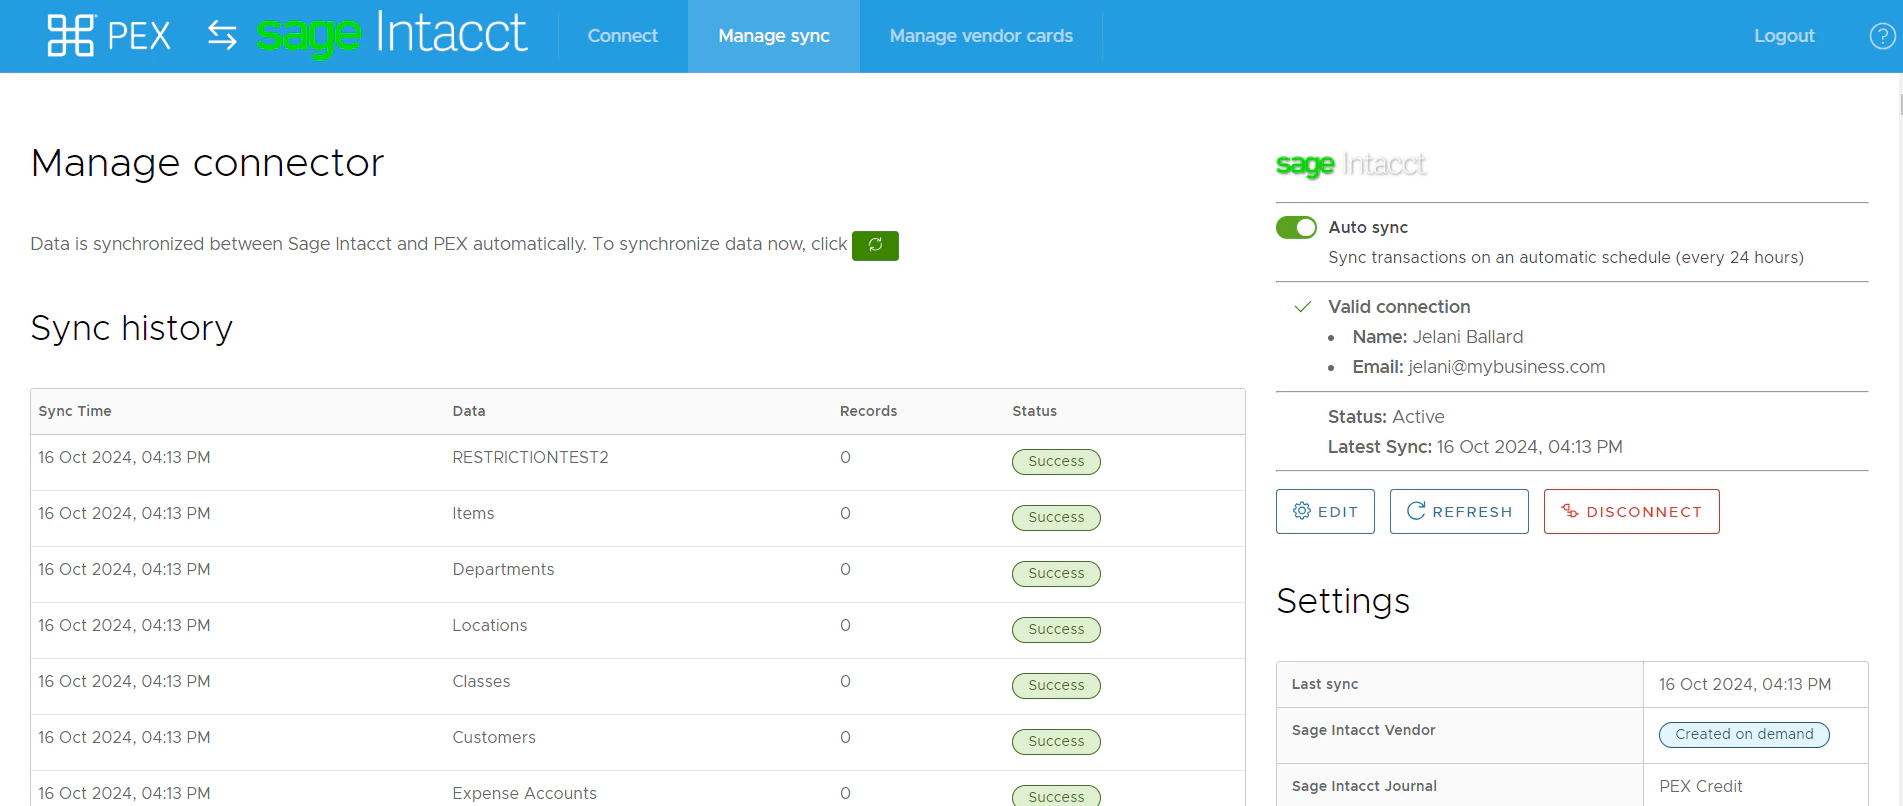 On the "Manage sync" tab you can:
* Run a manual sync between PEX and Intacct by clicking on the green sync button.
On the "Manage sync" tab you can:
* Run a manual sync between PEX and Intacct by clicking on the green sync button.
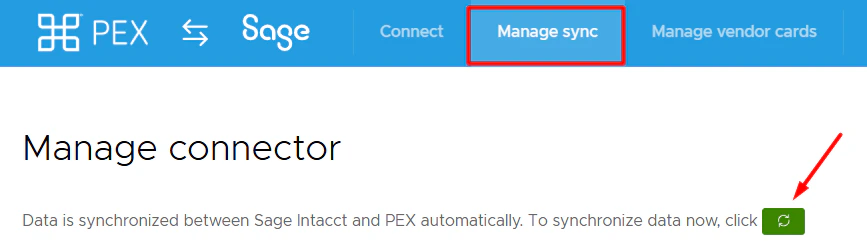 * Enable/disable auto-sync.
* With auto-sync enabled, transactions and tag option values sync automatically every 24 hours.
* Auto-sync will always process transactions based on the start date specified on the **Sync Selection** step, with a maximum limit of 2 months back from today. If there is no start date specified on the **Sync Selection** step then auto-sync will sync transactions up to 2 months back from today.
* Enable/disable auto-sync.
* With auto-sync enabled, transactions and tag option values sync automatically every 24 hours.
* Auto-sync will always process transactions based on the start date specified on the **Sync Selection** step, with a maximum limit of 2 months back from today. If there is no start date specified on the **Sync Selection** step then auto-sync will sync transactions up to 2 months back from today.
 * View/Edit configuration settings.
* View/Edit tag mapping.
* View Sync history.
* Change your Intacct account credentials if your Intacct password has changed.
* Disconnect from your Intacct account.
## FAQ
If you see the error below and can't select a default location,
* View/Edit configuration settings.
* View/Edit tag mapping.
* View Sync history.
* Change your Intacct account credentials if your Intacct password has changed.
* Disconnect from your Intacct account.
## FAQ
If you see the error below and can't select a default location,
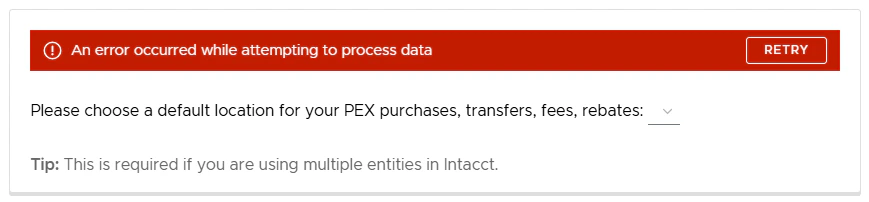 you need to grant PEX access to read locations:
Go to **Company** > **Admin** > **Roles**
Click **Edit** on the Web Services user
Click **View Subscriptions**
Click **Permissions** for the Company
Find **Locations**
Select **View** and **List**
you need to grant PEX access to read locations:
Go to **Company** > **Admin** > **Roles**
Click **Edit** on the Web Services user
Click **View Subscriptions**
Click **Permissions** for the Company
Find **Locations**
Select **View** and **List**
 Click **Save**
We strongly recommend using automatic sync of tag options from Intacct to PEX. This keeps your PEX tags and Intacct fields in sync. For more information, see [Create PEX tags for Sage Intacct](/administrator-guide/create-pex-tags-for-sage-intacct).
Click **Save**
Click **Save**
We strongly recommend using automatic sync of tag options from Intacct to PEX. This keeps your PEX tags and Intacct fields in sync. For more information, see [Create PEX tags for Sage Intacct](/administrator-guide/create-pex-tags-for-sage-intacct).
 Every synced transaction has a "Synced with Sage Intacct" note. As long as you don't remove that note on a transaction, it will not re-sync to your Sage Intacct account.
Yes. If you prefer not to manually tag each transaction, PEX Auto Tagger lets you create dynamic rules that automatically tag transactions. [Learn more about PEX Auto Tagger](/administrator-guide/pex-auto-tagger).
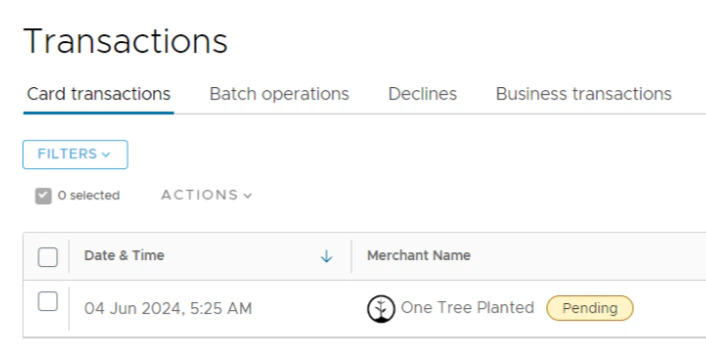
No. Only transactions in settled status get synced to your account. If you see a **Pending** label next to the merchant name as shown below, the transaction is still pending.
Every synced transaction has a "Synced with Sage Intacct" note. As long as you don't remove that note on a transaction, it will not re-sync to your Sage Intacct account.
Yes. If you prefer not to manually tag each transaction, PEX Auto Tagger lets you create dynamic rules that automatically tag transactions. [Learn more about PEX Auto Tagger](/administrator-guide/pex-auto-tagger).
No. Only transactions in settled status get synced to your account. If you see a **Pending** label next to the merchant name as shown below, the transaction is still pending.
 The connection between PEX and Sage Intacct is established at the top level, with permissions to access all entities. Journal entries are posted at the sub-entity level using the location field on each purchase.
If you didn't find the answer you need, see [Accounting Software Connector Troubleshooting](/administrator-guide/accounting-software-connector-troubleshooting).
## Support & inquiries
For any questions related to your connector, please email [appsupport+sageintacct@pexcard.com](mailto:appsupport+sageintacct@pexcard.com).
The connection between PEX and Sage Intacct is established at the top level, with permissions to access all entities. Journal entries are posted at the sub-entity level using the location field on each purchase.
If you didn't find the answer you need, see [Accounting Software Connector Troubleshooting](/administrator-guide/accounting-software-connector-troubleshooting).
## Support & inquiries
For any questions related to your connector, please email [appsupport+sageintacct@pexcard.com](mailto:appsupport+sageintacct@pexcard.com).