> ## Documentation Index
> Fetch the complete documentation index at: https://support.pexcard.com/llms.txt
> Use this file to discover all available pages before exploring further.
# PEX Connector for Xero (Prepaid)
> Auto-sync purchases, transfers, fees, rebates and receipt images from PEX into Xero, keeping your data accurate, organized, and up-to-date. Map Xero journal entry fields such as Expense Account, Expense Type, Office, etc. to PEX tags.
To configure this integration, you don't even need to wait for your account manager. You can get started right away with just your Xero and PEX credentials.
## Link PEX and Xero
To connect your PEX and your Xero accounts from the PEX Marketplace follow these steps:
Log in to [http://dashboard.pexcard.com/](http://dashboard.pexcard.com/?utm_source=support)
Navigate to [Apps > Available](https://dashboard.pexcard.com/apps/available?utm_source=support)
Scroll to locate PEX Connector for Xero.
Click **More info** > **Install** > **Launch**.
Click **Connect** to link your PEX and Xero accounts.
Enter your Xero Email Address and Password.
Click **Log In**.
Click **Allow access**.
**Note:**
To install the connector, you need to enable the following permissions: *Edit business settings & apps*, *Manage cardholder*, *View card transactions*. You can enable them in [My Profile -> Permissions](https://dashboard.pexcard.com/account/permissions?utm_source=support).
## PEX Sync Options
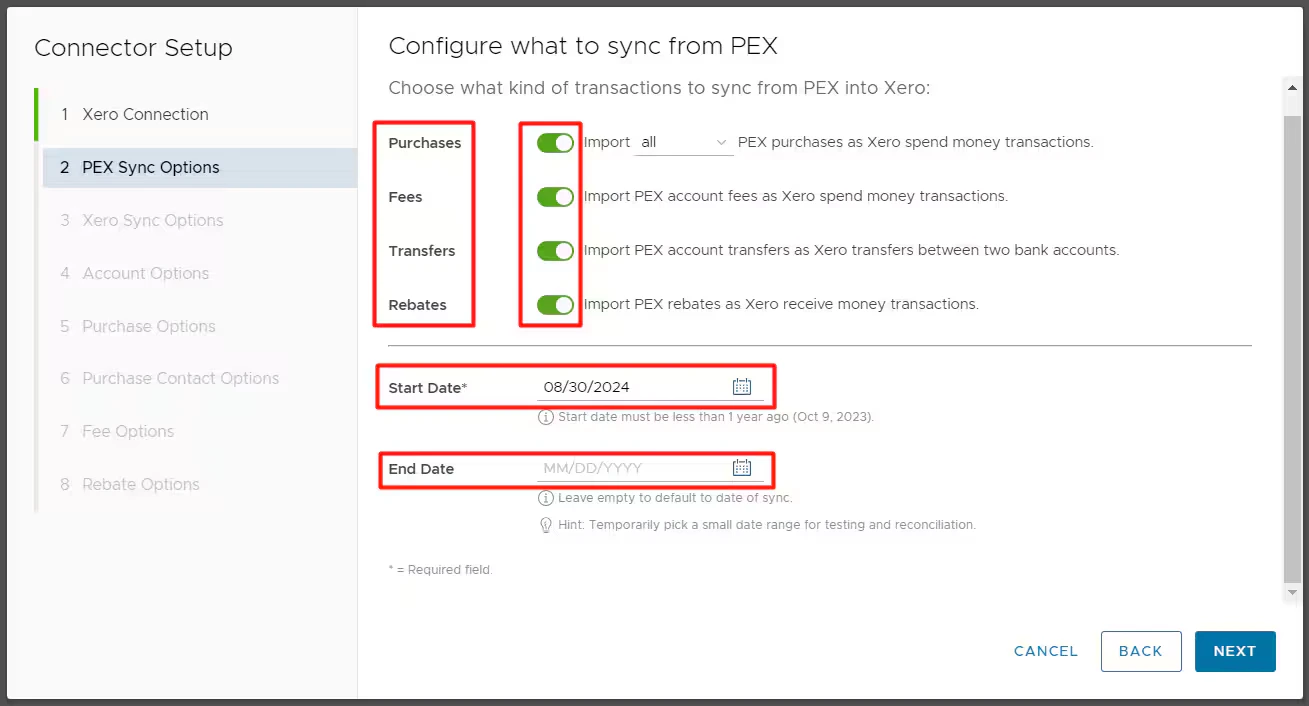
Select what type of transactions to sync:
**Purchases**\
Enable this option to allow PEX to import PEX purchases as expenses in Xero. You can choose to sync all PEX transactions (regardless of approval status) or just approved ones. For details on transaction review, see our [resource on reviewing transactions](/administrator-guide/how-to-review-transactions-with-receipts-tags-and-user-notes).
**Fees**\
Enable this option to have PEX import PEX account fees to Xero.
**Transfers**\
Enable this option to have PEX import transfers to Xero. An example of a transfer would be an ACH/wire transfer from your business checking account to your PEX business account.
**Rebates**\
Enable this option to have PEX import rebates to Xero. This option is available **only** if the "Purchases" toggle is ON.
**Start Date**\
Specify a start date for the sync. Transactions after this date will be synced automatically. The end date is optional. The start date and the end date could facilitate a narrow transaction window which is helpful initially to check the transaction sync.
 Click "Next".
## Xero Sync Options
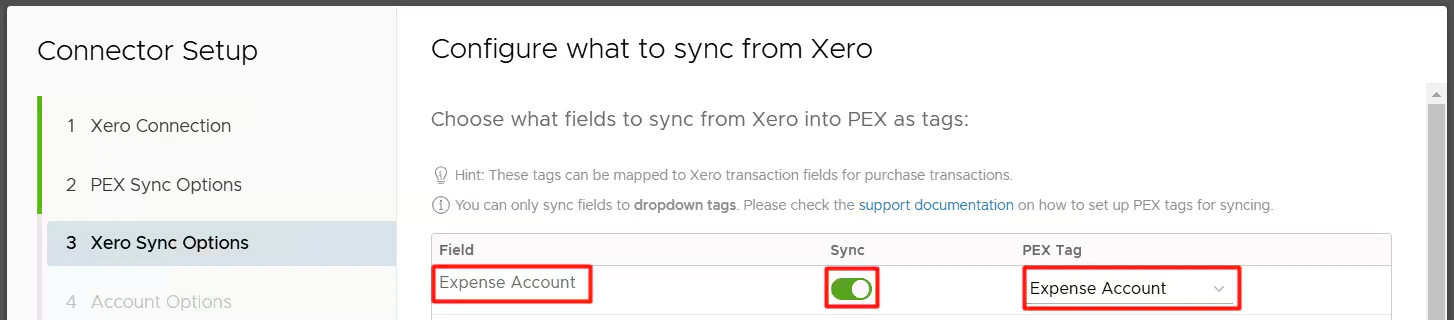
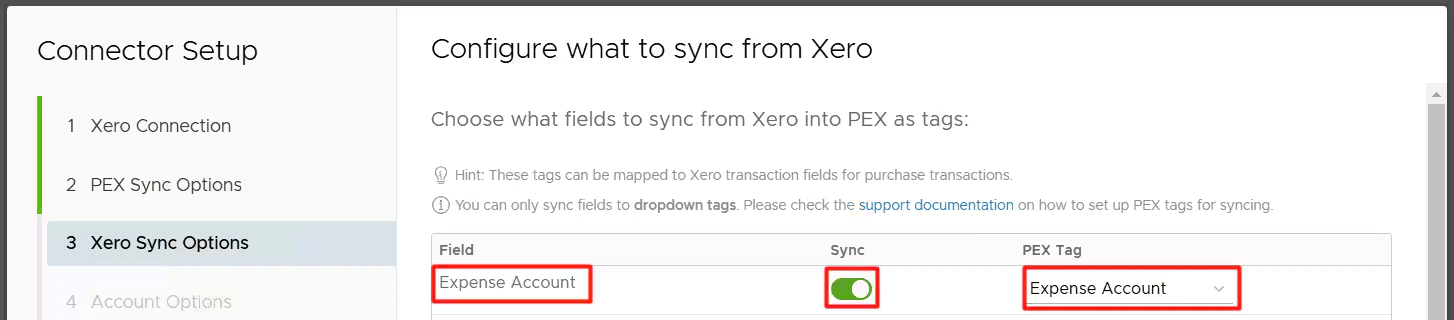
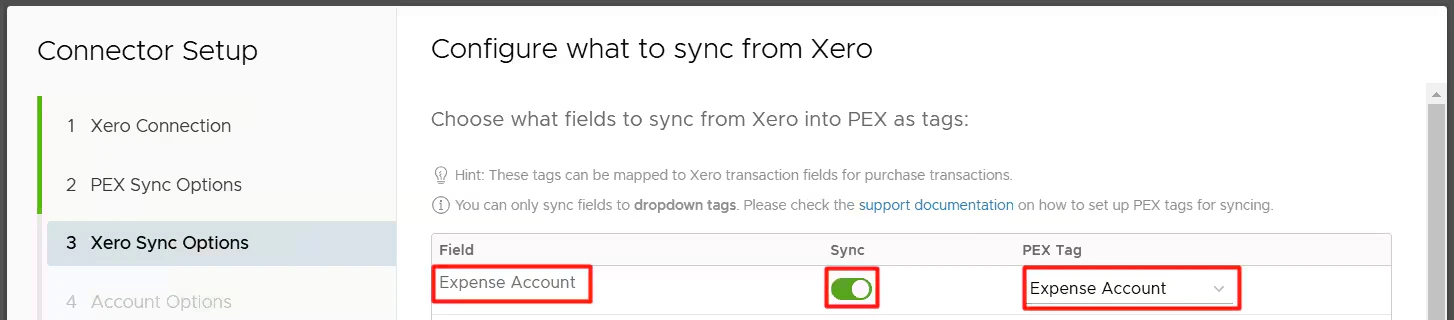
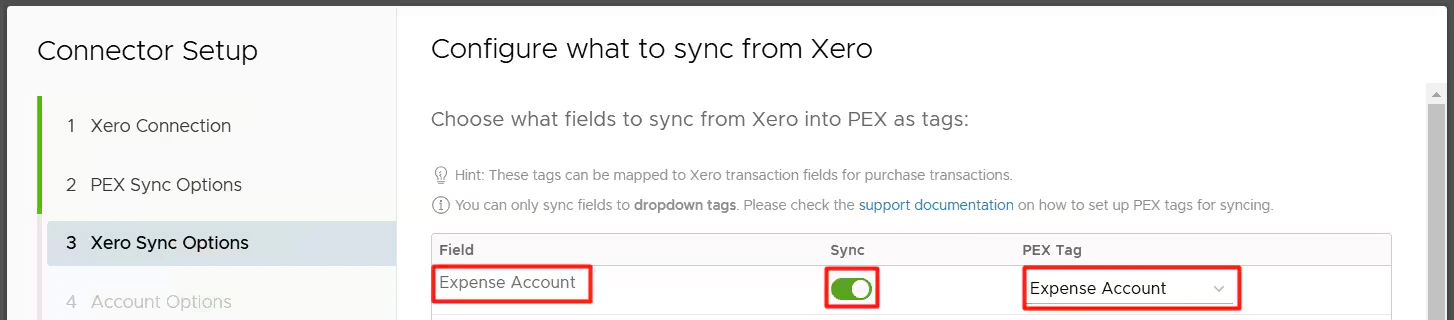
Field Column will show all the fields from Xero. You can link each of these fields to an existing PEX tag. If you choose to use PEX tags, you must create them in advance, following the logic described in the [Create PEX tags for Xero](/administrator-guide/create-pex-tags-for-xero) article.
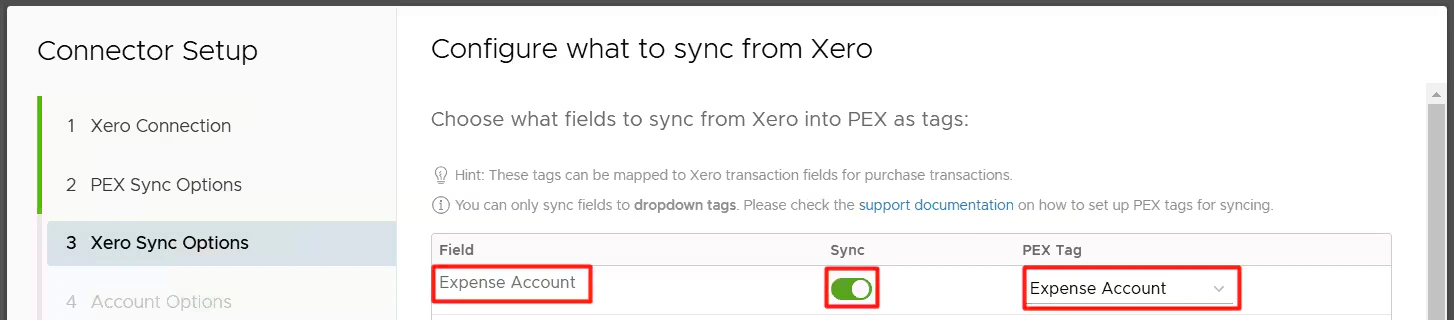
Syncing tag options should be **on** to import data from Xero. For example, the values for the PEX tag "Expense Account" will be automatically populated with the names of all your expense accounts.
Click "Next".
## Xero Sync Options
Field Column will show all the fields from Xero. You can link each of these fields to an existing PEX tag. If you choose to use PEX tags, you must create them in advance, following the logic described in the [Create PEX tags for Xero](/administrator-guide/create-pex-tags-for-xero) article.
Syncing tag options should be **on** to import data from Xero. For example, the values for the PEX tag "Expense Account" will be automatically populated with the names of all your expense accounts.
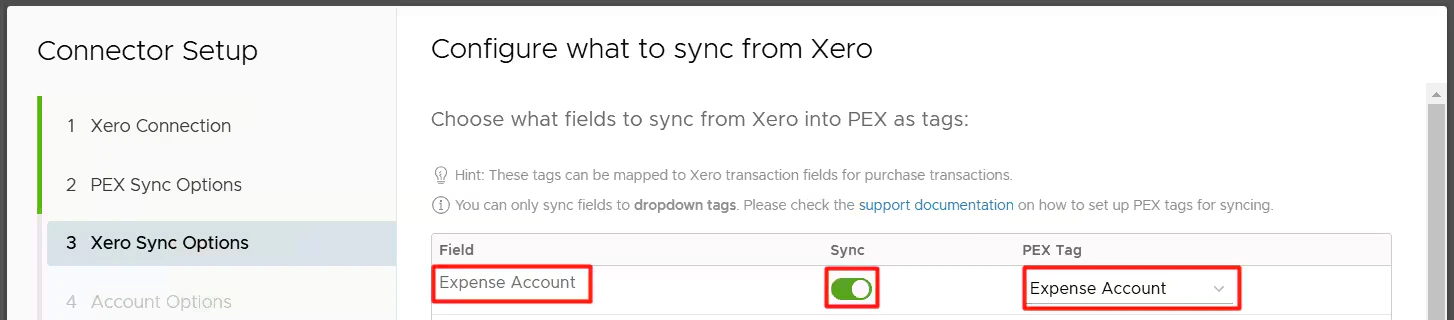 Along with expense accounts, you can include Overhead and Direct Costs accounts in the PEX tag "Expense Account":
Turn **on** the Overhead toggle if you want to include Overhead accounts.
Turn **on** the Direct Costs toggle if you want to include Direct Costs accounts.
Along with expense accounts, you can include Overhead and Direct Costs accounts in the PEX tag "Expense Account":
Turn **on** the Overhead toggle if you want to include Overhead accounts.
Turn **on** the Direct Costs toggle if you want to include Direct Costs accounts.
 Click "Next".
## Account options
Click "Next".
## Account options
 Please select accounts for each transaction type:
* **Source Cash**
* Select a Xero bank account that represents your business checking account.
* Transfers to PEX will credit this account.
Please select accounts for each transaction type:
* **Source Cash**
* Select a Xero bank account that represents your business checking account.
* Transfers to PEX will credit this account.
 * **PEX Cash**
* Select a GL account from Xero that represents your PEX business balance.
* Transfers to PEX will debit this account.
* Purchases in PEX will credit this account.
* Fees in PEX will credit this account.
* Rebates to PEX will debit this account.
* **PEX Cash**
* Select a GL account from Xero that represents your PEX business balance.
* Transfers to PEX will debit this account.
* Purchases in PEX will credit this account.
* Fees in PEX will credit this account.
* Rebates to PEX will debit this account.
 * **Purchases**
The connector needs to know which expense account to *debit* when syncing purchases. You can select either a static option or PEX tag:
* **Static option. Use this `` for PEX purchases: ``**. All PEX purchases will be recorded against a single expense account that you select in the second highlighted field below ("PEX Purchases" in our example).
* **Purchases**
The connector needs to know which expense account to *debit* when syncing purchases. You can select either a static option or PEX tag:
* **Static option. Use this `` for PEX purchases: ``**. All PEX purchases will be recorded against a single expense account that you select in the second highlighted field below ("PEX Purchases" in our example).
 You must select one account of the "Expense" type. The dropdown lists **only** accounts of the "Expense" type. The same account can be used for both purchases and fees.
* PEX purchase transactions that sync to Xero will *debit* the selected expense account ("PEX Purchases" in our example above).
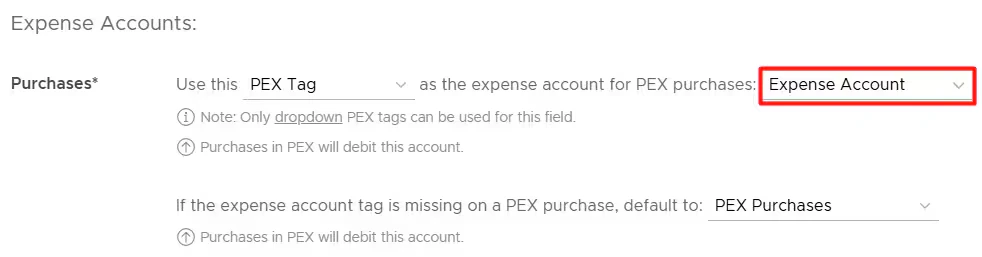
* **PEX Tag.**
* **Use this `` for PEX purchases: ``**. Select a PEX tag for expense accounts in the second highlighted field below (Expense Account" in our example). That tag must be created beforehand, following the logic described in the [Create PEX tags for Xero](/administrator-guide/create-pex-tags-for-xero) article.
You must select one account of the "Expense" type. The dropdown lists **only** accounts of the "Expense" type. The same account can be used for both purchases and fees.
* PEX purchase transactions that sync to Xero will *debit* the selected expense account ("PEX Purchases" in our example above).
* **PEX Tag.**
* **Use this `` for PEX purchases: ``**. Select a PEX tag for expense accounts in the second highlighted field below (Expense Account" in our example). That tag must be created beforehand, following the logic described in the [Create PEX tags for Xero](/administrator-guide/create-pex-tags-for-xero) article.
 * This lets a Xero expense account be dynamic for each transaction.
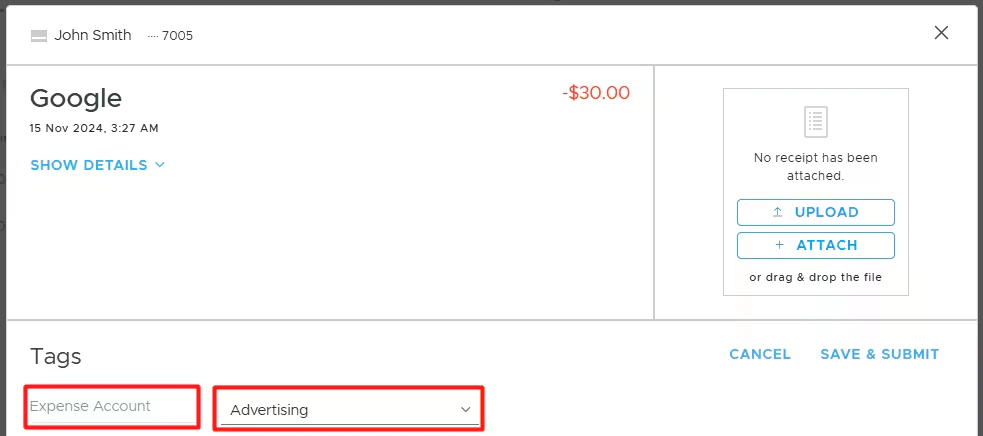
* If you select a PEX tag in the second highlighted field above ("Expense Account" in our example) then you and your cardholders will be able to select one of the expense accounts for each purchase transaction.
For that go to the "Transactions" menu -> locate a transaction -> click on it -> select an expense account value ("Advertising" in our example below) of a tag ("Expense Account" in our example below) -> click "Save". Note that you and your cardholders can select one of the tag values for each transaction once you finish the Xero connector setup and sync tag options from Xero to PEX.
* This lets a Xero expense account be dynamic for each transaction.
* If you select a PEX tag in the second highlighted field above ("Expense Account" in our example) then you and your cardholders will be able to select one of the expense accounts for each purchase transaction.
For that go to the "Transactions" menu -> locate a transaction -> click on it -> select an expense account value ("Advertising" in our example below) of a tag ("Expense Account" in our example below) -> click "Save". Note that you and your cardholders can select one of the tag values for each transaction once you finish the Xero connector setup and sync tag options from Xero to PEX.
 * When mapping to a tag, you can also set a default expense account in the "**If the expense account tag is missing on a PEX purchase, default to: ``**" (see the highlighted below). It ("PEX Purchases" in our example) will be used if you or your cardholders forget to tag a purchase before it's synced to Xero.
 If you or your cardholders do tag a purchase transaction with an expense account value from the tag chosen in the highlighted field below,
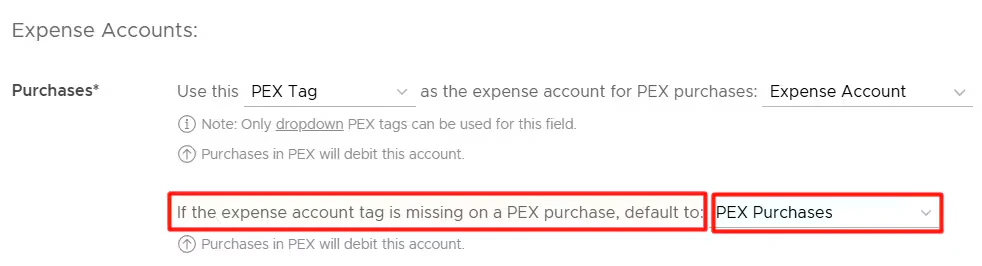 that specific purchase transaction will be recorded against the expense account ("Advertising" in our example below) you tagged the transaction with. Tags take precedence over default values.
 * **Fees**
* PEX fee transactions that sync to Xero will *debit* this account ("PEX Fees" in our example below). You must select one account of the "Expense" type. The dropdown will display **only** accounts of the "Expense" type. The same account can be used for both purchases and fees.
* **Fees**
* PEX fee transactions that sync to Xero will *debit* this account ("PEX Fees" in our example below). You must select one account of the "Expense" type. The dropdown will display **only** accounts of the "Expense" type. The same account can be used for both purchases and fees.
 * **Rebates**
* PEX rebate transactions that sync to Xero will *credit* this account ("Other Revenue" in our example below). You must select one account of the "Expense" or "Revenue" type. The dropdown control will display **only** accounts of the "Expense" and "Revenue" types.
* **Rebates**
* PEX rebate transactions that sync to Xero will *credit* this account ("Other Revenue" in our example below). You must select one account of the "Expense" or "Revenue" type. The dropdown control will display **only** accounts of the "Expense" and "Revenue" types.
 Click "Next".
## Purchase Options
Configure options for syncing PEX purchases.
**Receipts**\
You can enable automatic syncing of PEX purchase receipts as Xero transaction attachments.
Click "Next".
## Purchase Options
Configure options for syncing PEX purchases.
**Receipts**\
You can enable automatic syncing of PEX purchase receipts as Xero transaction attachments.
 **Expense Field Mappings**\
In this table, you have the option to map additional fields when syncing PEX purchases as Xero transactions. You can map the fields from Xero to either a static value or PEX tag.
If you go with PEX tags then you must create them beforehand following the logic described in the [Create PEX tags for Xero](/administrator-guide/create-pex-tags-for-xero) article. You can map a default value to use when the tag is missing.
For example, if the "Expense Type" is one of the fields on your Purchase:
* Mapping the "Expense Type" to a static value allows you to select one expense type ("Supplies" in our example below) from Xero, which will then be applied to all PEX purchases.
**Expense Field Mappings**\
In this table, you have the option to map additional fields when syncing PEX purchases as Xero transactions. You can map the fields from Xero to either a static value or PEX tag.
If you go with PEX tags then you must create them beforehand following the logic described in the [Create PEX tags for Xero](/administrator-guide/create-pex-tags-for-xero) article. You can map a default value to use when the tag is missing.
For example, if the "Expense Type" is one of the fields on your Purchase:
* Mapping the "Expense Type" to a static value allows you to select one expense type ("Supplies" in our example below) from Xero, which will then be applied to all PEX purchases.
 Note that a purchase will not be tagged with this static value. You will not see this static value on the transaction details. The static value will be used only when syncing a purchase to Xero.
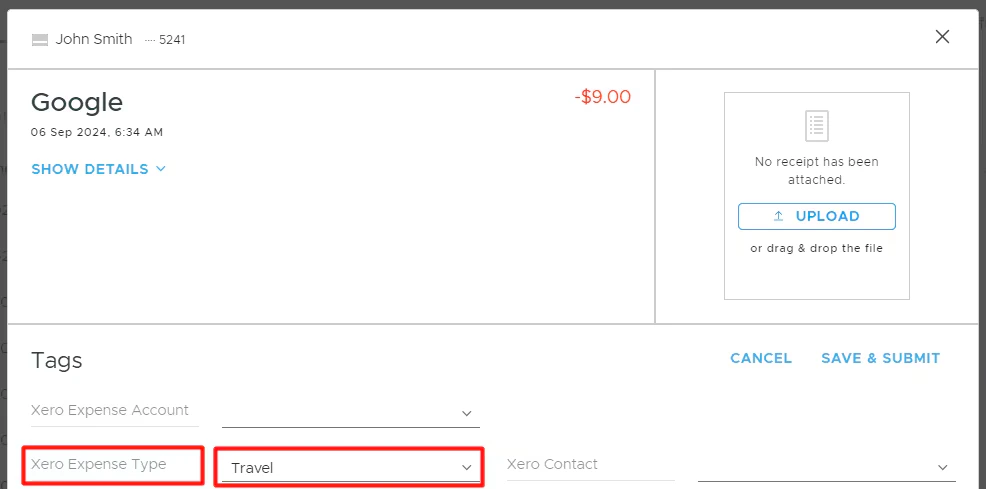
* Mapping the "Expense Type" to a PEX tag ("Xero Expense Type" in our example below) means that you and your cardholders can select one of the tag values for each purchase.
Note that a purchase will not be tagged with this static value. You will not see this static value on the transaction details. The static value will be used only when syncing a purchase to Xero.
* Mapping the "Expense Type" to a PEX tag ("Xero Expense Type" in our example below) means that you and your cardholders can select one of the tag values for each purchase.
 For that go to the "Transactions" menu -> locate a transaction -> click on it -> select a tag value ("Travel" in our example below) of the "Xero Expense Type" tag -> click "Save". Note that you and your cardholders can select one of the tag values for each purchase once you finish the Xero connector setup and sync tag options from Xero to PEX.
 When mapping to a tag, you can also specify a default "Expense Type" value: for example, Supplies, as highlighted below.
 Note that a purchase will not be tagged with this default value ("Supplies" in our example) on the transaction details. It means that if you or your cardholders forget to tag a purchase before it is synced to Xero, the default value ("Supplies" in our example) will be applied to this purchase during the sync.
If you or your cardholders do tag a purchase with the tag option from the tag chosen in the highlighted field below,
Note that a purchase will not be tagged with this default value ("Supplies" in our example) on the transaction details. It means that if you or your cardholders forget to tag a purchase before it is synced to Xero, the default value ("Supplies" in our example) will be applied to this purchase during the sync.
If you or your cardholders do tag a purchase with the tag option from the tag chosen in the highlighted field below,
 that specific purchase will be recorded against the tag option ("Travel" in our example below) you tagged the purchase with. Tags take precedence over default values.
 If you are using split tag functionality on the PEX platform, the connector will support that while exporting the purchases and create the same split structure for purchases in Xero.
**Item Description** can be mapped to a PEX text tag. This automatically defaults to the PEX Purchase description when the field is not mapped or the tag is missing.
Click "Next".
## Purchase Contact Options
Configure contact options for PEX purchases.
Select one of the following:
* **Use this `` as the transaction contact: ``**. With this option, all PEX purchases will be recorded against a single contact that you select in the second highlighted field below ("PEX" in our example).
If you are using split tag functionality on the PEX platform, the connector will support that while exporting the purchases and create the same split structure for purchases in Xero.
**Item Description** can be mapped to a PEX text tag. This automatically defaults to the PEX Purchase description when the field is not mapped or the tag is missing.
Click "Next".
## Purchase Contact Options
Configure contact options for PEX purchases.
Select one of the following:
* **Use this `` as the transaction contact: ``**. With this option, all PEX purchases will be recorded against a single contact that you select in the second highlighted field below ("PEX" in our example).
 * Tip: Consider creating a new contact in Xero called 'PEX' if you would like to record all of your PEX purchases against a single contact.
* **Use this `` as the transaction contact: ``**. Select a PEX tag for contacts in the second highlighted field below ("Xero contact" in our example).
* Tip: Consider creating a new contact in Xero called 'PEX' if you would like to record all of your PEX purchases against a single contact.
* **Use this `` as the transaction contact: ``**. Select a PEX tag for contacts in the second highlighted field below ("Xero contact" in our example).
 * That tag must be created beforehand following the logic described in the [Create PEX tags for Xero](/administrator-guide/create-pex-tags-for-xero) article.
* This lets a Xero contact be dynamic for each transaction.
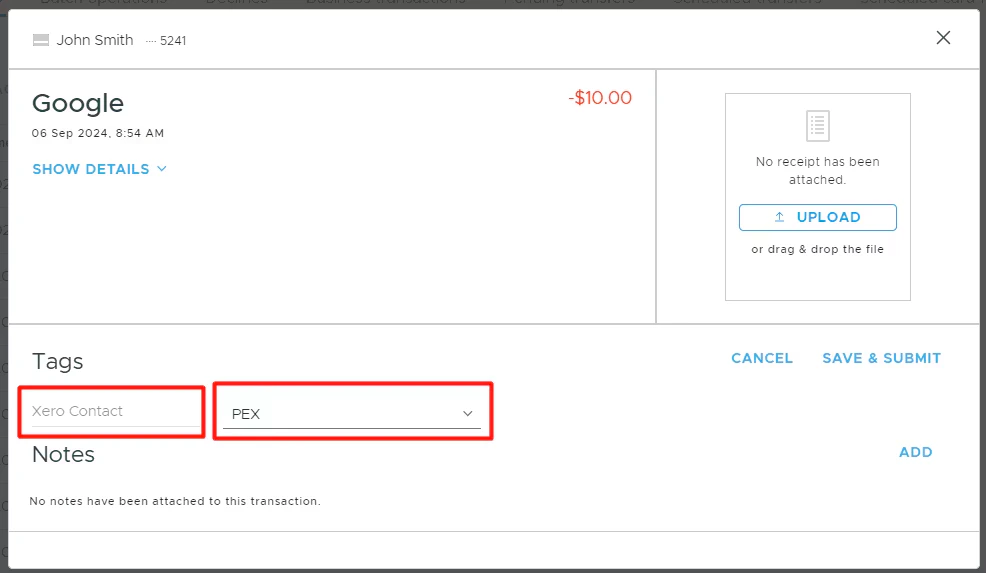
* If you select a PEX tag in the second highlighted field above ("Xero Contact" in our example) then you and your cardholders will be able to select one of the contacts for each purchase transaction.
For that go to the "Transactions" menu -> locate a transaction -> click on it -> select a contact value ("PEX" in our example below) of a tag ("Xero Contact" in our example below) -> click "Save".
* That tag must be created beforehand following the logic described in the [Create PEX tags for Xero](/administrator-guide/create-pex-tags-for-xero) article.
* This lets a Xero contact be dynamic for each transaction.
* If you select a PEX tag in the second highlighted field above ("Xero Contact" in our example) then you and your cardholders will be able to select one of the contacts for each purchase transaction.
For that go to the "Transactions" menu -> locate a transaction -> click on it -> select a contact value ("PEX" in our example below) of a tag ("Xero Contact" in our example below) -> click "Save".
 **Note:**
* You and your cardholders can select one of the tag values for each transaction once you finish the Xero connector setup and sync tag options from Xero to PEX.
* If you go with "**Use this `` as the transaction contact: ``**" then your purchases must be tagged; otherwise, purchases will fail to sync.
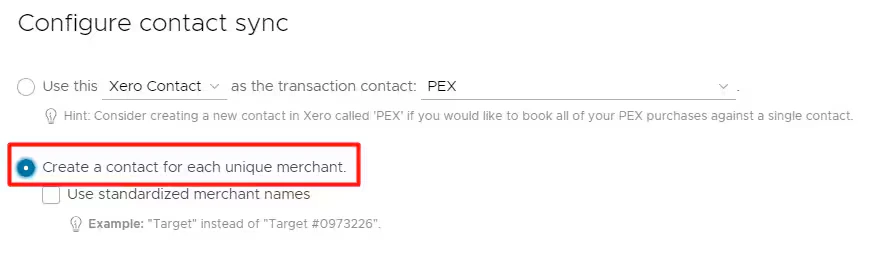
* **Create a Xero contact for each unique merchant**. With this option, PEX will record transactions against corresponding contacts that already exist in your Xero account. If there is no corresponding contact then PEX will auto create a new contact in Xero.
**Note:**
* You and your cardholders can select one of the tag values for each transaction once you finish the Xero connector setup and sync tag options from Xero to PEX.
* If you go with "**Use this `` as the transaction contact: ``**" then your purchases must be tagged; otherwise, purchases will fail to sync.
* **Create a Xero contact for each unique merchant**. With this option, PEX will record transactions against corresponding contacts that already exist in your Xero account. If there is no corresponding contact then PEX will auto create a new contact in Xero.
 * Note that the connector will not create duplicate contacts, but "Walmart23455", "Walmart-brooklyn223" are two unique contacts from the connector's point of view. If you don't want to have "Walmart23455" and "Walmart-brooklyn223" then read below.
## Standardized merchant names
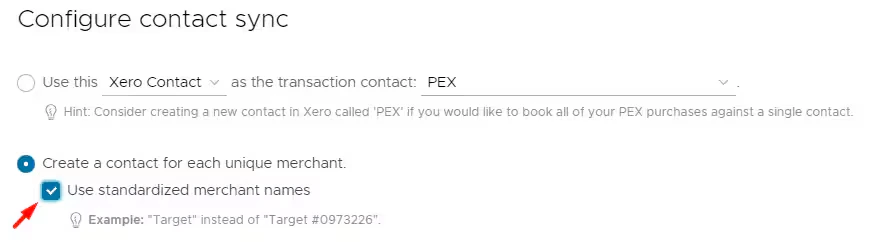
With the "**Create a Xero contact for each unique merchant**" option, you can also synchronize your purchases with standardized merchant names if you check "Use standardized merchant names" checkbox.
* Note that the connector will not create duplicate contacts, but "Walmart23455", "Walmart-brooklyn223" are two unique contacts from the connector's point of view. If you don't want to have "Walmart23455" and "Walmart-brooklyn223" then read below.
## Standardized merchant names
With the "**Create a Xero contact for each unique merchant**" option, you can also synchronize your purchases with standardized merchant names if you check "Use standardized merchant names" checkbox.
 This means that a purchase transaction "Walmart23455" and a purchase transaction "Walmart-brooklyn223" will be recorded in Xero with "Walmart" as a contact instead of "Walmart23455" or "Walmart-brooklyn223".
Click "Next".
## Fee options
Configure options for syncing PEX fees:
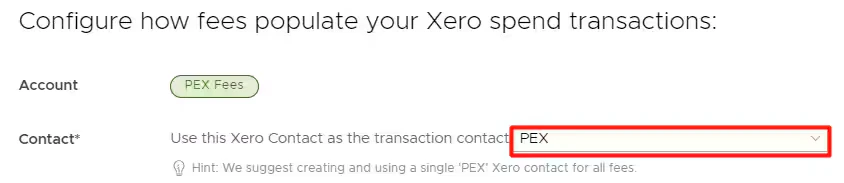
* **Contact**
* You can map a single Xero Contact to use for PEX fees.
This means that a purchase transaction "Walmart23455" and a purchase transaction "Walmart-brooklyn223" will be recorded in Xero with "Walmart" as a contact instead of "Walmart23455" or "Walmart-brooklyn223".
Click "Next".
## Fee options
Configure options for syncing PEX fees:
* **Contact**
* You can map a single Xero Contact to use for PEX fees.
 * **Expense Field Mappings**
* You can map additional fields when syncing PEX fees as Xero transactions. However, you can map to static values **only** because account fees cannot have tags in PEX.
* **Expense Field Mappings**
* You can map additional fields when syncing PEX fees as Xero transactions. However, you can map to static values **only** because account fees cannot have tags in PEX.
 ## Rebates options
Configure options for syncing PEX rebates:
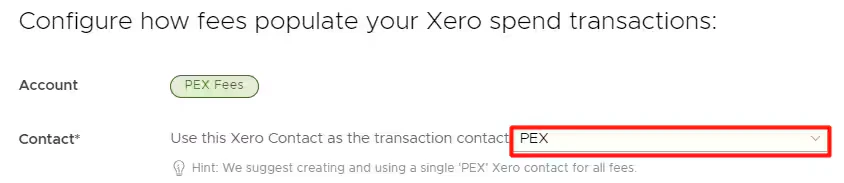
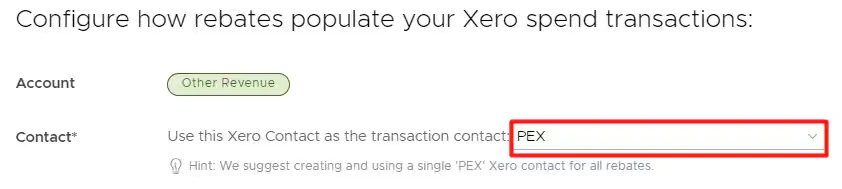
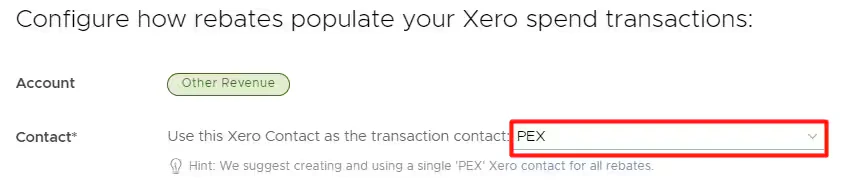
* **Contact**
* You can map a single Xero Contact to use for PEX rebates.
## Rebates options
Configure options for syncing PEX rebates:
* **Contact**
* You can map a single Xero Contact to use for PEX rebates.
 * **Expense Field Mappings**
* You can map additional fields when syncing PEX rebates as Xero transactions. However, you can map to static values **only** because rebates cannot have tags in PEX.
* **Expense Field Mappings**
* You can map additional fields when syncing PEX rebates as Xero transactions. However, you can map to static values **only** because rebates cannot have tags in PEX.
 ## Manage Connector
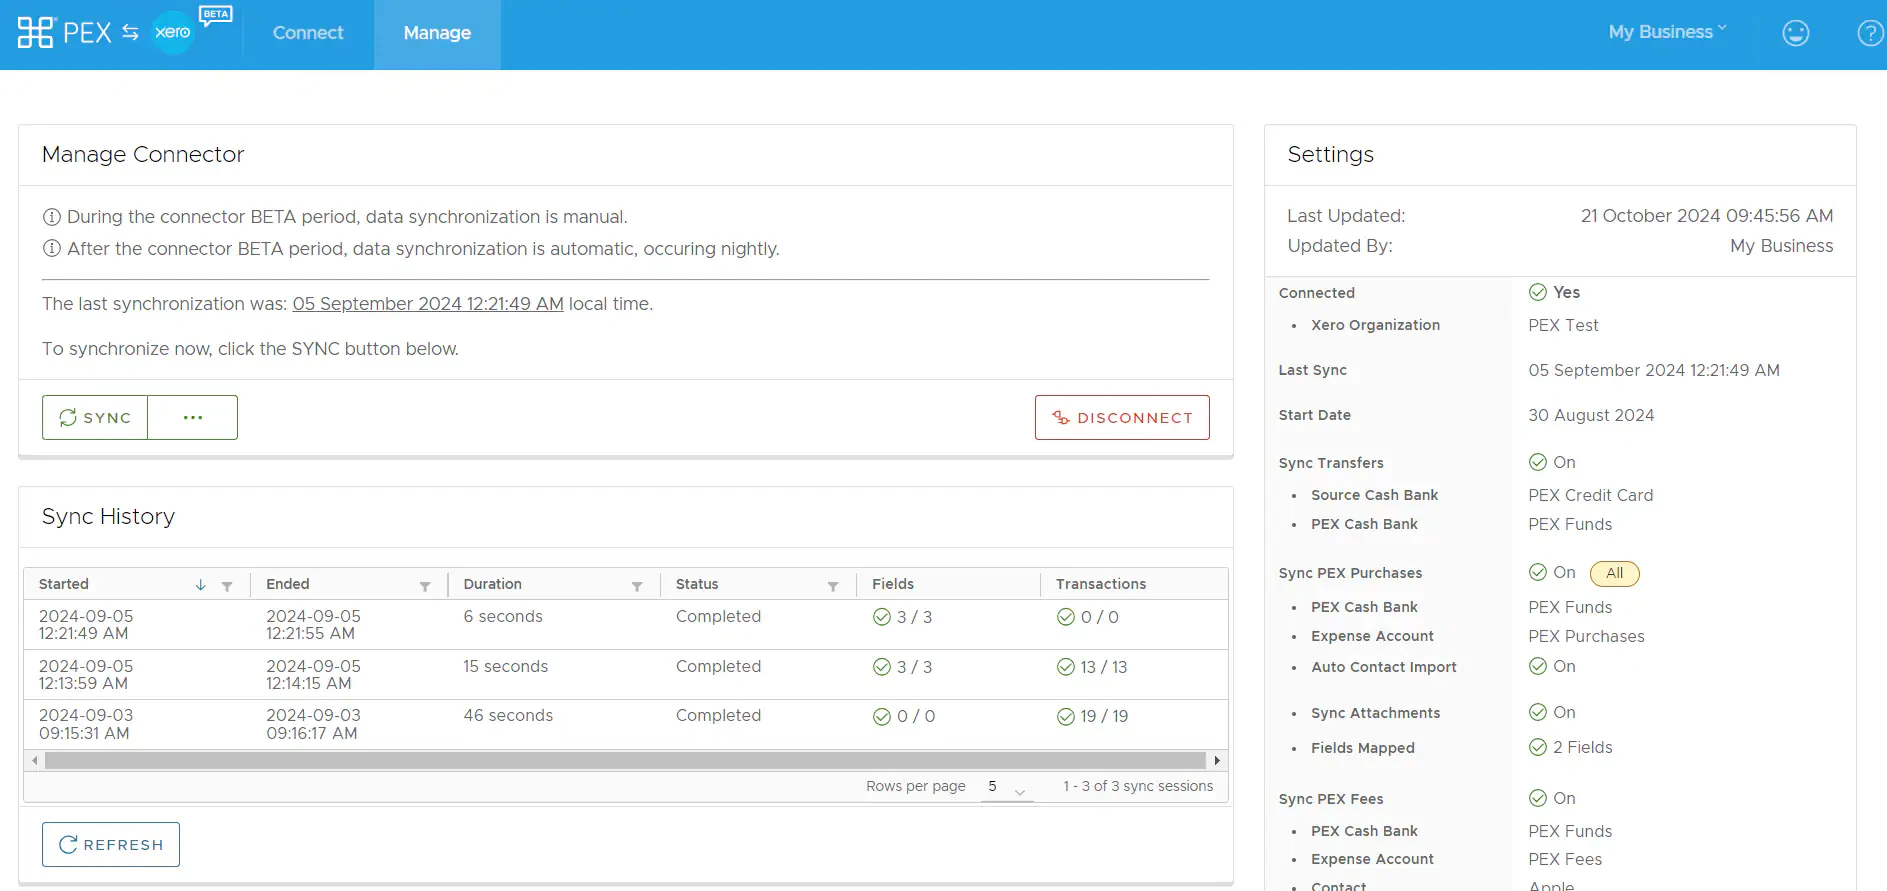
 On the "Manage" tab you can:
View/Edit configuration setting.
View/Refresh Sync history.
Trigger Sync manually:
* From PEX to Xero (transactions)
* From Xero to PEX (tag option values)
Disconnect from your Xero account.
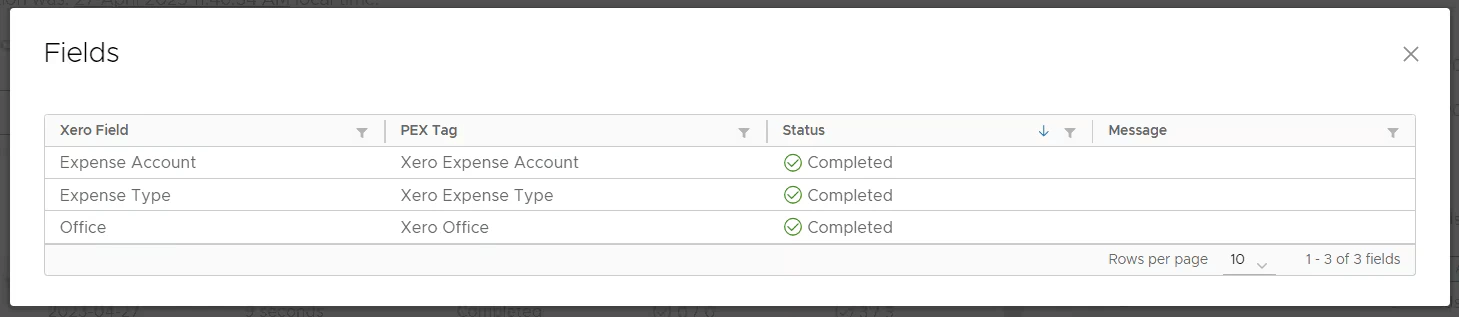
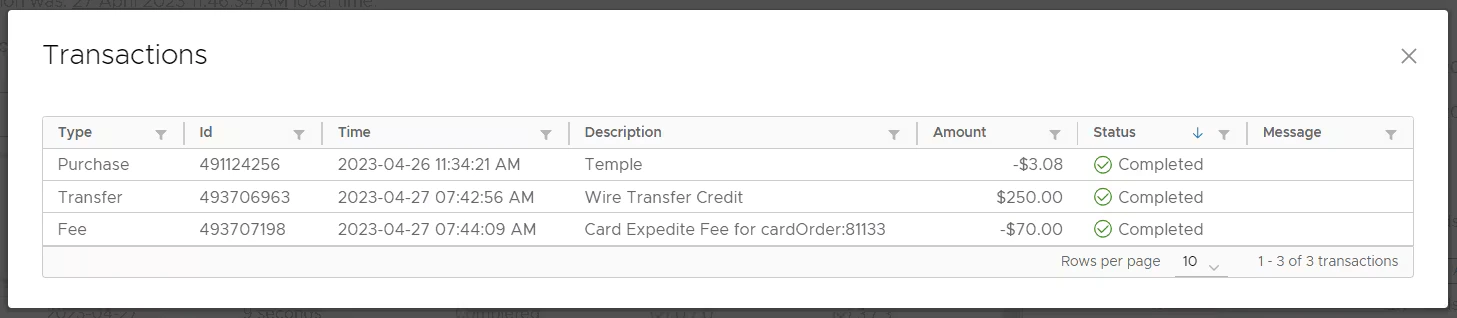
Clicking on the Fields or Transactions count in the Sync History grid will open a modal with further details of the synced/failed data.
On the "Manage" tab you can:
View/Edit configuration setting.
View/Refresh Sync history.
Trigger Sync manually:
* From PEX to Xero (transactions)
* From Xero to PEX (tag option values)
Disconnect from your Xero account.
Clicking on the Fields or Transactions count in the Sync History grid will open a modal with further details of the synced/failed data.
 ## Auto Tagger
The Auto Tagger app is a great compliment to Xero. It allows you to create rules that auto-tag purchases. [Learn more.](/administrator-guide/pex-auto-tagger)
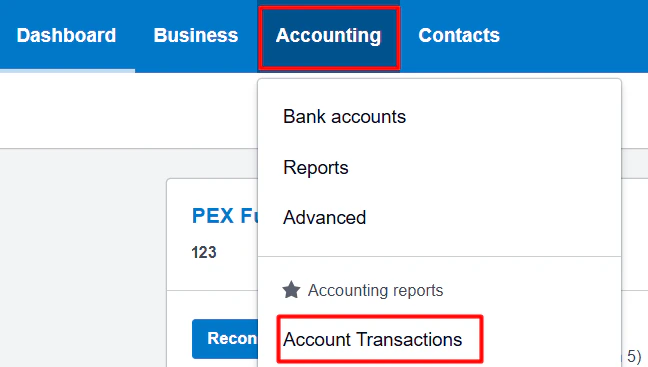
## View Transactions in Xero
Log into Xero account and navigate to *Accounting -> Account Transactions ->*
## Auto Tagger
The Auto Tagger app is a great compliment to Xero. It allows you to create rules that auto-tag purchases. [Learn more.](/administrator-guide/pex-auto-tagger)
## View Transactions in Xero
Log into Xero account and navigate to *Accounting -> Account Transactions ->*
 *-> Select accounts -> Click Update* to view synced transactions.
 ## FAQ
You need to add tracking categories before they appear on the "Xero Sync Options" step:
Go to your Xero account.
Click on the "**Accounting**" tab.
Select "**Tracking categories**".
Click "**+Add Tracking category**".
* Add a tracking category for Expense Type and Office.
**Note:**
Note that a maximum of four categories in total (including no more than 2 active categories) can exist at any one time and you cannot add a new tracking category until an existing one has been archived or deleted.
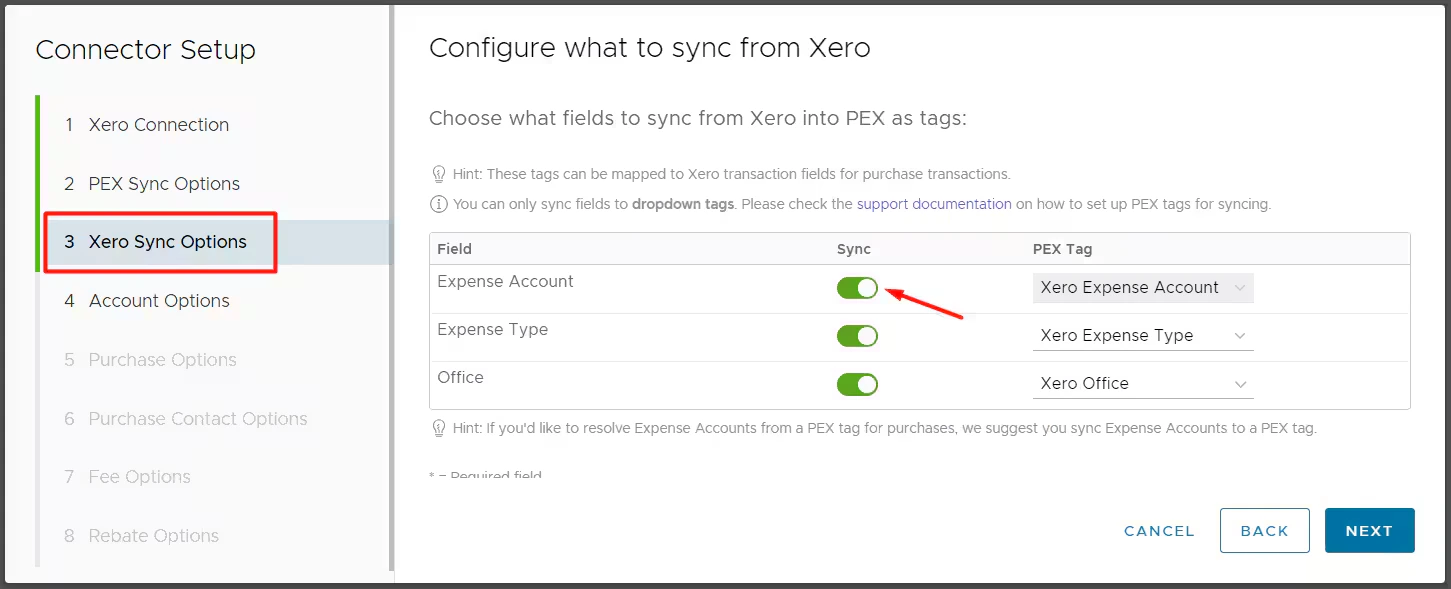
We strongly recommend using automatic sync of tag options from Xero to PEX. This will keep your PEX tags and Xero fields in sync. For more information, check out the support article [Create PEX tags for Xero](/administrator-guide/create-pex-tags-for-xero) to add tags and test tag options.
Once added, enable "Sync" for fields on the "Xero Sync Options" step (as shown in the example below).
## FAQ
You need to add tracking categories before they appear on the "Xero Sync Options" step:
Go to your Xero account.
Click on the "**Accounting**" tab.
Select "**Tracking categories**".
Click "**+Add Tracking category**".
* Add a tracking category for Expense Type and Office.
**Note:**
Note that a maximum of four categories in total (including no more than 2 active categories) can exist at any one time and you cannot add a new tracking category until an existing one has been archived or deleted.
We strongly recommend using automatic sync of tag options from Xero to PEX. This will keep your PEX tags and Xero fields in sync. For more information, check out the support article [Create PEX tags for Xero](/administrator-guide/create-pex-tags-for-xero) to add tags and test tag options.
Once added, enable "Sync" for fields on the "Xero Sync Options" step (as shown in the example below).
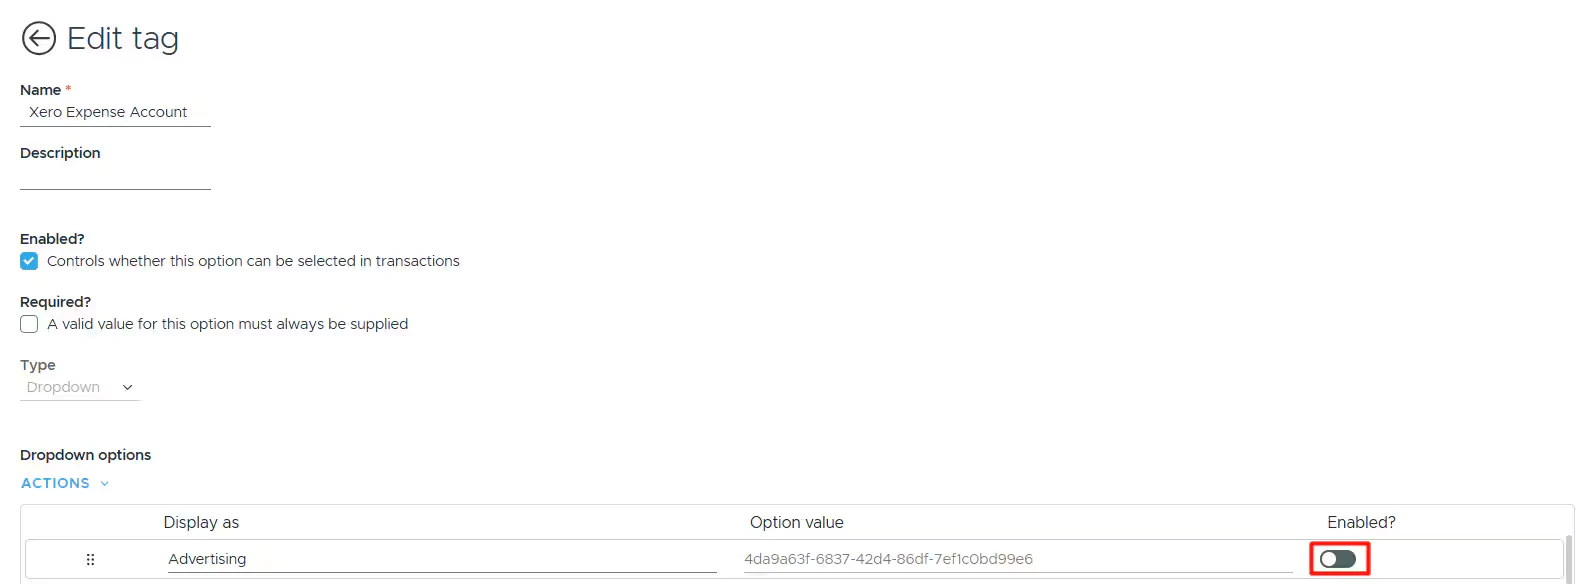
 The deleted or archived account's tag option will be disabled in Tag Manager after the next sync of tag options from Xero to PEX.
 **Note:**
Note that if you restore the archived account in Xero, its tag option will not automatically re-enable in Tag Manager; you will need to enable it manually.
Every synced transaction has a "Synced with Xero" note. As long as you don't remove the "Synced with Xero" note on a transaction, it will not re-sync to your Xero account.
Yes. PEX Auto Tagger offers a solution. It allows you to create rules that auto-tag purchases. [Learn more.](/administrator-guide/pex-auto-tagger)
No. Only transactions in settled status get synced to your account. If you see a "Pending" label next to the merchant name as shown on the screen below, then the transaction is still in the pending status.
**Note:**
Note that if you restore the archived account in Xero, its tag option will not automatically re-enable in Tag Manager; you will need to enable it manually.
Every synced transaction has a "Synced with Xero" note. As long as you don't remove the "Synced with Xero" note on a transaction, it will not re-sync to your Xero account.
Yes. PEX Auto Tagger offers a solution. It allows you to create rules that auto-tag purchases. [Learn more.](/administrator-guide/pex-auto-tagger)
No. Only transactions in settled status get synced to your account. If you see a "Pending" label next to the merchant name as shown on the screen below, then the transaction is still in the pending status.
 Didn't find the answer you were looking for? Check out our [Accounting Software Connector Troubleshooting](/administrator-guide/accounting-software-connector-troubleshooting) article.
## Support & Inquiries
For questions related to your connector, please email [appsupport+xero@pexcard.com](mailto:appsupport+xero@pexcard.com)
Didn't find the answer you were looking for? Check out our [Accounting Software Connector Troubleshooting](/administrator-guide/accounting-software-connector-troubleshooting) article.
## Support & Inquiries
For questions related to your connector, please email [appsupport+xero@pexcard.com](mailto:appsupport+xero@pexcard.com)