> ## Documentation Index
> Fetch the complete documentation index at: https://support.pexcard.com/llms.txt
> Use this file to discover all available pages before exploring further.
# PEX Connector for Zoho Expense
> Auto-sync purchases, transfers, fees and receipt images from PEX into Zoho Expense, ensuring your data is clean, accurate and up to date. Map Zoho Expense fields such as Expense Account and Customer to PEX tags.
## Connect PEX and Zoho Expense
To connect your PEX and your Zoho Expense accounts from the PEX Marketplace follow these steps:
Log in to [http://dashboard.pexcard.com/](http://dashboard.pexcard.com/?utm_source=support)
Navigate to [Apps > Available](https://dashboard.pexcard.com/apps/available?utm_source=support)
Locate **Connector for Zoho Expense**.
Click **More info** > **Install** > **Launch**.
* You'll be re-directed to a **Connect** tab.
**Note:**
To install the connector, you need to enable the following permissions: *Edit business settings & apps*, *Manage cardholder*, *View card transactions*. You can enable them in [My Profile -> Permissions](https://dashboard.pexcard.com/account/permissions?utm_source=support).
Click **Connect to Zoho Expense**.
 You will be redirected to the Zoho Expense Sign in page.
* Enter email or mobile number.
* Enter password.
* Enter OTP.
* Click **Verify**.
* Click **Accept**.
## Configure Settings
To configure settings:
Choose your Zoho Expense organization to connect with your PEX account.
You will be redirected to the Zoho Expense Sign in page.
* Enter email or mobile number.
* Enter password.
* Enter OTP.
* Click **Verify**.
* Click **Accept**.
## Configure Settings
To configure settings:
Choose your Zoho Expense organization to connect with your PEX account.
 Click **Next**.
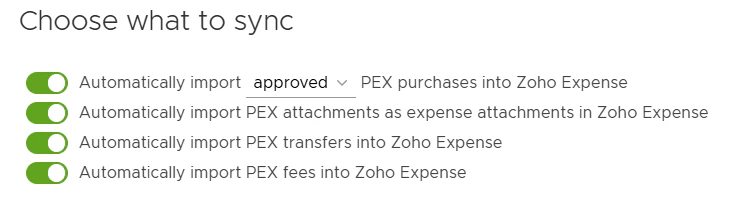
Choose what transactions you would like to sync:
* **Automatically import PEX purchases into Zoho Expense**.
* Enable this option to import PEX purchases as expenses.
* You can choose to sync all PEX transactions (regardless of approval status) or just approved (recommended).
* PEX purchases must have an Expense Account PEX Tag in order to sync. For details on transaction review, please see our article [How to Review Transactions](/administrator-guide/how-to-review-transactions-with-receipts-tags-and-user-notes).
* **Automatically import PEX attachments as expense attachments in Zoho Expense**.
* Enable this option to import PEX receipts as expense attachments.
* This option is available only if the "Automatically import PEX purchases into Zoho Expense" toggle is **enabled**.
* **Automatically import PEX transfers into Zoho Expense**.
* Enable this option to import PEX transfers.
* A example of a transfer would be an ACH/wire transfer from your business checking account to your PEX business account.
* **Automatically import PEX fees into Zoho Expense**.
* Enable this option to import PEX fees.
* Examples of a PEX Fee include an ISA fee for international use or priority shipping fees.
Click **Next**.
Choose what transactions you would like to sync:
* **Automatically import PEX purchases into Zoho Expense**.
* Enable this option to import PEX purchases as expenses.
* You can choose to sync all PEX transactions (regardless of approval status) or just approved (recommended).
* PEX purchases must have an Expense Account PEX Tag in order to sync. For details on transaction review, please see our article [How to Review Transactions](/administrator-guide/how-to-review-transactions-with-receipts-tags-and-user-notes).
* **Automatically import PEX attachments as expense attachments in Zoho Expense**.
* Enable this option to import PEX receipts as expense attachments.
* This option is available only if the "Automatically import PEX purchases into Zoho Expense" toggle is **enabled**.
* **Automatically import PEX transfers into Zoho Expense**.
* Enable this option to import PEX transfers.
* A example of a transfer would be an ACH/wire transfer from your business checking account to your PEX business account.
* **Automatically import PEX fees into Zoho Expense**.
* Enable this option to import PEX fees.
* Examples of a PEX Fee include an ISA fee for international use or priority shipping fees.
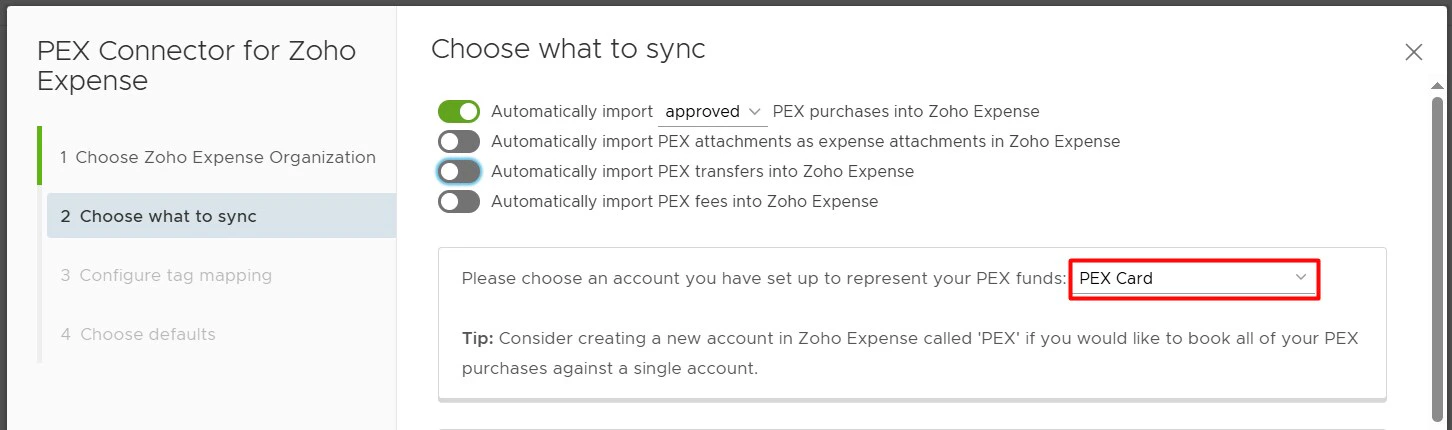
 **Choose an account you have set up in Zoho Expense to represent your PEX funds**.
* Transfers that sync to Zoho Expense will debit the selected account.
* Purchases that sync to Zoho Expense will credit this account.
* Fees that sync to Zoho Expense will credit this account (both business account fees and ISA fees).
**Choose an account you have set up in Zoho Expense to represent your PEX funds**.
* Transfers that sync to Zoho Expense will debit the selected account.
* Purchases that sync to Zoho Expense will credit this account.
* Fees that sync to Zoho Expense will credit this account (both business account fees and ISA fees).
 **Create a merchant for each unique PEX merchant**.
* If you **enable** this option, PEX will book purchases against corresponding merchants that already exist in your Zoho Expense account. If there is no corresponding merchant then PEX will auto create a new merchant in Zoho Expense.
* Note that the connector will not create duplicate merchants, but "Walmart23455", "Walmart-brooklyn223" are two unique merchants from the connector's point of view.
* If you **disable** this option, all PEX purchases will be booked against a single merchant selected from the drop down list.
* Tip: Consider creating a new merchant in Zoho Expense called "PEX" if you would like to book all of your PEX purchases against a single merchant.
**Create a merchant for each unique PEX merchant**.
* If you **enable** this option, PEX will book purchases against corresponding merchants that already exist in your Zoho Expense account. If there is no corresponding merchant then PEX will auto create a new merchant in Zoho Expense.
* Note that the connector will not create duplicate merchants, but "Walmart23455", "Walmart-brooklyn223" are two unique merchants from the connector's point of view.
* If you **disable** this option, all PEX purchases will be booked against a single merchant selected from the drop down list.
* Tip: Consider creating a new merchant in Zoho Expense called "PEX" if you would like to book all of your PEX purchases against a single merchant.
 **Specify a start date for the sync**.
* Transactions on and after this date will sync.
* The start date must be less than 1 year in the past.
Click **Next**.
## Configure Tag Mapping
*Transaction tags are available with* [*selected plans*](https://www.pexcard.com/pricing?utm_source=support)*. For more information about tags, please see* [*How to Setup and Create Tags with Tag Manager*](/administrator-guide/how-to-setup-and-create-tags-with-tag-manager)*. Customers without tags will be asked to choose a default category for all purchases.*
You can map a Zoho Expense field "Expense Account" to a PEX tag. That tag must be created beforehand, following the logic described in the [Create PEX tags for Zoho Expense](/administrator-guide/create-pex-tags-for-quickbooks-online) article.
**Specify a start date for the sync**.
* Transactions on and after this date will sync.
* The start date must be less than 1 year in the past.
Click **Next**.
## Configure Tag Mapping
*Transaction tags are available with* [*selected plans*](https://www.pexcard.com/pricing?utm_source=support)*. For more information about tags, please see* [*How to Setup and Create Tags with Tag Manager*](/administrator-guide/how-to-setup-and-create-tags-with-tag-manager)*. Customers without tags will be asked to choose a default category for all purchases.*
You can map a Zoho Expense field "Expense Account" to a PEX tag. That tag must be created beforehand, following the logic described in the [Create PEX tags for Zoho Expense](/administrator-guide/create-pex-tags-for-quickbooks-online) article.
 Make sure to enable the "Sync Tag Options from Zoho Expense" toggle. This will pull your expense accounts from Zoho Expense into PEX as tag option values.
 The mapping and auto sync allows you and your cardholders to select a tag value for each purchase.
For that go to the "Transactions" menu -> locate a transaction -> click on it -> select a tag value ("Advertising" in our example below) of the "Zoho Expense Account" tag -> click "Save". Note that you and your cardholders can select one of the tag values for each purchase once you finish the Zoho Expense connector setup and sync tag options from Zoho Expense to PEX.
The mapping and auto sync allows you and your cardholders to select a tag value for each purchase.
For that go to the "Transactions" menu -> locate a transaction -> click on it -> select a tag value ("Advertising" in our example below) of the "Zoho Expense Account" tag -> click "Save". Note that you and your cardholders can select one of the tag values for each purchase once you finish the Zoho Expense connector setup and sync tag options from Zoho Expense to PEX.
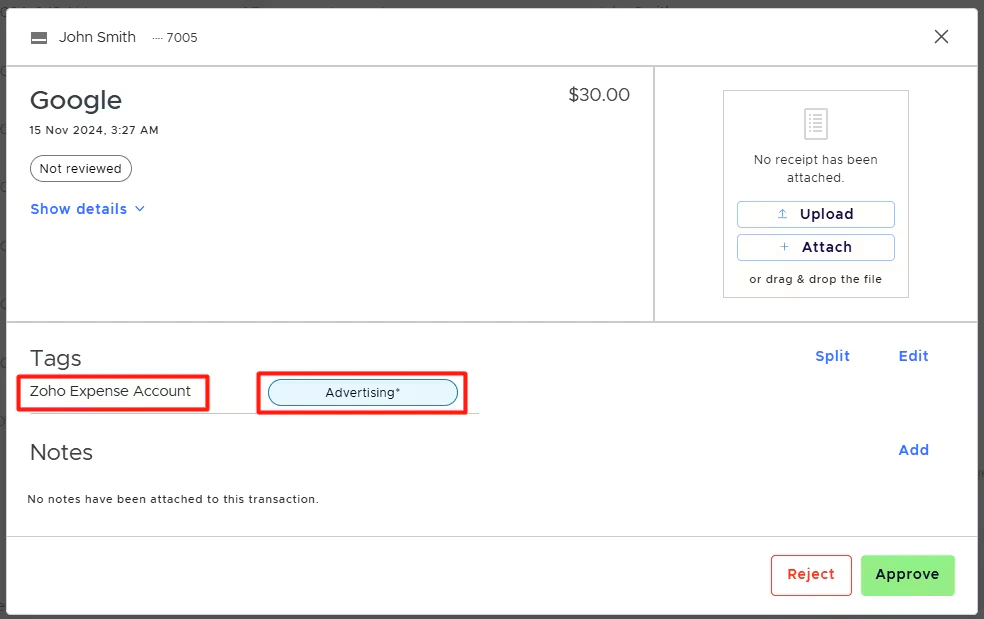 The purchase will debit the expense category that it is tagged with ("Advertising" in our example above).
If you use a Customer field in Zoho Expense, map it to a PEX tag. That PEX tag must be created beforehand, following the logic described in the [Create PEX tags for Zoho Expense](/administrator-guide/create-pex-tags-for-quickbooks-online) article.
* Make sure to enable the "Sync" toggle. This will pull your Customers from Zoho Expense into PEX as tag option values.
The purchase will debit the expense category that it is tagged with ("Advertising" in our example above).
If you use a Customer field in Zoho Expense, map it to a PEX tag. That PEX tag must be created beforehand, following the logic described in the [Create PEX tags for Zoho Expense](/administrator-guide/create-pex-tags-for-quickbooks-online) article.
* Make sure to enable the "Sync" toggle. This will pull your Customers from Zoho Expense into PEX as tag option values.
 Click **Next**.
## Choose Defaults
**Purchases**:
* You can select a default expense account and customer for your purchases. Only untagged purchases will default to the expense account and customer selected here.
* Note: It’s recommended to tag purchase transactions before syncing to Zoho Expense. Untagged transactions will sync to the selected default expense account and customer.
Click **Next**.
## Choose Defaults
**Purchases**:
* You can select a default expense account and customer for your purchases. Only untagged purchases will default to the expense account and customer selected here.
* Note: It’s recommended to tag purchase transactions before syncing to Zoho Expense. Untagged transactions will sync to the selected default expense account and customer.
 **Transfers**:
* Choose an asset account from which funds will be taken to use when syncing transfers into Zoho Expense (e.g., Checking).
* Choose an expense account to which funds will be allocated when syncing transfers into Zoho Expense (e.g., General).
The transfer example flow might be this: Checking -> General -> PEX Card (account selected to represent your PEX funds).
**Transfers**:
* Choose an asset account from which funds will be taken to use when syncing transfers into Zoho Expense (e.g., Checking).
* Choose an expense account to which funds will be allocated when syncing transfers into Zoho Expense (e.g., General).
The transfer example flow might be this: Checking -> General -> PEX Card (account selected to represent your PEX funds).
 * Choose a customer that will be applied for all your transfers syncing to Zoho Expense.
* Choose a merchant that will be applied for all your transfers syncing to Zoho Expense.
**Fees**:
* Choose an expense account that all your fees syncing to Zoho Expense will debit.
* Choose a customer that will be applied for all your fees syncing to Zoho Expense.
* Choose a merchant that will be applied for all your fees syncing to Zoho Expense.
## Start syncing
Navigate to the History tab and click the "Sync now" button to initiate the sync between PEX and Zoho Expense.
* Choose a customer that will be applied for all your transfers syncing to Zoho Expense.
* Choose a merchant that will be applied for all your transfers syncing to Zoho Expense.
**Fees**:
* Choose an expense account that all your fees syncing to Zoho Expense will debit.
* Choose a customer that will be applied for all your fees syncing to Zoho Expense.
* Choose a merchant that will be applied for all your fees syncing to Zoho Expense.
## Start syncing
Navigate to the History tab and click the "Sync now" button to initiate the sync between PEX and Zoho Expense.
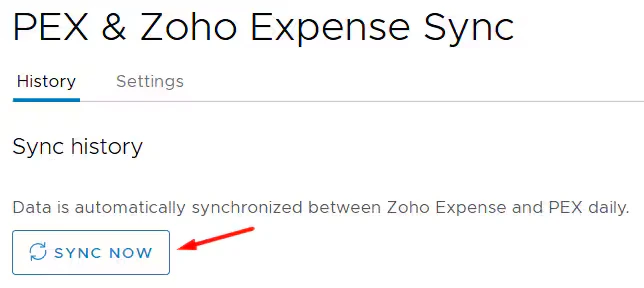 Manual sync will process transactions based on the start date specified on the **Choose what to sync** step, with a limit of 1 year back from today. If there is no start date specified on the **Choose what to sync** step then manual sync will process transactions only up to 2 months back from today.
 Auto-sync is enabled by default. With auto-sync enabled, transactions and tag option values sync automatically every 24 hours.
Auto-sync will always process transactions based on the start date specified on the **Choose what to sync** step, with a maximum limit of 2 months back from today. If there is no start date specified on the **Choose what to sync** step then auto-sync will sync transactions up to 2 months back from today.
Each sync also imports tag option values from Zoho Expense to PEX if the "Sync" toggle is enabled.
Auto-sync is enabled by default. With auto-sync enabled, transactions and tag option values sync automatically every 24 hours.
Auto-sync will always process transactions based on the start date specified on the **Choose what to sync** step, with a maximum limit of 2 months back from today. If there is no start date specified on the **Choose what to sync** step then auto-sync will sync transactions up to 2 months back from today.
Each sync also imports tag option values from Zoho Expense to PEX if the "Sync" toggle is enabled.

 Once transactions are synced to Zoho Expense, you can view their history in the Sync History table and view the synced transactions in your Zoho Expense account.
## Auto Tagger
The Auto Tagger app is a great complement to Zoho Expense. It allows you to create rules that auto-tag purchases. [Learn more.](/administrator-guide/pex-auto-tagger)
## Manage Connector
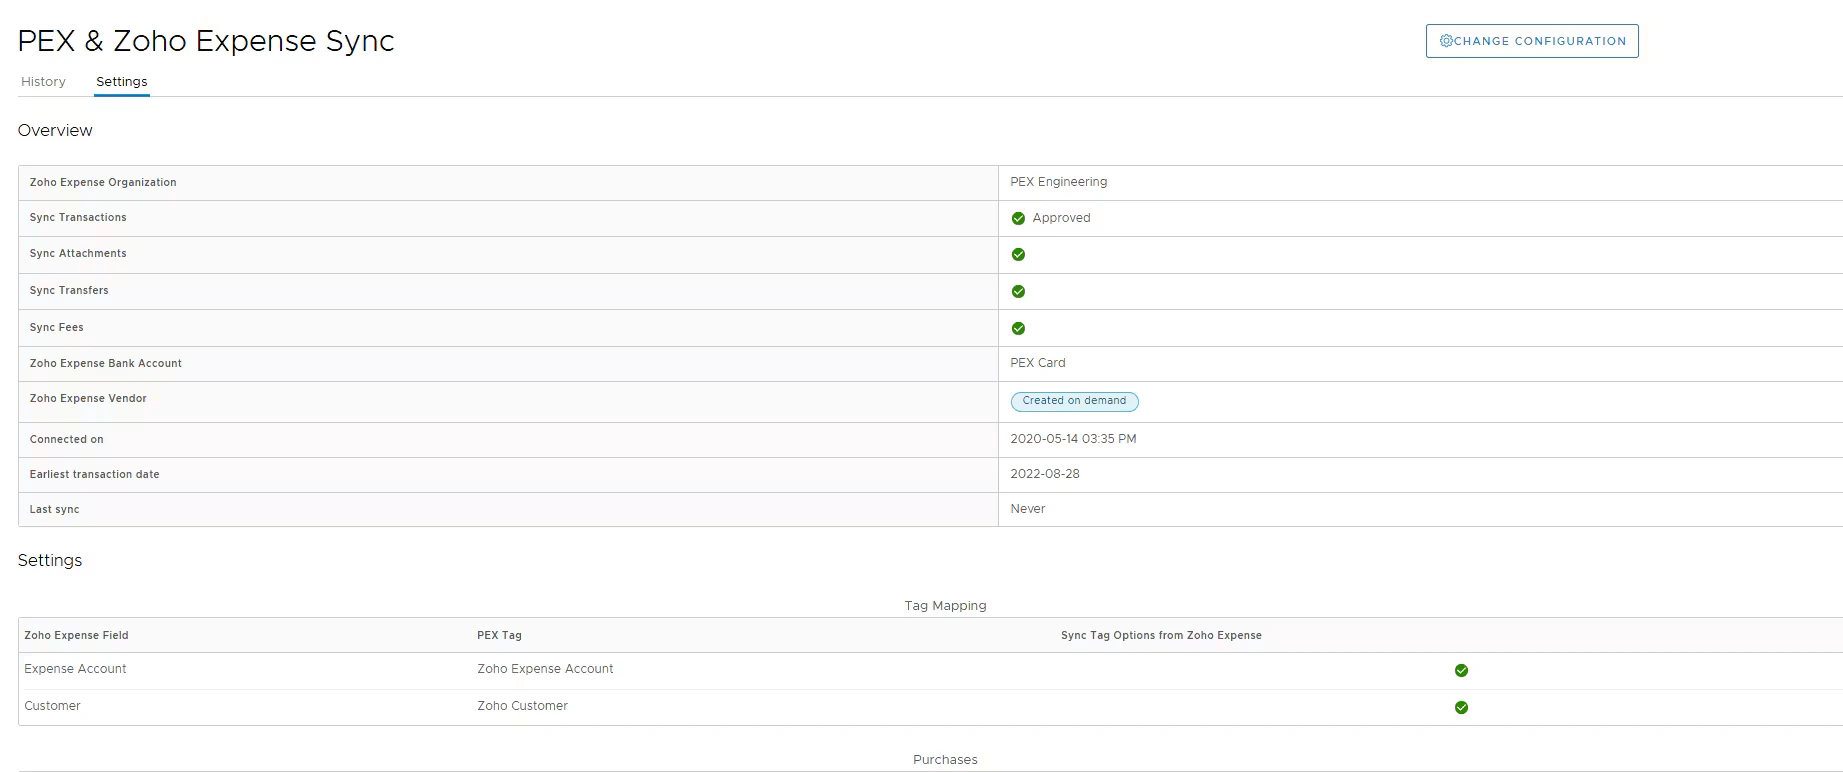
On the Settings tab you can:
* View/Edit configuration settings.
* View/Edit tag mapping.
* Disconnect from your Zoho Expense account.
Once transactions are synced to Zoho Expense, you can view their history in the Sync History table and view the synced transactions in your Zoho Expense account.
## Auto Tagger
The Auto Tagger app is a great complement to Zoho Expense. It allows you to create rules that auto-tag purchases. [Learn more.](/administrator-guide/pex-auto-tagger)
## Manage Connector
On the Settings tab you can:
* View/Edit configuration settings.
* View/Edit tag mapping.
* Disconnect from your Zoho Expense account.
 ## Support
**Didn’t find the answer you were looking for?** Check out our [Accounting Software Connector Troubleshooting](/administrator-guide/accounting-software-connector-troubleshooting) article.
For any questions related to your connector, please email [appsupport+zohoexpense@pexcard.com](mailto:appsupport+zohoexpense@pexcard.com)
## Support
**Didn’t find the answer you were looking for?** Check out our [Accounting Software Connector Troubleshooting](/administrator-guide/accounting-software-connector-troubleshooting) article.
For any questions related to your connector, please email [appsupport+zohoexpense@pexcard.com](mailto:appsupport+zohoexpense@pexcard.com)