> ## Documentation Index
> Fetch the complete documentation index at: https://support.pexcard.com/llms.txt
> Use this file to discover all available pages before exploring further.
# PEX Exporter for Microsoft Dynamics Great Plains (Prepaid)
> Convert PEX transactions into a Microsoft Dynamics Business Central compatible format for faster expense reporting within your accounting system. This application is for mid-sized businesses who use Microsoft Dynamics Business Central for accounting.
**Coming soon:** Integrate with Microsoft Dynamics. Learn more [here](https://forms.gle/qqH3vwn6W4gDrCmy7).
## Accessing the app
Log on to your PEX account on [dashboard.pexcard.com](http://dashboard.pexcard.com/?utm_source=support).
Navigate to the **Apps** section in the left-hand side menu.
Click **Available** at the top.
Find the **PEX Exporter for Microsoft Dynamics** app.
Click **More info** at the bottom of the app tile.
Click **Install** at the bottom to install the app.
Once installed, click **Launch** to open the app.
**Note:**
1. You do not need to download any file to install an app. The exporter is web-based.
2. In order to see the application, you need to be an Admin with *ViewCardUsage* and *Edit Business Profile* permissions.
## Configuration
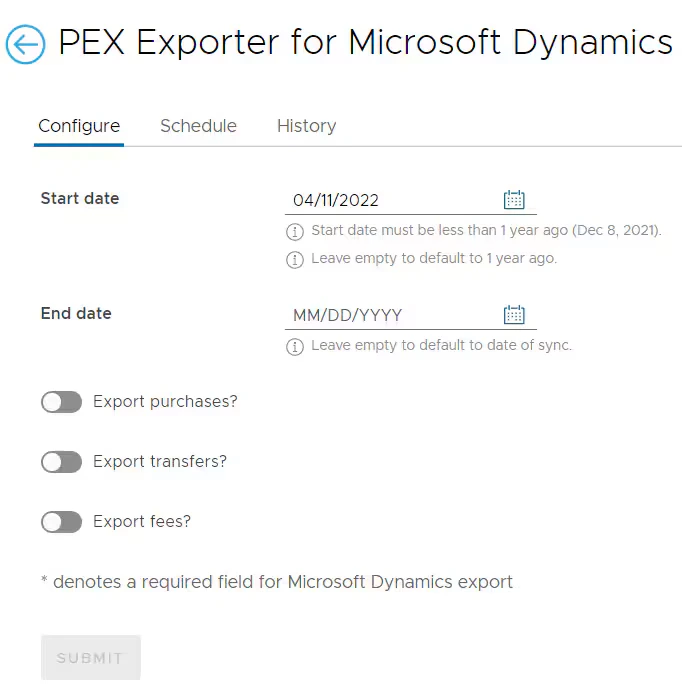
Select the earliest transaction date. The exporter will pick transactions that are settled on and after this date.
There are three settings corresponding to three types of transactions on the PEX platform:
* **Sync Purchases** includes your PEX card purchases made at the merchant.
* **Sync Transfers** includes PEX account funding/defunding transactions.
* **Sync Fees** includes PEX account fees if any.
Enable the desired type of transaction(s) and set up the configuration for each type of transaction. Once the app has launched, you will be directed to set up the app.
 ## Configure purchase, transfer, and fee transactions
You are presented with the option to sync Purchases, Transfers, and/or Fees. Start with **Purchases**. Turn the toggle **ON** for Sync Purchases and select whether you want to export **all** or only **approved** transactions.
The table represents the configuration for each column in the file:
* **Enabled.** This option controls whether the corresponding Target field is included in the file. If turned **OFF**, the Target field is excluded; if **ON**, it is included. All required fields denoted with an asterisk (`*`) are enabled by default.
* **Target field.** These are the names of the columns in the file.
* **Source.** Select which data is populated in the Target field. The source can be:
* **Transaction** — data from the transaction is used (e.g. amount and date may be mapped from the transaction).
* **Text** — the target field is populated with the text you enter in the source column.
* **Tag** — the target field is populated from a tag value. Tags are based on your business's active PEX tags. To manage tags, go to **Business settings** > **Tag manager**.
* **Source value.** Depending on the selected Source, you can select or enter the source value.
**Note:**
All options included as a default can be updated based on your preferences.
## Configure purchase, transfer, and fee transactions
You are presented with the option to sync Purchases, Transfers, and/or Fees. Start with **Purchases**. Turn the toggle **ON** for Sync Purchases and select whether you want to export **all** or only **approved** transactions.
The table represents the configuration for each column in the file:
* **Enabled.** This option controls whether the corresponding Target field is included in the file. If turned **OFF**, the Target field is excluded; if **ON**, it is included. All required fields denoted with an asterisk (`*`) are enabled by default.
* **Target field.** These are the names of the columns in the file.
* **Source.** Select which data is populated in the Target field. The source can be:
* **Transaction** — data from the transaction is used (e.g. amount and date may be mapped from the transaction).
* **Text** — the target field is populated with the text you enter in the source column.
* **Tag** — the target field is populated from a tag value. Tags are based on your business's active PEX tags. To manage tags, go to **Business settings** > **Tag manager**.
* **Source value.** Depending on the selected Source, you can select or enter the source value.
**Note:**
All options included as a default can be updated based on your preferences.
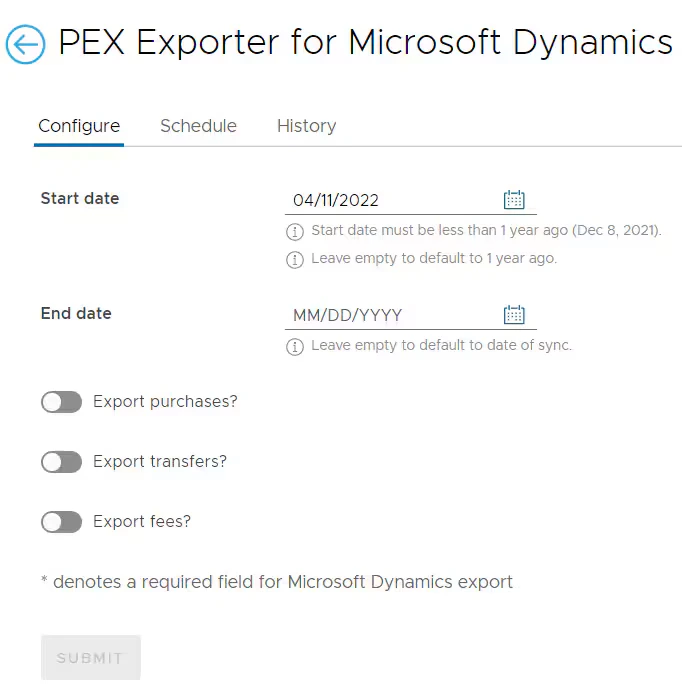 Repeat the setup in the same way for **Transfers** and **Fees**. Once all required fields are populated, click **Submit**.
**Note:**
1. When configuring transfers, *Account No.* is the bank account your business uses to fund transactions.
2. When configuring fees, *Account No.* is the bank account from which you pay fees for the PEX platform. Tags selected are based on your business's active PEX tags. To manage tags, go to **Business settings** > **Tag manager**.
## Schedule
You can create a schedule by specifying the **Schedule date** and **Schedule time** when the file will be generated. The schedule can be recurring by turning on the **Repeat** toggle.
Repeat the setup in the same way for **Transfers** and **Fees**. Once all required fields are populated, click **Submit**.
**Note:**
1. When configuring transfers, *Account No.* is the bank account your business uses to fund transactions.
2. When configuring fees, *Account No.* is the bank account from which you pay fees for the PEX platform. Tags selected are based on your business's active PEX tags. To manage tags, go to **Business settings** > **Tag manager**.
## Schedule
You can create a schedule by specifying the **Schedule date** and **Schedule time** when the file will be generated. The schedule can be recurring by turning on the **Repeat** toggle.
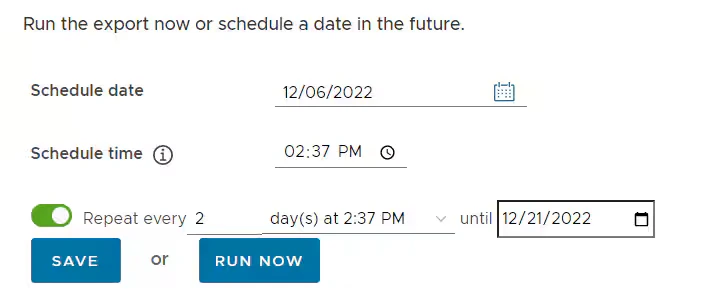 Once the schedule is saved, you will see a list of your saved schedules. Options in the **Action** column let you run ad hoc reports or delete the schedule.
## History
When the export file is run now or on the set schedule, the file is available to download in the **History** section.
The **History** tab lists prior exports, including the date range selected, status, number of transactions found, number eligible, and number exported. The **Action** column includes a download button when the file is ready. For a small date range with few transactions, the download is usually ready in less than a minute. For a large date range, it may take a few minutes—refresh the screen for the latest status.
**Note:**
If you selected *Approved* transactions only on the Configure screen, only approved transactions are shown.
Once the schedule is saved, you will see a list of your saved schedules. Options in the **Action** column let you run ad hoc reports or delete the schedule.
## History
When the export file is run now or on the set schedule, the file is available to download in the **History** section.
The **History** tab lists prior exports, including the date range selected, status, number of transactions found, number eligible, and number exported. The **Action** column includes a download button when the file is ready. For a small date range with few transactions, the download is usually ready in less than a minute. For a large date range, it may take a few minutes—refresh the screen for the latest status.
**Note:**
If you selected *Approved* transactions only on the Configure screen, only approved transactions are shown.
 ## FAQ
The PEX Exporter for Microsoft Dynamics supports .CSV and .XLS.
At this time, split tags are not supported.
Every exported purchase has a "Synced to PEX Connector for Microsoft Dynamics" note. If you remove this note, the purchase will be re-exported.
For any questions, please email [dynamics@pexcard.com](mailto:dynamics@pexcard.com).
## FAQ
The PEX Exporter for Microsoft Dynamics supports .CSV and .XLS.
At this time, split tags are not supported.
Every exported purchase has a "Synced to PEX Connector for Microsoft Dynamics" note. If you remove this note, the purchase will be re-exported.
For any questions, please email [dynamics@pexcard.com](mailto:dynamics@pexcard.com).