> ## Documentation Index
> Fetch the complete documentation index at: https://support.pexcard.com/llms.txt
> Use this file to discover all available pages before exploring further.
# Connecting the PEX MCP Server to an OpenAI ChatGPT agent
> Wire the PEX MCP Server into an OpenAI ChatGPT agent so it can read your PEX account data and call PEX tools on your behalf.
This article shows you how to connect the **PEX MCP Server** to an OpenAI ChatGPT agent. The agent can then read your PEX account data and call PEX tools on your behalf. By the end, it can answer questions like *"what is my business profile?"* or *"list all my PEX cards"* from live PEX data.
**Heads up — Beta feature.**
Authorized apps and the PEX MCP Server are currently labeled **Beta** in the PEX dashboard. Behavior and field names may change.
**About the screenshots.** The example uses a placeholder account. Your screen will show your own organization, agent name, and account data in the same positions.
***
## What you will need before you start
* **An admin account** in the PEX dashboard: `https://dashboard.pexcard.com`.
* **Two-factor authentication (MFA) enabled** on your PEX account. Token generation requires MFA. Turn it on under **Profile** > **Two-Factor Authentication** if needed.
* **A ChatGPT Plus, Pro, Team, or Enterprise plan.** Free ChatGPT does not support custom connectors or agents.
* **Developer access within ChatGPT.** Custom MCP connectors require **Developer mode**, found under **Settings** → **Security and login**. On Team and Enterprise plans, your workspace administrator may need to grant this access.
***
## Step 1. Navigate to the Agents page
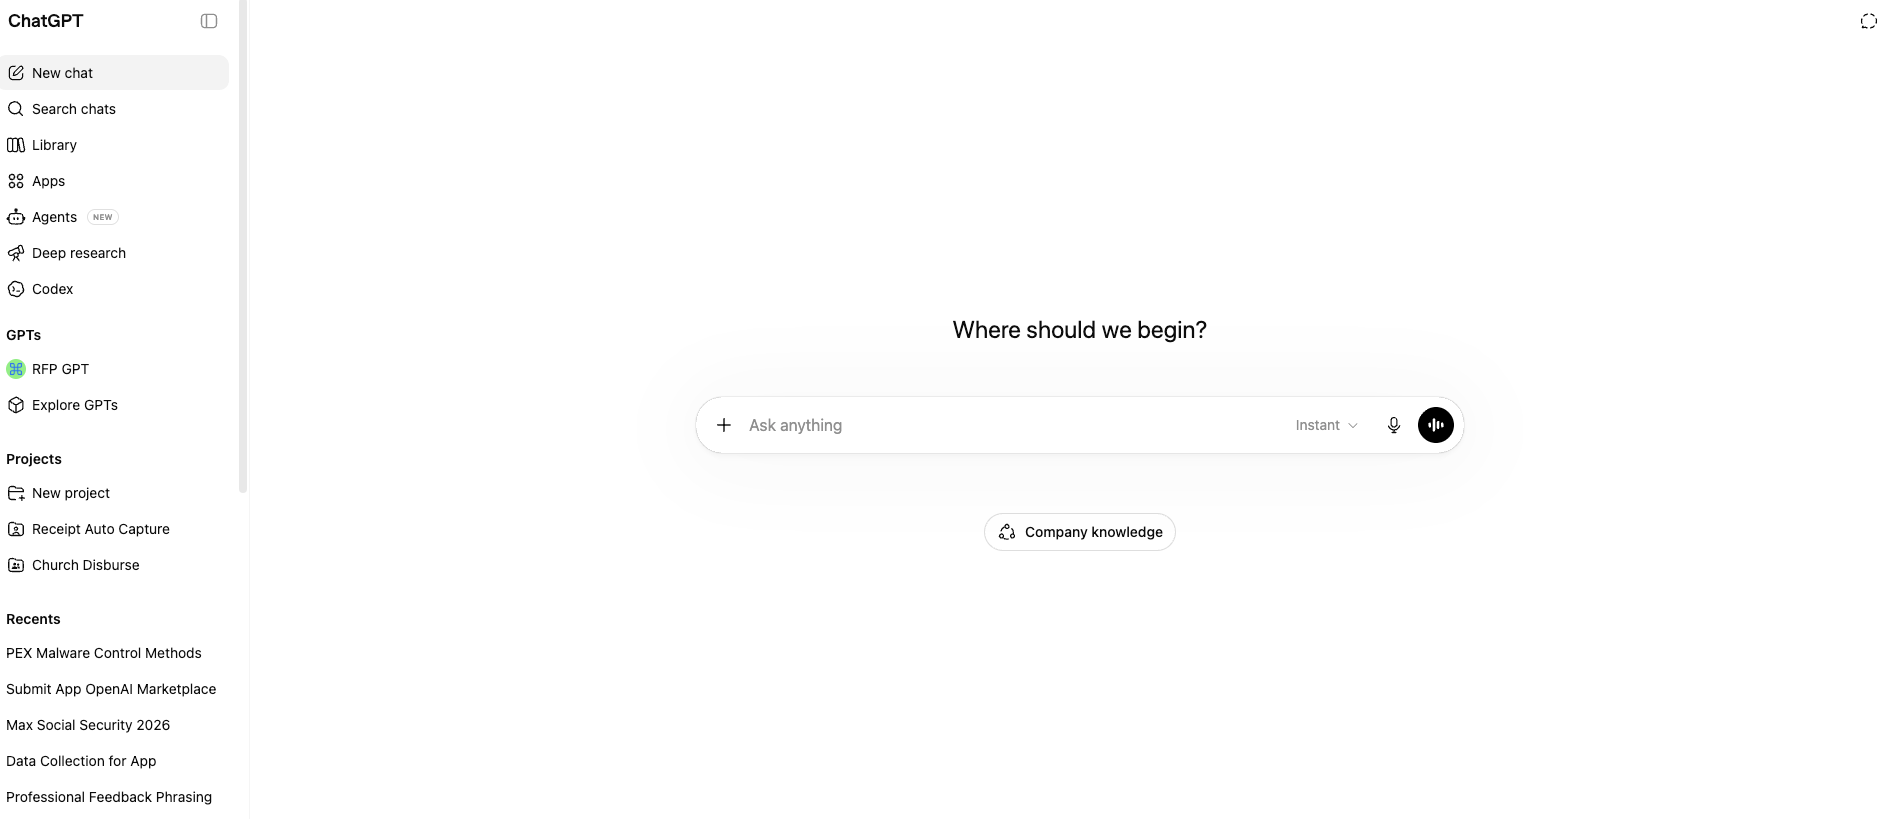
Sign in to [ChatGPT](https://chatgpt.com). In the left sidebar, click **Agents**.
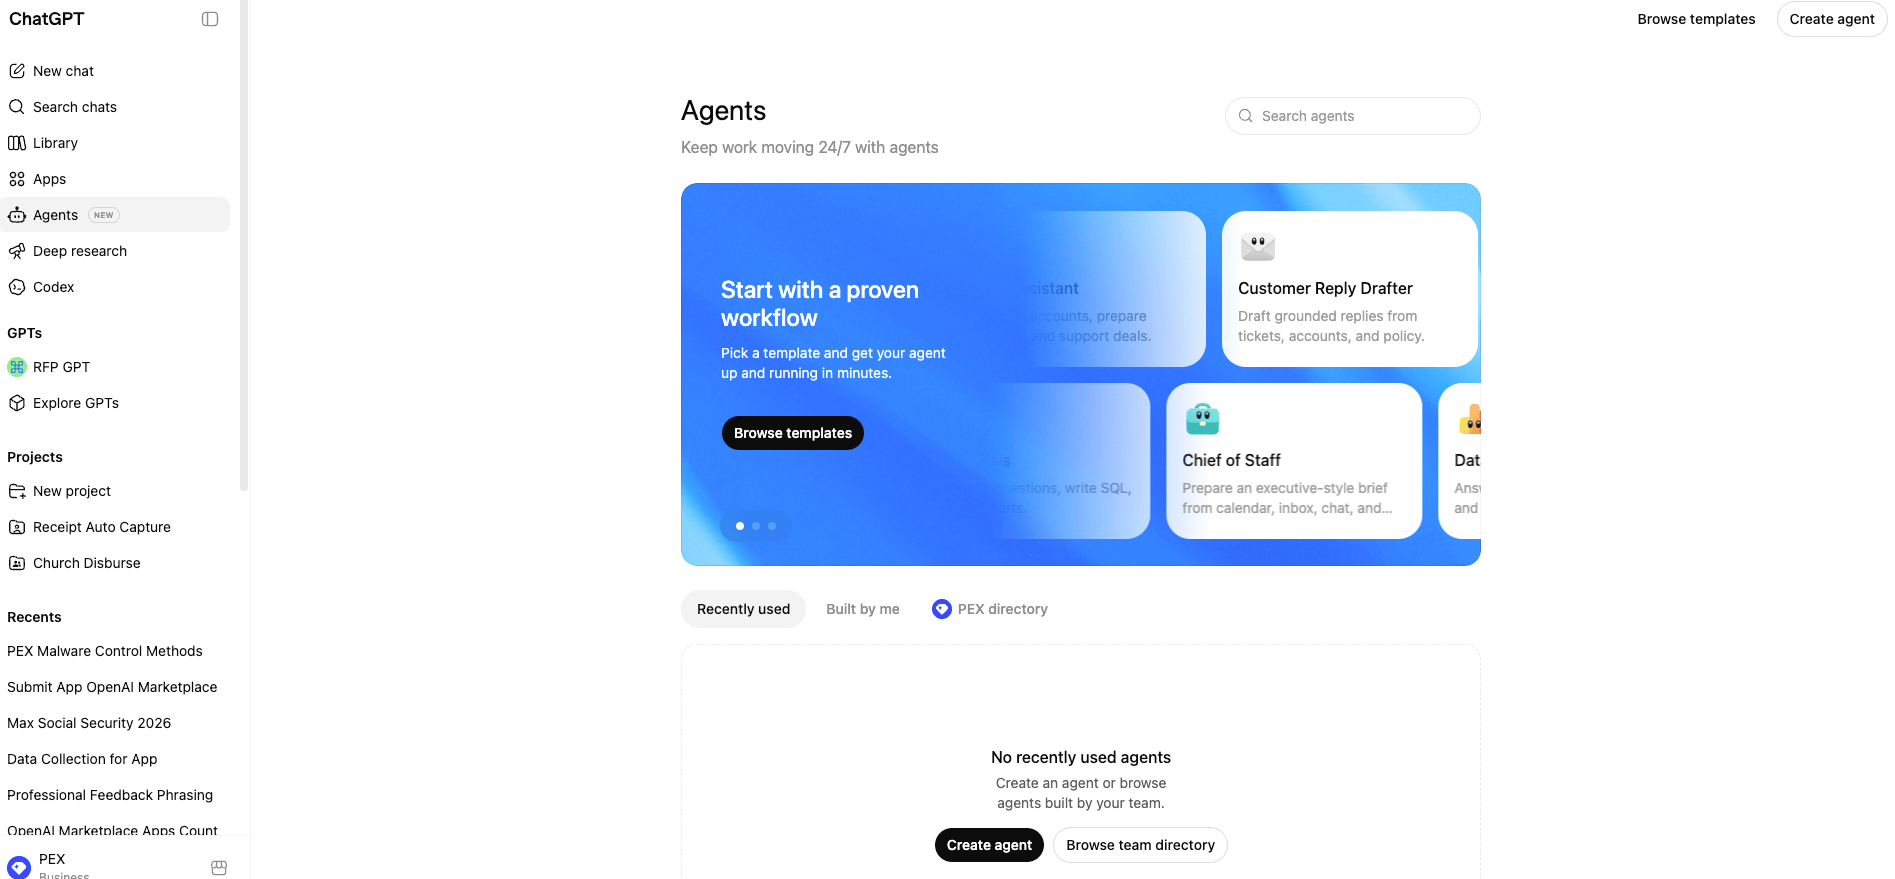
 On the **Agents** page, click **Create agent** in the top-right corner.
 ***
## Step 2. Create a new agent
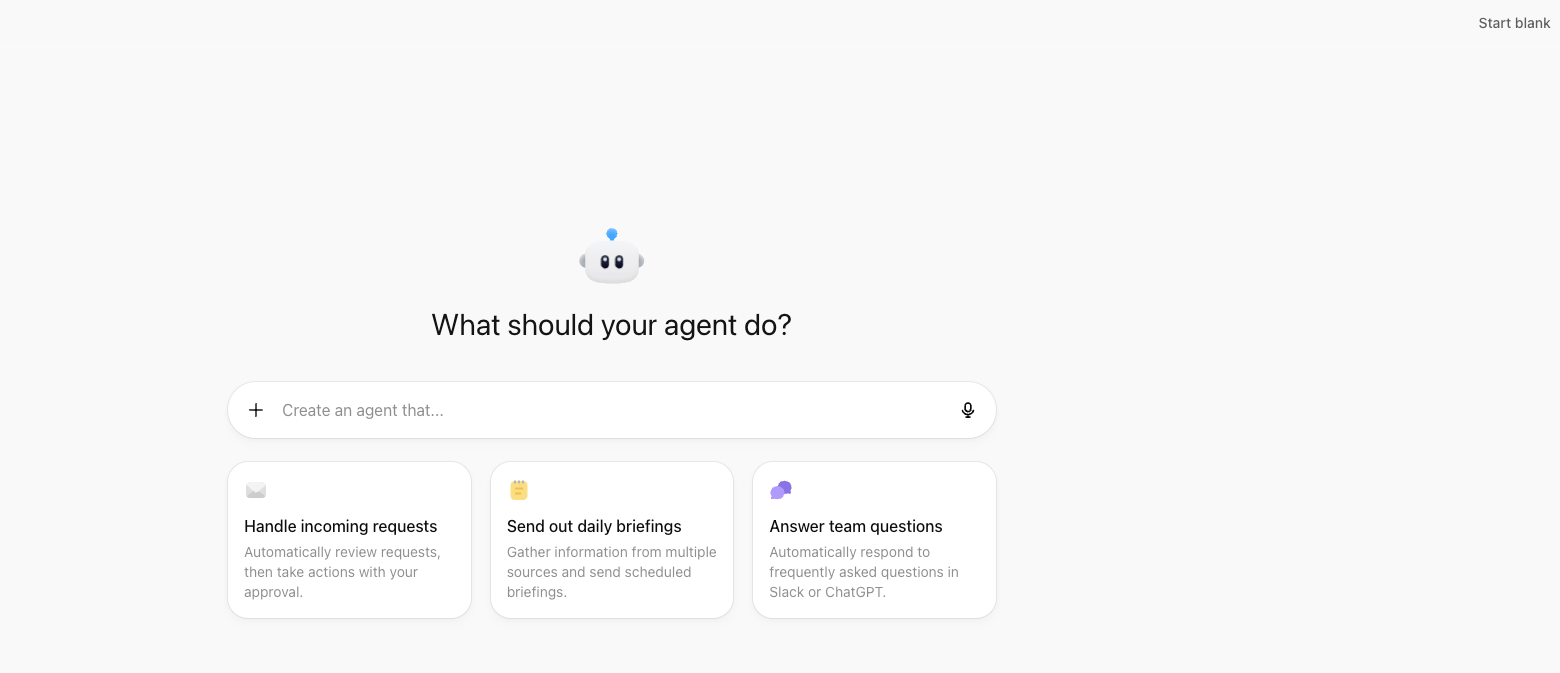
ChatGPT opens the **What should your agent do?** screen. Skip the guided setup: click **Start blank** in the **top-right corner of the screen**.
***
## Step 2. Create a new agent
ChatGPT opens the **What should your agent do?** screen. Skip the guided setup: click **Start blank** in the **top-right corner of the screen**.
 ***
## Step 3. Configure the agent
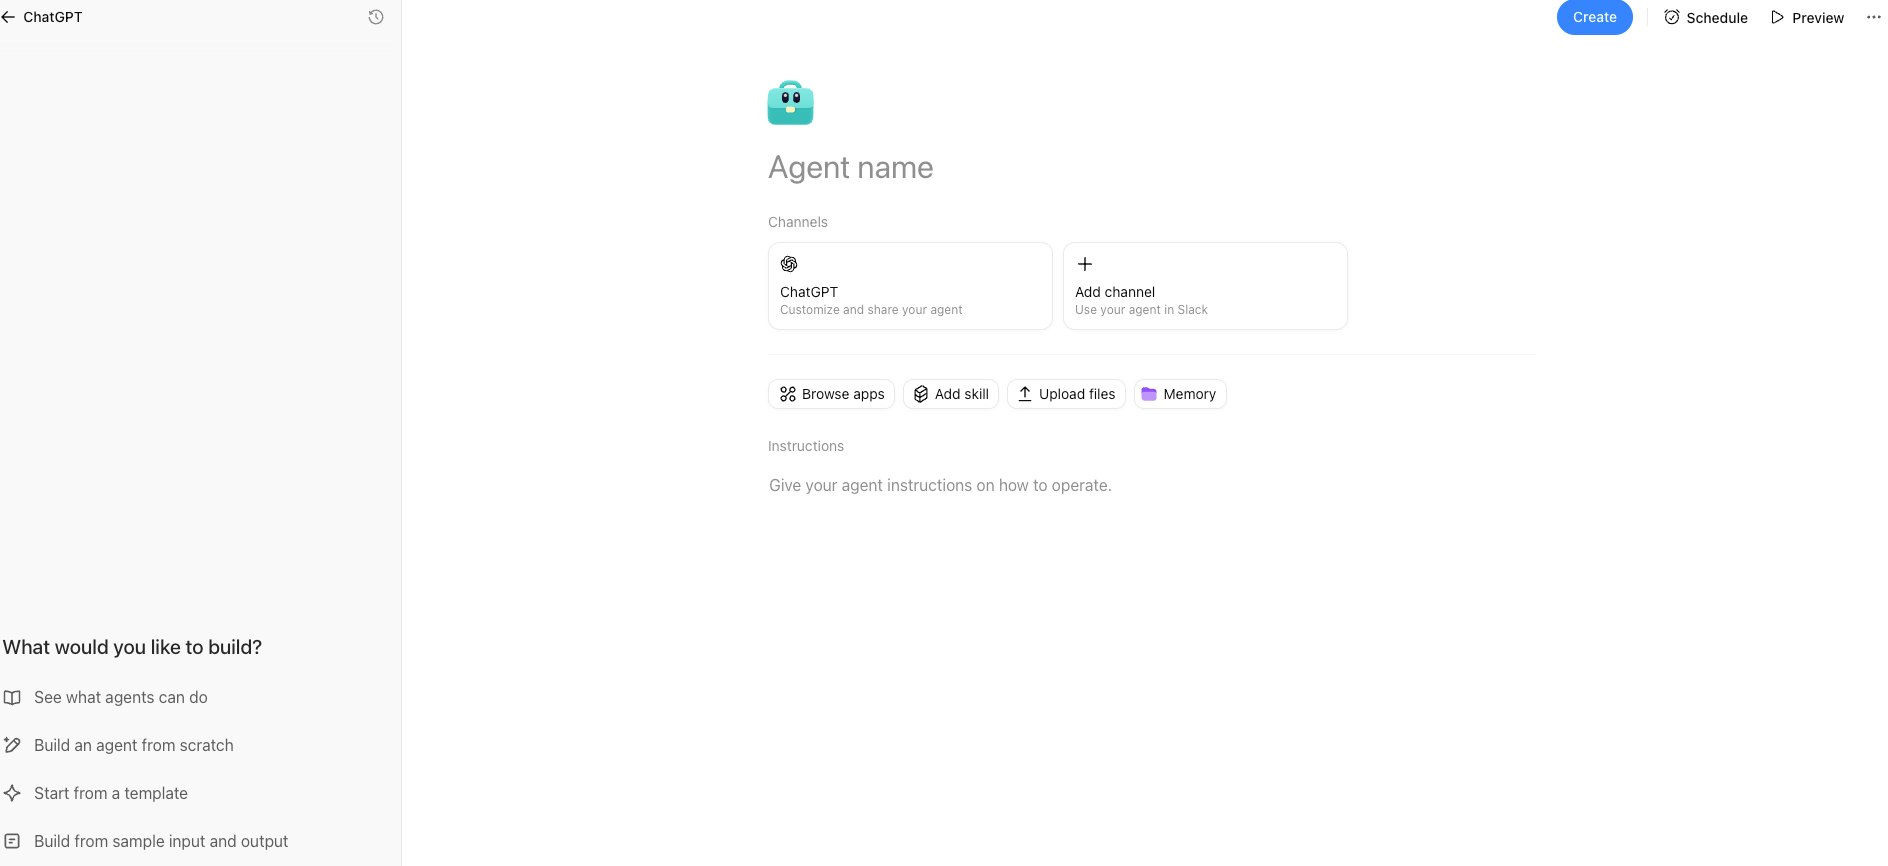
On the agent configuration page, set the following:
| Field | Suggested value |
| ---------------- | ------------------------------------------------------------------------------------------------------------------------------------------------------------------------------------------------------------------------------------------------------------------------------ |
| **Agent name** | A descriptive name, e.g. `PEX Account Assistant`. |
| **Instructions** | How the agent should behave, e.g. *"You are a PEX account assistant. Use the PEX MCP Server tools to answer questions about the user's PEX business account, cards, transactions, and spending rules. Always confirm which account you are looking at before returning data."* |
***
## Step 3. Configure the agent
On the agent configuration page, set the following:
| Field | Suggested value |
| ---------------- | ------------------------------------------------------------------------------------------------------------------------------------------------------------------------------------------------------------------------------------------------------------------------------ |
| **Agent name** | A descriptive name, e.g. `PEX Account Assistant`. |
| **Instructions** | How the agent should behave, e.g. *"You are a PEX account assistant. Use the PEX MCP Server tools to answer questions about the user's PEX business account, cards, transactions, and spending rules. Always confirm which account you are looking at before returning data."* |
 Leave the agent open. You will return to it in Step 5.
***
## Step 4. Generate an API token from the PEX dashboard
In a new browser tab, sign in to the PEX dashboard. Click your avatar in the top-right and choose your name to open your **user profile**.
Click the **Authorized apps** tab (marked **Beta**). **PEX MCP Server** appears in the list.
Click **MCP server config** next to **PEX MCP Server**.
Complete the MFA prompt. This is required every time you generate a token.
Click **Generate** and copy the token immediately. The dashboard shows it only once.
**Treat this token like a password.**
Anyone with the token can call PEX tools as you. If it is exposed, revoke it on this page and generate a new one.
***
## Step 5. Enable Developer mode and add the PEX MCP Server as a connector
Back in ChatGPT, enable **Developer mode**, then add the PEX MCP Server as a connector.
Click your profile picture in the top-right corner of ChatGPT, then click **Settings**.
In the Settings panel, click **Security and login**.
Scroll to **Developer mode** and turn the toggle on. Accept the confirmation prompt.
Leave the agent open. You will return to it in Step 5.
***
## Step 4. Generate an API token from the PEX dashboard
In a new browser tab, sign in to the PEX dashboard. Click your avatar in the top-right and choose your name to open your **user profile**.
Click the **Authorized apps** tab (marked **Beta**). **PEX MCP Server** appears in the list.
Click **MCP server config** next to **PEX MCP Server**.
Complete the MFA prompt. This is required every time you generate a token.
Click **Generate** and copy the token immediately. The dashboard shows it only once.
**Treat this token like a password.**
Anyone with the token can call PEX tools as you. If it is exposed, revoke it on this page and generate a new one.
***
## Step 5. Enable Developer mode and add the PEX MCP Server as a connector
Back in ChatGPT, enable **Developer mode**, then add the PEX MCP Server as a connector.
Click your profile picture in the top-right corner of ChatGPT, then click **Settings**.
In the Settings panel, click **Security and login**.
Scroll to **Developer mode** and turn the toggle on. Accept the confirmation prompt.
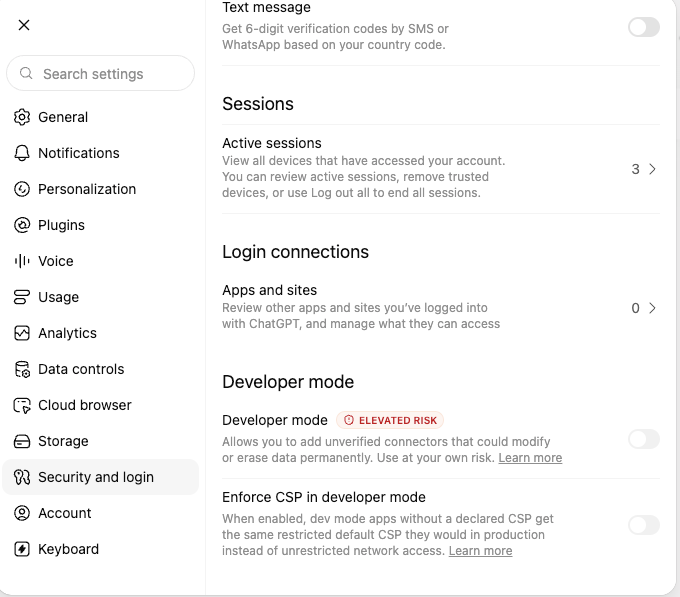 Developer mode is labeled **Elevated risk** because it allows unverified connectors. The PEX MCP Server is the only connector this guide adds.
Go to **Settings** → **Connectors** and click **Add custom connector**. Fill in the form:
| Field | Value |
| ------------------------- | ----------------------------------------- |
| **Server URL** | `https://marketplace.pexcard.com/mcp` |
| **Authentication** | **API key** (header-based) |
| **Header name** | `X-Pex-Api-Token` |
| **API key / Token value** | Paste the API token you copied in Step 4. |
Click **Save**. ChatGPT validates the connection. If the token is valid, the connector appears in your connectors list.
Saving a connector does not attach it to your agent. Return to the agent configuration page, click **Browse apps**, and select **PEX MCP Server**. Confirm it appears in the agent's apps.
**Common mistake.**
The header name is case-sensitive: `X-Pex-Api-Token`. A wrong header name fails silently when the agent calls a tool.
**Don't see Developer mode?**
Custom connectors require a paid ChatGPT plan. On Team and Enterprise plans, your workspace administrator may need to enable Developer mode for your account.
***
## Step 6. (Optional) Upload PEX knowledge files
The MCP server gives the agent live access to **your account data**. It does not teach the agent **how PEX works**. To fill that gap, upload reference material with **Upload files** on the agent configuration page.
Developer mode is labeled **Elevated risk** because it allows unverified connectors. The PEX MCP Server is the only connector this guide adds.
Go to **Settings** → **Connectors** and click **Add custom connector**. Fill in the form:
| Field | Value |
| ------------------------- | ----------------------------------------- |
| **Server URL** | `https://marketplace.pexcard.com/mcp` |
| **Authentication** | **API key** (header-based) |
| **Header name** | `X-Pex-Api-Token` |
| **API key / Token value** | Paste the API token you copied in Step 4. |
Click **Save**. ChatGPT validates the connection. If the token is valid, the connector appears in your connectors list.
Saving a connector does not attach it to your agent. Return to the agent configuration page, click **Browse apps**, and select **PEX MCP Server**. Confirm it appears in the agent's apps.
**Common mistake.**
The header name is case-sensitive: `X-Pex-Api-Token`. A wrong header name fails silently when the agent calls a tool.
**Don't see Developer mode?**
Custom connectors require a paid ChatGPT plan. On Team and Enterprise plans, your workspace administrator may need to enable Developer mode for your account.
***
## Step 6. (Optional) Upload PEX knowledge files
The MCP server gives the agent live access to **your account data**. It does not teach the agent **how PEX works**. To fill that gap, upload reference material with **Upload files** on the agent configuration page.
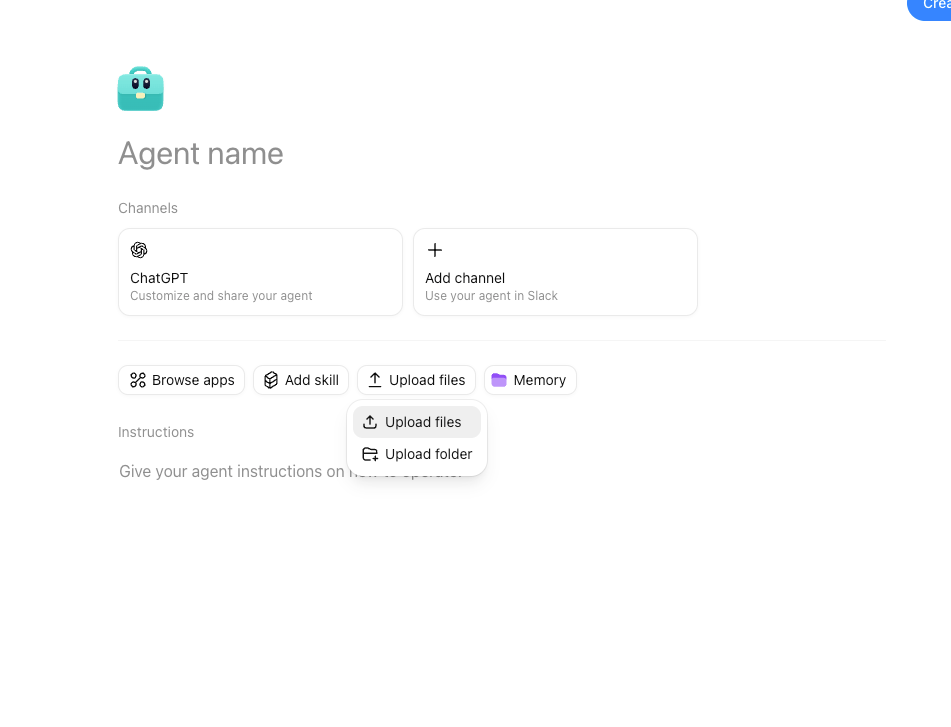 Useful files include:
* PEX product guides or internal policy documents.
* A summary of your organization's spending rules and approval workflows.
* Frequently asked questions specific to your team.
**Tip:**
The MCP server answers *"what is in my account right now."* Uploaded files answer *"how does PEX work."* Together, the agent can look up a declined transaction and explain the relevant policy in one answer.
***
## Step 7. Create and test the agent
Click **Create** in the top-right corner to save your agent. Then open a conversation with it and ask:
> *What tools do you have access to?*
The agent should list the PEX MCP Server tools, including:
* **Card tools** — list cards, card orders, card spend rules, scheduled funding, load limits.
* **Transaction tools** — cardholder transactions, network transactions, transaction details, attachments.
* **Business tools** — business profile, admins, billing, linked accounts, one-time transfers.
* **Spending rulesets** — list rulesets, ruleset cards.
* **Other** — vendors, bills, payments, invoices, callback subscriptions, MCC categories, groups & cardholders.
To confirm a live call works, ask:
> *What is my business profile?*
The agent calls `pex_get_business_profile` and returns your Business Account ID, name, address, and contact info.
You can now ask questions like *"list all my PEX cards"*, *"show transactions for card 1234 last week"*, or *"what spending rulesets do I have?"*
***
## Troubleshooting
**The agent says it cannot see the PEX tools.**
Check **Settings** → **Connectors** to confirm the PEX MCP Server connector is listed and enabled. Then open the agent configuration, click **Browse apps**, and confirm **PEX MCP Server** is selected.
**Tool calls return 401 / Unauthorized.**
The token is invalid, expired, or has stray whitespace. Regenerate it in **Authorized apps** and update the connector.
**Tool calls return data from the wrong account.**
Tokens are scoped to the user who generated them. Generate the token under the correct PEX user.
**The header name field rejects what I typed.**
The header name must be exactly `X-Pex-Api-Token`. Other casings do not work.
**I don't see the Authorized apps tab in the PEX dashboard.**
The feature is in **Beta**. Contact PEX support to confirm your account is enabled.
**I don't see Developer mode in ChatGPT.**
Custom connectors require a paid ChatGPT plan. On Team and Enterprise plans, your workspace administrator may need to allow Developer mode.
***
## FAQ
**Do I need special access to turn on Developer mode?**
On Team and Enterprise workspaces, yes. Your OpenAI workspace administrator must grant developer access. If the **Developer mode** toggle under **Settings** → **Security and login** is missing or disabled, ask your OpenAI admin to enable it before Step 5. Personal Plus and Pro accounts can turn on Developer mode directly.
**Does PEX support grant ChatGPT developer access?**
No. PEX support handles PEX-side issues such as API tokens. Developer access in ChatGPT is controlled by your OpenAI admin.
***
## Revoking access
To revoke an agent's access to PEX:
1. Open the **Authorized apps** tab in the PEX dashboard.
2. Revoke the token associated with **PEX MCP Server**.
3. (Optional) Remove the PEX connector from ChatGPT under **Settings** → **Connectors**.
Revoking the token immediately blocks all calls that use it.
***
## Need more help?
* For PEX-side issues (tokens, account access, MCP server availability), email `adminsupport@pexcard.com`.
* For ChatGPT issues (agents, connectors, Developer mode), see [OpenAI's help center](https://help.openai.com).
## Related topics
- [Connecting the PEX MCP Server to a Microsoft Copilot Studio agent](/developer-guide/connecting-pex-mcp-to-copilot-studio.md)
- [Connecting the PEX MCP Server to your AI assistant](/developer-guide/connecting-pex-mcp-to-claude-and-github-copilot.md)
- [MCP Integrations](/developer-guide/mcp-integrations.md)
- [PEX MCP Server](/administrator-guide/pex-mcp-server.md)
- [Using the PEX AI Agent (Ask PEX)](/administrator-guide/ai-agent.md)
Useful files include:
* PEX product guides or internal policy documents.
* A summary of your organization's spending rules and approval workflows.
* Frequently asked questions specific to your team.
**Tip:**
The MCP server answers *"what is in my account right now."* Uploaded files answer *"how does PEX work."* Together, the agent can look up a declined transaction and explain the relevant policy in one answer.
***
## Step 7. Create and test the agent
Click **Create** in the top-right corner to save your agent. Then open a conversation with it and ask:
> *What tools do you have access to?*
The agent should list the PEX MCP Server tools, including:
* **Card tools** — list cards, card orders, card spend rules, scheduled funding, load limits.
* **Transaction tools** — cardholder transactions, network transactions, transaction details, attachments.
* **Business tools** — business profile, admins, billing, linked accounts, one-time transfers.
* **Spending rulesets** — list rulesets, ruleset cards.
* **Other** — vendors, bills, payments, invoices, callback subscriptions, MCC categories, groups & cardholders.
To confirm a live call works, ask:
> *What is my business profile?*
The agent calls `pex_get_business_profile` and returns your Business Account ID, name, address, and contact info.
You can now ask questions like *"list all my PEX cards"*, *"show transactions for card 1234 last week"*, or *"what spending rulesets do I have?"*
***
## Troubleshooting
**The agent says it cannot see the PEX tools.**
Check **Settings** → **Connectors** to confirm the PEX MCP Server connector is listed and enabled. Then open the agent configuration, click **Browse apps**, and confirm **PEX MCP Server** is selected.
**Tool calls return 401 / Unauthorized.**
The token is invalid, expired, or has stray whitespace. Regenerate it in **Authorized apps** and update the connector.
**Tool calls return data from the wrong account.**
Tokens are scoped to the user who generated them. Generate the token under the correct PEX user.
**The header name field rejects what I typed.**
The header name must be exactly `X-Pex-Api-Token`. Other casings do not work.
**I don't see the Authorized apps tab in the PEX dashboard.**
The feature is in **Beta**. Contact PEX support to confirm your account is enabled.
**I don't see Developer mode in ChatGPT.**
Custom connectors require a paid ChatGPT plan. On Team and Enterprise plans, your workspace administrator may need to allow Developer mode.
***
## FAQ
**Do I need special access to turn on Developer mode?**
On Team and Enterprise workspaces, yes. Your OpenAI workspace administrator must grant developer access. If the **Developer mode** toggle under **Settings** → **Security and login** is missing or disabled, ask your OpenAI admin to enable it before Step 5. Personal Plus and Pro accounts can turn on Developer mode directly.
**Does PEX support grant ChatGPT developer access?**
No. PEX support handles PEX-side issues such as API tokens. Developer access in ChatGPT is controlled by your OpenAI admin.
***
## Revoking access
To revoke an agent's access to PEX:
1. Open the **Authorized apps** tab in the PEX dashboard.
2. Revoke the token associated with **PEX MCP Server**.
3. (Optional) Remove the PEX connector from ChatGPT under **Settings** → **Connectors**.
Revoking the token immediately blocks all calls that use it.
***
## Need more help?
* For PEX-side issues (tokens, account access, MCP server availability), email `adminsupport@pexcard.com`.
* For ChatGPT issues (agents, connectors, Developer mode), see [OpenAI's help center](https://help.openai.com).
## Related topics
- [Connecting the PEX MCP Server to a Microsoft Copilot Studio agent](/developer-guide/connecting-pex-mcp-to-copilot-studio.md)
- [Connecting the PEX MCP Server to your AI assistant](/developer-guide/connecting-pex-mcp-to-claude-and-github-copilot.md)
- [MCP Integrations](/developer-guide/mcp-integrations.md)
- [PEX MCP Server](/administrator-guide/pex-mcp-server.md)
- [Using the PEX AI Agent (Ask PEX)](/administrator-guide/ai-agent.md)